My Renovation Log

The friendliest place on the web for anyone with an RV or an interest in RVing!
If you have answers, please help by responding to the unanswered posts.
Another long rambling post.
I have been assessing windows for the last couple of days. I am trying to figure out which ones leak and why. I still don't have a great handle on it. I have some windows that I pulled the rubber glazing totally off. When I did, I was astounded at the literal composite pile that was the whole way around the track/groove of a window with a relatively good rubber glazing. It makes me wonder what the purpose is. It does not keep debris out. It does not seal the window. The urethane that glues the window to the frame does that (and the butyl that seals the frame to the RV). It does not hold the window glass in. Again, the urethane glass sealant does that as well. It would be easier to keep the tracks clan without the rubber.

I broke down and bought a 2 gal 135 lb PSI air compressor at Harbor Freight. I am blowing out weep holes and wondering if I should pull all the rubber off every window to clean them. I have a new replacement for all but the sliding pain portion of sliding windows. I can probably reuse some of it and will buy a little. I am having my son or wife spray a stream of water on the window from a pump-up sprayer. They work around the window while I evaluate from inside. Anyplace there is a small failure of the urethane glass sealant, I will use Permatex 81730 Flowable Silicone Windshield and Glass Sealer. It should fill existing breaches in the urethan pretty well since it has very low viscosity to flow into the cracks.
 
I'm following your story so keep us updated. My 1997 Class C has been kept outside for 7 years since I bought it. The rubber around all the windows is 24 years old and is shrinking. It has not leaked yet but It may not be long before I need the same repairs.

The front window in the overhead bunk is what worries me the most. You did a lot of work to get that sealed up. I'm considering just removing the glass and rubber then build a wooden framework to glue a flat piece of filon over the hole. Then cover the new filon with a big mural decal to hide the seams. Is it a one person job to remove that window?
 
TBar, What you are proposing sounds like more work than I did with the window. The only things that made it difficult were figuring out what to use, waiting on product delivery, and the fact that it was my first experience doing it. It is really pretty simple. Removing a framed window takes a second person for about 5 minutes. If you are going to remove the glass from the frame and leave the frame in place on the RV, I think you might be making a mistake. I think you save no work by doing that. It is much easier to remove the frame and then remove the glass while the frame is on a flat surface where you can use Goof Off Professional etc. Or use a heat gun. KEEP THE HEAT GUN AWAY FROM FLAMMABLES. You can even take it in the house to work on it. Resetting the frame is easy, and you KNOW it is sealed for 20 years.

Work-wise resetting the glass would be easier than the mural to me. I am likely to pull a bedroom window and have no hesitation now. However, it is a sliding window, so it might be a little learning curve IF I pull the glass.

If you were here, I would be glad to help. Also, if you need to talk by phone, let me know. I am certainly not an expert, but I agonized over every issue and now understand the process thanks to a lot of online help.
 
Thanks for the reply! Except for what you posted I have not seen a lot of info on resealing the front window on a Class C. I may go that route. Where did you source the gasketing around the front window? I know my gasket is likely different but I might be able to match it up with a diagram.

BTW, decals are actually very easy to apply with soapy water and a shower squeegee. Removing old decals is way harder than applying new ones.
 
Today I intend to at least start the process of replacing the 6 gal tank on my Atwood water heater and installing a Hott Rid, so I have an electric hot water option. One challenge will be connecting the Hott Rod to power since the only power under the sink is the propane on/off switch and the generator start switch. I assume these are DC. The cord is long enough to route up through the kitchen counter and built-in microwave (MW) cabinet to the dedicated microwave receptacle. The MW receptacle is accessible inside of the wall cabinet next to the MW. That would mean not using the Hott Rod and MW at the same time. I could access wires to my other receptacles there, so I could likely put in a junction box. If so, then I would have to install a switch for the Hott Rid. Maybe I should stay with a receptacle and pung and unplug the Hott Rod. I have no space on the 30 amp panel for more breakers.

I guess I could grab a receptacle wire in the rear master BR and try to snake to the kitchen through the chase for ductwork /wires.

Any suggestions?
 
Last edited:
I ran a dedicated circuit from a dedicated breaker in the AC box by adding a breaker to an empty slot then put a switch with LED in the basement next to the heater. Everything routed in the basement so it was an easy install.

I don't have a switch for the electric side inside the RV but after looking at the complexity to route the circuit I decided the switch in the basement was enough. I only turn the heater off when I leave the RV more than a day.
 
I ran a dedicated circuit from a dedicated breaker in the AC box by adding a breaker to an empty slot.
My AC box has no empty slots so I am forced to tie into an existing circuit. My choices are:
1. Dedicated Microwave circuit which would require a switch beside the microwave so they were not on at the same time.
2. The circuit with all non-GFI receptacles (I doubt I would ever overload this circuit).
3. GFI circuit (bath and kitchen) - blow drier etc would overload.
 
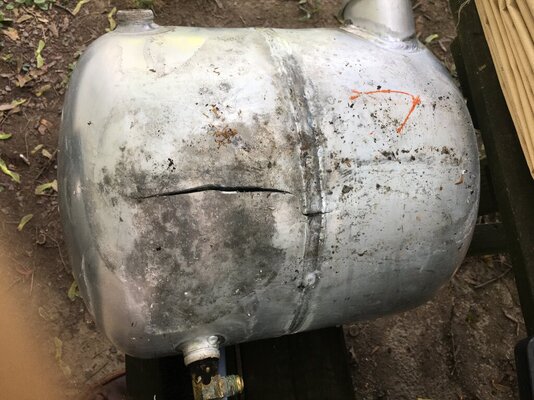
Want to see another example of a tank not fully drained? My BiL took the MH and had it “professionally winterized” every year. Last year he stored it with them. He could not find the leak after he got it back. - This is the very bottom of the tank.
 

Attachments

  • 808D4293-6D5F-46A8-9DB9-F36BAD9EC258.jpeg
    808D4293-6D5F-46A8-9DB9-F36BAD9EC258.jpeg
    174.8 KB · Views: 10
I never got started on this until noon today. It went pretty well, but I have not finished with the Hott Rod and still have to seal the hot water heater plate to the coach exterior. At 71, I definitely feel myself getting tired if I have no help. just running inside and back outside 30 times is a workout but I kind of enjoy the work.

There was NO room to spare in the opening. So I had to destroy the styrofoam to get the old one out, and it took some struggle to get the new one in the opening.

It was less complicated than I thought it would be, but it is almost a full day's work for an old guy alone. I had less trouble getting the lock rings over the heat chamber tubes than some. I beveled the tube ends with a large flat file first. To drive the rings on, I got a couple fitting for 3 1/2" PVC and split one side on a table saw. This allowed me to spread it to the right size. I then drove the rings on by pounding on the PVC coupling with a hammer.
 
Last edited:
Slow and steady wins the race. I work alone a lot too. It takes longer for sure and sometimes you have to be super creative when a second set of hands is needed.
 
You have good days and bad days. I was at least 80% done with the hot water tank replacement and the Hott Rod install Yesterday. I worked to exhaustion today and now I am about 75% done. I am about ready to start a bonfire Or drive it into the river.

Both rebuilding the overhang and this project went fine through all the technical aspects. When I get to the no skill stuff like laying a piece of plywood in the overhang or reseating my hot water heater, I hit a brick wall.
Something is preventing me from getting the top of the water heater the last 3/8” into the exterior opening. So how hard can that be to figure out what is restricting it? Evidently it is impossible. So how hard can it be just to take it all back out and inspect the opening and the unit and maybe rasp or sand the opening slightly bigger? That too is evidently impossible Without breaking the insulation to pieces like I did when I removed the old tank.

The thing that adds an extra layer of frustration is it looks like the kitchen cabinet was strategically designed to prevent even someone 5’8” 160lb from accessing more than the very back of the tank.

I think I just have to walk away from this for a couple of days.
 
I think I just have to walk away from this for a couple of days.
If possible, at least look at another project. Back in my house flipping days, I walked away often at days end, came back in the morning and like a light bulb clicked on.
 
I used to experience that regularly when I was a Manager over the computer services dept with the DOJ.

I appreciate the reminder.
 
Last edited:
In past weeks I:
Repaired the bedroom wall and window
Repaired a few window blinds
Put a new carburetor on the generator and got it running
Installed a new house battery

In the past week, I:
Installed a new propane alarm,
Dual (photo and ion) smoke detector.
installed a 12VDC socket to run a DC fan (etc).
Hooked up a battery monitor,
Finished putting LED lights throughout,
I will pick up a battery-operated CO detector until I can replace the wall mount detector.

I think things are finally totally ready for a test trip just as the snow starts flying.
 
Does it only have one house battery that you replaced?
Yes, to me that might be its single biggest design flaw. It only has room for one 100AH battery. Which I guess is typical for a class C. Changing from Incandescent to LED bulbs reduces consumption but it is still a limitation.
 
I'm a little behind on reading but ....

... I don’t offend so if it is your opinion I should drive this rig off a cliff feel free to express yourself. ...

Just my thoughts. Push, don't drive it off the cliff, better yet keep up the great work!

Hang in there, eventually you will get to enjoy all the work.

Just my opinion / thoughts. -- Butyl is the way to go, if someone uses house caulk they most likely don't understand MH / TT engineering. Butyl holds up to the vibration where caulk develops leaks.

Also they make plastic razor blade to trim butyl without scratching the finish.

I spend a little extra to get products made for MH / TT like Dicor 501 SL, good butyl tape, etc. I haven't regretted those choices yet.
 

Latest posts

Members online

Forum statistics

Threads
131,954
Posts
1,388,150
Members
137,708
Latest member
7mark7
Back
Top Bottom