Serious rot along edge of floor - where is it coming from?

The friendliest place on the web for anyone with an RV or an interest in RVing!
If you have answers, please help by responding to the unanswered posts.

CarissaT

Member
Joined
Sep 16, 2021
Posts
11
Location
Canada
Hi,
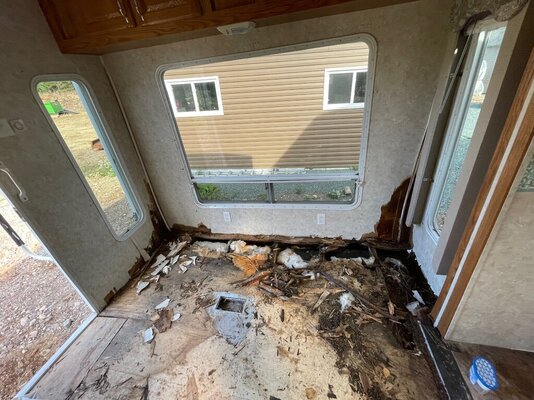
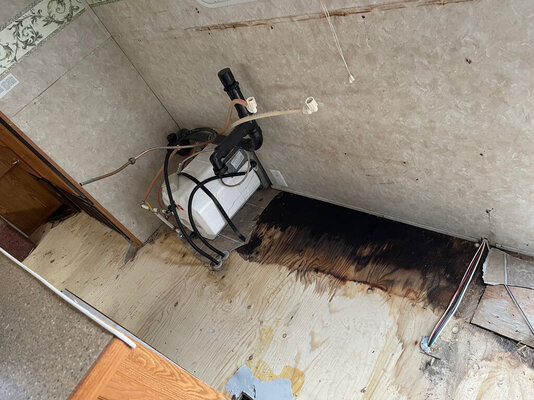
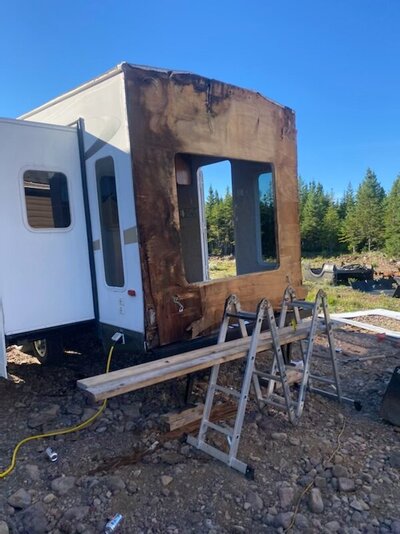
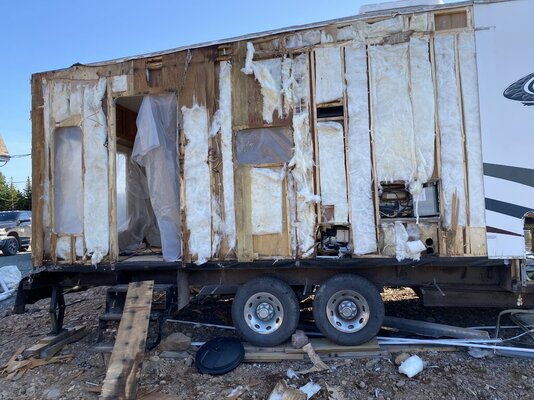
I just bought a camper (2005 Cherokee) that has some very severe rot along the edges of the back and side. The wood supports along the edge of the unit are completely gone, turned basically to powder, and the walls are sinking down from lack of support. Some of the walls are also rotted near the floor especially in the back corners where it looks like the water wicked up. Up above that area the walls don't seem affected. My main concern is, where did this water come from? The polyethylene seems to be completely intact on the bottom. The roof appears to be solid when walking on it. At first I thought maybe it was issues with the back window, but now I see it's all along the other wall too. Anyone with experience with this issue, who can tell me what to look for?
 

Attachments

  • IMG_2680.jpeg
    IMG_2680.jpeg
    203.7 KB · Views: 33
  • IMG_2694.jpeg
    IMG_2694.jpeg
    205.4 KB · Views: 33
K I would be more inclined to think it's roof to sidewall since it's so even right across all the edges, regardless of where windows are. So it would be coming in from the top and rolling down behind the interior wall, and then sitting down inside the polyethylene? Whats the best way to fix this type of leak?
 
No silver bullets - just drudge work. Uncover the seams (usually have some sort of trim strip over them) and discover what's there. Re-seal as needed. Looks like you may have a bad rear corner seam too.

If the wall studs are wood rather than metal (you say they powdered), you may have to strip the walls down and rebuild. If that is extensive, it may not be worth repairing unless you have lots of time to spare and deep pockets.
 
The wall studs are wood unfortunately. But it looks like the studs are only water damaged in a couple of spots near the back where there was a lot of wicking and probably a lot more standing water (I'm thinking most of the water rolled to the back), and only up maybe a foot at most, so that shouldn't be too difficult to cut out and replace. The biggest issue is the bottom wood support under the walls which is basically non-existent and then of course the flooring. Tools and labour for fixing it is not a problem, but I'm sure there is a good chance it would be cost prohibitive to fix if I had to pay someone. We have a full machine shop here so we may end up welding in steel instead of replacing that rim with wood again. For re-sealing, I'm wondering if marine silicone is a good choice? Should we treat the wood floor joists with something after we replace them? Also what would be a good material for repairing any holes or cuts we have to make in the polyethylene on the bottom? I know there is specialized tape for this but it's fairly expensive, just wondering if Gorilla waterproof tape would work?

 
Last edited:
Just another thought, did the water come from a leak inside the unit and the water just collected at that edge? Would be proven once you open the walls. Not that it changes the scope of work but would reveal if there's a repair needed to the roof or wall seams.

Mark B.
Albuquerque, NM
 
Two edges are rotten - the second picture is of the side where I took out the kitchen cabinets. The third edge is where the slide is and that's not rotten, but one whole corner of the OSB on the slide is so that will also have to be replaced. I haven't ventured into the upper bedroom area yet. Here's hoping.
 
I repaired a camper a few years ago where the floor was wet and rotted due to no butyl sealant at the wall to floor seam (from the factory). The trim at this joint covers the sealant (if applied) and unless you detach the trim and inspect, it's not visible. Water apparently seeped and creeped from the poor seal.Walls had no damage, but the wall bottom plate (wood) was deteriorated at the frame joint. Walls were anchored to frame by bolts thru the bottom plate of the wall and thru the metal frame. I was able to replace the bad wood using some lap joints and construction glue without resorting to unbolting the entire wall. New flooring plywood and stick on vinyl tiles made it complete. I don't think I spent more than $300 in materials, 3 sheets of plywood and some 2x4s, couple boxes of tiles, etc. Three days.
Good luck
 
Looks like you'll be busy on that wall. I'm just finishing up on my 5th wheel rear wall. Was almost as bad as your photo. Mine has a smaller window. 3 sheets of 1/4" (5 mil) 4 x8 ft. sanded plywood attached horizontally, screwed and glued to the repaired framing. New filon sheet needs to be glued on, cut the holes for the lights and window, reseal with new trim. My leak was definitely due to loss of seal at roof to corner trim. My AC condensate always runs to the rear wall and obviously was pooling and leaking inside the wall.
Plywood is stupid high, paid $25 a sheet for the same stuff I bought for less than $10 last year. I'm working outside on the repair, weather permitting, and the RV is tarped.

You got this..... Keep us updated on your progress.
Just wanted to say "Hi" from Cumming, Georgia! I just posted about leaking, hope to see you around and hope the OP gets her issue solved!
 
Yep, roof seals are gone all around. So this has now turned into taking all of the filon off, scraping off all of the plywood, rebuilding the bottom half of all the walls and the sill plate, replacing rotted flooring, and then putting it all back together. I’ll post pics as we go since this is pretty extensive, maybe it will help someone along the way!

We are going to attempt some novel ideas with this one. Going plywood-free on the outside, using rigid foam to come out as far as the studs for a flat surface for the filon, glue and screw filon to studs from the outside. Ice and water shield going over the whole roof and blueskin around the windows. Should be interesting lol
 

Attachments

  • 2C580B17-3557-4A94-A3EE-E4694D8F3BE1.jpeg
    2C580B17-3557-4A94-A3EE-E4694D8F3BE1.jpeg
    189.1 KB · Views: 7
So I'm trying to figure out the best adhesive to use for this project, gluing the filon directly to the polystyrene foam and wood studs. It looks like low expansion foam adhesive should work well. I'm just wondering if a lack of flexibility will be an issue? But it does seem to bond to everything like crazy that I've used with it including to my own fingers as anyone who has used it is well aware I'm sure. I don't know how expensive this will be or how much we will have to use. Another option I'm wondering about is marine silicone since that apparently retains a bit of flexibility. Like I mentioned we are planning to also use some screws on the outside to attach the filon to the studs, possibly screws for metal roofing to eliminate potential water incursion. Any thoughts?
 
Last edited:
I would put the plywood back on. it'll give the walls the structural strength they need.

These are built to the absolute cheapest, least material, lest structural limits they can be already. If the RV could be built with enough structural integrity without plywood you can bet your last paycheck that the manufacturers would do it that way. Trying to rebuild an RV with less materials will not make it better IMHO.
 
Not less materials, different materials. It was originally built with fiberglass insulation in the bays and filon/meranti board adhered to the studs by some silicone on the studs and screws just in the top and bottom. Now it will be built with rigid foam and screws throughout with foam adhesive sticking the filon on to the foam and studs which are stuck to the interior wall. Big upgrade as far as I’m concerned in sturdiness, being more water impervious and far better R value. It would cost them way more to build this way but if they had, the whole thing wouldn’t have rotted out.
 
I admire your devotion to this project. I would not know where to begin to fix something like that.

If this was mine, i would hav to “fix” it by junking it and buying a new one.
 
Well it’s too late to give up, I bought it and I need a functional camper ASAP. And if I have to put this much money and work into it, it darn well better be a lot better in the end than when it was originally built! It needs good winterizing anyway because someone will be living in it all winter. And we might want to use it in the winter next year too. So lets bite the bullet and make it the best camper around lol!

oh and I forgot to mention, the metal angled brackets that supported the sill plate on the outside wall and the steps are rusted to pieces. Wayyyyy too thin to start with and literally bending. So we have $700 worth of steel bought to rebuild all of that, then going to clean rust off the chassis and paint. And the supports for the walls will be steel tubing now, not wood. It will literally be better than new!

Anyone have any good tips for getting plywood off the filon (where it’s actually still attached haha)? Oscillating tool with scraper attachment? I have a feeling this is going to be Time Consuming.
 
Last edited:

Latest posts

Forum statistics

Threads
131,927
Posts
1,387,648
Members
137,675
Latest member
ozgal
Back
Top Bottom