Where to pick up chassis ground?

The friendliest place on the web for anyone with an RV or an interest in RVing!
If you have answers, please help by responding to the unanswered posts.

chaostactics

Well-known member
Joined
Jul 8, 2022
Posts
223
Location
Maryland
I'm getting ready to mount a solar system. Batteries are going inside immediately on the other side of the bulkhead of my passthrough between my passthrough and my under bed storage.

Part of the wiring for this is that I need to pick up chassis ground with a minimal amount of wire run.

What's anyone's best suggestion for tapping safely for a chassis ground?
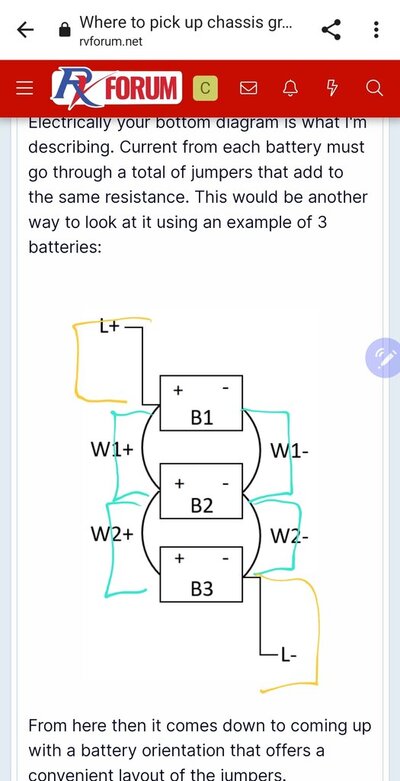
Screenshot_20220913-113703_Chrome.jpgScreenshot_20220913-122930_Gallery.jpg
 
Looks like the majority of your high current devices are on a negative bus bar, which is a good thing. So the chassis ground in this installation is for incidental loads like lights and other sundry devices. "Ideally" you tap into the frame closest to the higher-current grounded sources/loads but for a general purpose ground return, the closest point that offers a solid mechanical and electrical connection to a "substantial" frame member checks the box. If there's an existing/factory grounding point that looks suitable, then use that. If there are other high current devices (e.g. converter) that are grounded then using a single ground point for those is preferred over just grounding it to the chassis at some other point. Just depends on the sensitivity of the source/load to voltage drop that would happen running through the frame. Barring any specific electrical or configuration requirement I would bond to the frame at the closest point practical relative to your negative bus location.

Mark B.
Albuquerque, NM

Yes it would be a long cable run from my bus to the power distro center. Im just wondering if there's some place inside of the cargo bay to find chassis ground. The problem is I drill though the bottom of the cargo compartment to find chassis 1. It means my ground lug may be exposed to outside elements. there's gotta be a way to protect a lug that goes outside of an enclosed space right? 2. It's going to be a struggle and a half to figure out where the frame rails are in relation to the floor of the passthrough as the underbelly is highly insulated so I can't visualize the frame rails by getting under the RV and looking.

Powerful rare earth magnets maybe?
 
Last edited:
I have the same issue. My batteries and Inverter are located in a similar rear storage compartment. I was going to run the ground to the DC panel hook up but to a nearer ground point would be easier.

Solarman, what are the pros and cons to the two methods?

I am going to have a welder add reinforcement metal to the hitch. Maybe I could have him weld a bolt to the frame for a connection point to the under carriage.
 
. It means my ground lug may be exposed to outside elements. there's gotta be a way to protect a lug that goes outside of an enclosed space right?
There is no worries of having the chassis ground exposed to the elements, the only concern is the contact from the chassis to the cable lug.

Depending on where the converter is located, and it's DC return is tied to the frame, try to have your system bus bar as close to that as you can.

One thing I noticed is the way you connected to the paralleled batteries. Do not use the connection on the end of the parallel wires, connect somewhere in the middle. The way you have it, the farthest battery has to go through 3 cables worth of loss before it goes into your system. On the ground side of the batteries, you want equal length cables from each battery to the chassis ground point, do not daisy chain them. Ideally, the same would apply to the positive side cables.

I'm just being a perfectionist here.
 
Yes it would be a long cable run from my bus to the power distro center. Im just wondering if there's some place inside of the cargo bay to find chassis ground. The problem is I drill though the bottom of the cargo compartment to find chassis 1. It means my ground lug may be exposed to outside elements. there's gotta be a way to protect a lug that goes outside of an enclosed space right? 2. It's going to be a struggle and a half to figure out where the frame rails are in relation to the floor of the passthrough as the underbelly is highly insulated so I can't visualize the frame rails by getting under the RV and looking.

Powerful rare earth magnets maybe?
although it would be good practice to "ground" the system at the battery negative, it should not really be necessary. of the RV's ( read Travel trailers, not Motorhomes. ) i have modified for solar, not one of them has had any currents running through the chassis, due to the construction of the RV, there is generally no well defined chassis return path, much like a fiberglass boat....so all the DC loads are connected with twin conductors back to the load center. the feed to the load center to the battery is also a twin pair and therefore all currents flow through well defined paths. the only "ground" that I have seen is the AC input from shore power connected to the load center and then to chassis. be aware that an RV does not have a real ground like a residence does, there is no grounding spike driven into the ground..!!
now, cars and busses have a different scheme, mainy due to cost constraints imposed by bean counters. most cars are of a monocoque construction and do allow for reasonably well defined current paths. busses will use a combination of these two methods and therefore the chassis "ground" or negative bonding should ONLY be at one point in the system to avoid ground current loops.

i'll post more later, i have to run.../
 
The way you have it, the farthest battery has to go through 3 cables worth of loss before it goes into your system...the farthest battery has to go through 3 cables worth of loss before it goes into your system
But it's also the way any differences in jumper resistance won't cause one battery to source more current than another. No disagreement that having identical length cables from all the batteries to a common point is a valid method, but the daisy chain and taking power from the "corners" makes the installation (cabling, battery location/orientation) less critical.

Mark B.
Albuquerque, NM
 
@solarman to be fair this wiring diagram is specifically for a camper van so maybe it's how he's grounding the power distribution center for the entire system?

One would assume my system already has some sort of correct ground at the power center. Although I'll double check that there's no ground on the tongue when I pull the lead acid battery.

You are correct I am installing this I'm a TT not a motorhome or van.

Screenshot_20220913-163429_Chrome.jpg
 
Everywhere I look, when paralleling batteries it is recommended that the cables be the same length for both pos (+) and neg (-).

But it's also the way any differences in jumper resistance won't cause one battery to source more current than another
I don't understand this statement, the furthest battery will deliver less power due to power loss on the extra cableing. Defintely not balanced.

This is what I would recommend.

1629428742768.png
1629429001564.png

Also the OP has a trailer which invariably uses the chassis for signal returns from the various lights and accessories used.
 
I don't understand this statement, the furthest battery will deliver less power due to power loss on the extra cableing. Defintely not balanced.
Electrically your bottom diagram is what I'm describing. Current from each battery must go through a total of jumpers that add to the same resistance. This would be another way to look at it using an example of 3 batteries:


1663159285932.png

From here then it comes down to coming up with a battery orientation that offers a convenient layout of the jumpers.

Mark B.
Albuquerque, NM
 
Electrically your bottom diagram is what I'm describing. Current from each battery must go through a total of jumpers that add to the same resistance. This would be another way to look at it using an example of 3 batteries:


From here then it comes down to coming up with a battery orientation that offers a convenient layout of the jumpers.

Mark B.
Albuquerque, NM


Mark thank you so much for taking the time to draw this out. I am indeed running three batteries. If I'm understanding everything I'm reading correctly the jumpers that I have marked in Blue on your drawing should be the same length as short as possible and as large a gauge as practical. The ones marked in Orange don't necessarily need to be the same length where they run from the battery Bank to the bus bars. But ideally as short as possible and as large a gauge is practical?

Also do you have any input on grounding to the chassis or not? The wiring diagram I'm basing my insulation off of is technically for a camper van and not a trailer.

Presumably my factory power distribution center is already wired for ground somewhere. So it seems like I may not need to add a ground off of the negative of my battery Bank?
 

Attachments

  • Screenshot_20220914_100957.jpg
    Screenshot_20220914_100957.jpg
    77.2 KB · Views: 2
The RV 12V accessories (lights, fans, fridge, etc) are probably using the chassis as a return path to the 12V source. So as long as the battery bank negative side is connected to the chassis, then you are fine. On my trailer, the converter has 2 connections to the chassis. One is the 120VAC ground and the other is the -12VDC return. They are connected at the same spot on the trailer chassis.
 
The RV 12V accessories (lights, fans, fridge, etc) are probably using the chassis as a return path to the 12V source. So as long as the battery bank negative side is connected to the chassis, then you are fine. On my trailer, the converter has 2 connections to the chassis. One is the 120VAC ground and the other is the -12VDC return. They are connected at the same spot on the trailer chassis.

I should in theory be able to figure this out with a multimeter by checking resistance between the neg terminal of my current hitch battery (which is getting replaced by my Li batteries) and the chassis right?

Solarman had mentioned, if I'm understanding right, that if I attempt to add a chassis ground at the battery Bank but I already have one elsewhere in the system I could end up with a ground feedback loop?


I can't imagine that the factory power center doesn't have an AC and a DC ground already. But I'll check it anyway.
 
I don't see an edited drawing but in words, pairs [W1+ = W1-], [W2+ = W2-], and so on for all batteries. The pairs themselves do not need to match depending on the physical layout. The orange leads are delivering current to the load (a series circuit) and can be any needed/convenient length.

What gauge you want can be calculated based on the load and the corresponding voltage drop you're willing to accept. Some installations you want as little drop as possible for most efficient power delivery or for voltage sensitive loads. Some loads may tolerate a lot of drop and you may not care due to frequency of use or other reason. There's an economy of scale too, picking a given wire gauge and using it for everything, even things that it's not optimum for, with the idea the losses come out in the wash and you save money and assembly complexity by buying materials and tooling in bulk. I want to be the guy that sells yellow and white 14ga stranded wire to Winnebago, *everything* in my RV uses that. :) Some of this is really diving in the minutia and has diminishing return, so don't go too far down this rabbit hole. If you discover something that could be better later you can always redo it.

Your power center is grounded to the frame somewhere. On mine the power center ground is connected directly to the converter negative output, and it may or may not be frame grounded right there (mine is). It might just run to where the batteries are grounded and then grounded to the frame there, depending on your physical layout. Whichever physical location you poke into the frame at, I would want to make your power center and updated system ground point the same. For clarity you might want to add the stock converter and it's connections to your diagram.

Mark B.
Albuquerque, NM
 
Just make sure you connect the shunt to the chassis somewhere to pick up that current from the stuff that uses the chassis for the return path as shown in your post #8.
 
I have the same issue. My batteries and Inverter are located in a similar rear storage compartment. I was going to run the ground to the DC panel hook up but to a nearer ground point would be easier.

Solarman, what are the pros and cons to the two methods?

I am going to have a welder add reinforcement metal to the hitch. Maybe I could have him weld a bolt to the frame for a connection point to the under carriage.
I would look into issues of using chassis ground. the steel is not as good of a conductor as copper wire. For high current uses you want high count stranded wire because of the skin effect on current. Been a lot of years since college but high current can also lead to high losses in the circuit. Kevin
 
I didn't do the big solar install that you guys are doing (only 200 W) but I did improve my return path by adding a parallel cable from the battery chassis connection in the front to the converter chassis connection in the back. This helped a lot, and no, that does not create ground loops. I also added an additional parallel cable for the positive path. I measured about 45 Amps into my 2 GC2 batteries from my WF8955 so I was happy.

In a pre wired RV that uses the chassis for returns for it's 12V appliances, fridge, lights, fans and whatever, you must also use it in conjunction with any added cables.

Skin effect is an AC issue, it does not apply in this DC application.
 
Agree with above. That's why I'd run either my new ground to the existing frame point, or move the existing frame ground point to where the new equipment is. With all the high current I/O at one point the issue of voltage drop through steel and any ground loops are eliminated. From there, the only stuff using frame ground is going to be sundry loads like lights or maybe the water pump, stuff that will work fine using the chassis return. All the "serious" sources and loads are running through copper.

Mark B.
Albuquerque, NM

while a second ground would certainly work, one needs to question if that is actually needed. IF the load center is grounded and all current paths return to the negative terminal then that's fine.. non needed..one objection I would have to a second ground at the battery negative is when a shunt is in use, those stray chassis loads will not be measured now as the return currents are now out of the loop. that said, this is an RV.. there is no inspector to satisfy and conventional NEC codes don't apply.. so ground it where you see fit.. it might well be worth a simple experiment to monitor current with the shunt and toggle various loads to verify if there is indeed any chassis returns.
 
I didn't do the big solar install that you guys are doing (only 200 W) but I did improve my return path by adding a parallel cable from the battery chassis connection in the front to the converter chassis connection in the back. This helped a lot, and no, that does not create ground loops. I also added an additional parallel cable for the positive path. I measured about 45 Amps into my 2 GC2 batteries from my WF8955 so I was happy.

In a pre wired RV that uses the chassis for returns for it's 12V appliances, fridge, lights, fans and whatever, you must also use it in conjunction with any added cables.
I have yet to see one ( travel trailer ) that uses the chassis as a DC return path.. does yours really do that ? of the units i have worked on, the load center had a chassis ground for the AC side, the battery negative was only grounded at the battery terminal. still this is the RV world and anything goes.. LOL


Skin effect is an AC issue, it does not apply in this DC application.
 
Back
Top Bottom