Winterizing part 2

The friendliest place on the web for anyone with an RV or an interest in RVing!
If you have answers, please help by responding to the unanswered posts.

TonyL

Well-known member
Joined
Dec 10, 2017
Posts
1,444
Location
UK
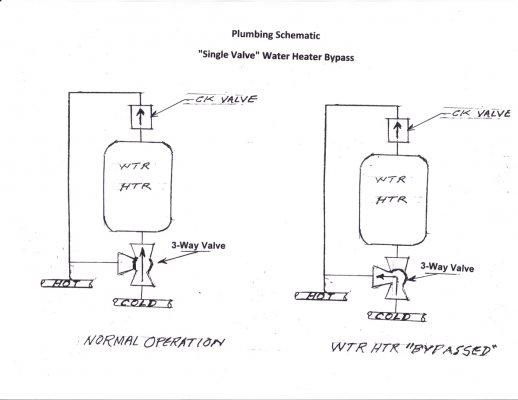
Before we actually winterize our fifth wheel, I thought I would do a dummy run just to see how it all works. Good job I did, our unit has a utility/command center for the water system located in one of the lockers. After draining the water heater, I put the valves to the winterize position and started the water pump.
Water was drawn from my water container (simulating antifreeze) but then it started to fill the water heater. The winterizing instructions said that antifreeze should not enter the water heater. Having looked on you tube where someone has done a brilliant video of exactly how this system works, my conclusion is that the check valve for the water heater is not working correctly and letting water back into the water heater. It seems that the valve is located on the hot water water outlet rather than the inlet, so I am assuming that a piece of limescale might be the issue. Anyone have any other suggestions?
Regards
TonyL
 
I had a Cougar 5th wheel that only had one valve for hot water heater bypass and no check valve. Took it back to the dealer when it was still under warranty and they confirmed that it didn?t have a check valve. The dealer recommended that I just fill the water heater with the pink stuff. I got around it by leaving the water heater full of water, turn the bypass valve to bypass and then winterized with the pink stuff. After I got pink stuff out of all the faucets, I would then drain the hot water heater.
 
I would install valves where you need them or replace check valves. I by pass the hot water tank and drain it by removing the anode. I run the pink stuff through every facet, the toilet and shower.

 
Access to the rear of the water heater requires either a midget or a contortionist, either of which, I ain't! Looking at the back of the water heater there is a check valve on the outlet, I just want to confirm if it is the problem before I try and replace it.
TonyL
 
Make sure your valve positions are correct and you're not missing one. No antifreeze should be going in your hot water tank.

All your hot water facets and shower come from the hot water tank, if you can't by pass your hot water tank you're going need a lot of antifreeze.

 
TonyL said:
Access to the rear of the water heater requires either a midget or a contortionist, either of which, I ain't! Looking at the back of the water heater there is a check valve on the outlet, I just want to confirm if it is the problem before I try and replace it.
TonyL

The one valve you have should be a directional valve and not a shut off valve. In one position, water flows into the bottom of the tank and the other position, water goes up the cross over pipe, stops at the check valve you?re suppose to have and then it finds it?s way to all the hot water faucets.
 
A single-valve heater bypass requires a check valve in the tank outlet to function properly, so your surmise is probably correct.  However, it could also be a faulty valve.  Or could it be that the valve simply isn't fully closed?
The bypass valve should be in the heater inlet tubing, closing the path to the heater and diverting water to the outlet tube.
 
Hi Gary, the set-up we have doesn't have any valves on the back of the heater, just those on the convenience center. If I was savvy enough I would post a link to the you tube video. If you search The convenience center open range, you will see the set-up we have
Thanks
TonyL
 
The valve you?re talking probably says something like ?bypass? in one position when you rotate it 90 degrees, it may say ?normal?. How is yours labeled?
 
Tony, I "googled up" an Open Range owner's manual and read the winterizing instructions: To winterize the plumbing system: 1. Turn off the pump. 2. Drain the water heater and the entire water system. 3. The open end of the hose is to insert into a gallon jar of anti-freeze liquid. 4. Position valves as shown. 5. Turn on the pump to supply RV system. You may use four to six gallons or more

I also viewed the Convenience Panel (slick, IMHO) and it sure appears to me that you have the single 3-way valve and, as Gary stated, you should also have a ck valve plumbed into the wtr heater outlet.  (It is often difficult to recognize the valve ?.. it just looks like part of the piping.)

I would "think" the RVIA stds would require a check valve be installed, but up in reply #1 of this thread you will note that Don C. stated that he had an RV that did not have a ck valve and the dealer verified that.  The workaround he describes was a great approach I believe, and I intend to use it in the future.

The ck valve on my coach leaked a little antifreeze  (just once, 2 years ago) and I believe I will take Don's approach; i.e., instead of draining the wtr heater "up front" I am going to leave the wtr htr tank full and make draining it the last step in the winterizing operation.  I don't believe there will be any mixing of the "pink stuff" with the fresh water that's in the (completely filled) heater.  I sure don't want to replace that ck valve until I have to remove the wtr heater for other reasons ??.. hopefully, years from now.

I sketched up a schematic of my "single valve" bypass system thinking it may help some of our newer members who are not that familiar with it.  Sometimes you have to click on the attachments to enlarge them for viewing.  It is very commonly used, but many RVs use separate valves (vice a 3-way) for the bypass function.

Just my $.02, of course.

Stay safe.
 

Attachments

  • WTR Htr Bypass.jpg
    WTR Htr Bypass.jpg
    211.9 KB · Views: 13
You have to be able to by pass the hot water tank. Fortunately, my hot water tank is under the dinette chair so it's easy access but my last unit was terrible
 
TonyL said:
. Anyone have any other suggestions?

In a conversation I had with a mobile repair tech who was helping me with a leak situation, we talked about winterizing and he said what he does is to remove the filter from the water pump and fill that with pink, then pump that into the various water lines. While that sounded like a good way to do it I have to wonder whether the relatively limited volume of the filter housing would the weak link in that scenario.

In our Bounder we have a 3 way valve that can be set to suck pink into the lines from the gallon container. But this year I bought a winterizing kit for our Viair air pump and will use that to blow out the lines. No mess, no bother-- hopefully!

Here's a YouTube video showing the process
https://tinyurl.com/y6xk66gz

 
I live in Ohio so I winterize often going from warm to cold climates. I installed a "T" valve at the water pump with a 2 foot tube. Making the process a five minute job makes going home a lot easier.
 
Hi Gary, the set-up we have doesn't have any valves on the back of the heater, just those on the convenience center.
Usually works the same way, regardless of the physical location of the valve.

I would "think" the RVIA stds would require a check valve be installed, but up in reply #1 of this thread you will note that Don C. stated that he had an RV that did not have a ck valve and the dealer verified that.  The workaround he describes was a great approach I believe, and I intend to use it in the future.
The outlet check valve is not an RVIA standards item - it is needed only when the heater bypass plumbing uses a single "3-way" diverter valve. If the bypass plumbing uses three separate valves, no outlet check valve is needed to make the bypass work.
 
Thanks for all your replies, I picked up a replacement check valve today, crawled into the locker and fitted it. Carried out the dummy run of dosing with antifreeze and it worked exactly as it should. Even better, no leaks!?
Regards
TonyL
 
Hi Rene, yes, just as the you tube video showed, the outlet from the water heater had a check valve fitted. It seems it is specifically there to enable bypass and winterizing, back flow from the hot water pipe work was getting through the check valve into the water heater. I could even blow back through the faulty valve. If anyone else has a similar set up, you will need a 1" spanner (wrench) to swap it.
 
Back
Top Bottom