Adding an LED Light strip to Your RV

The friendliest place on the web for anyone with an RV or an interest in RVing!
If you have answers, please help by responding to the unanswered posts.
Lou Schneider said:
Light strips are unregulated, which means they need 12 volts, not the 13.5-14 volts the RV converter supplies when you're plugged into power.

I'd use something like this to feed the strip.  It's called a dimmer, but it's actually a combination dimmer and regulator.  Inside is a full electronic regulator board that can take anywhere from 12-24 volts while putting out LED safe voltage.

The wifi controller does the same thing, so you don't need both.

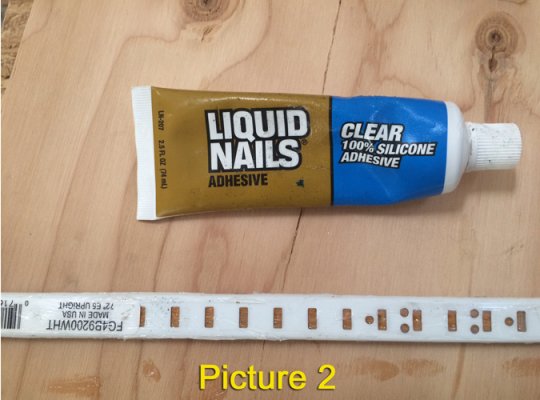
Lou, the light strips we are all using here already come with a 12 volt controller.
 
Rene T said:
I would go back to them and have them punch in the numbers or the name. They should find it.

If you can't find the Quake Hold! clips at HD, you can get them as an add-on item from Amazon --> http://www.amazon.com/Quakehold-4338--Maze-ing-Picture-Hook/dp/B000FJQQQS/ref=sr_1_1?ie=UTF8&qid=1426622137&sr=8-1&keywords=quake+hold+4338
 
Great Idea you have there.
We added these same lights on the side of our travel trailer, they held up well until our controller box broke off, and found the strip hanging, the sticky tape was useless, but the box and lights are ok, anyways we went to home depot and bout enough aluminum U channel  x 2 for 9.99 a piece, we are going to use the idea of attaching it to the channel similar to your idea using the silicone to stick it in the channel, but will attach the channel to the RV. We did add some in a channel inside the rv, a warm white with dimmer, they look lovely.
Thanks for giving us the idea of using silicone and metal channel. :)
 
mine are siliconed to an aluminum channel which is screwed to the wall under the awning, staying up great, no problems, but you have to make sure they are the waterproof ones and that the control box is protected. Also just took the interior lights down from under the cabinets and installed led light strip in a channel, and used small molding that covers the channel, pretty neat. Used grab it to attach the molding, stained the wood molding to match close to the color of the cabinets.
 

Attachments

  • IMG_5266.jpg
    IMG_5266.jpg
    102.3 KB · Views: 88
  • IMG_5253.jpg
    IMG_5253.jpg
    80.1 KB · Views: 91
  • P1040521.jpg
    P1040521.jpg
    82.2 KB · Views: 94
Lou Schneider said:
Light strips are unregulated, which means they need 12 volts, not the 13.5-14 volts the RV converter supplies when you're plugged into power.

I'd use something like this to feed the strip.  It's called a dimmer, but it's actually a combination dimmer and regulator.  Inside is a full electronic regulator board that can take anywhere from 12-24 volts while putting out LED safe voltage.

The wifi controller does the same thing, so you don't need both.

Thats good information. I guess I assumed that I would have 12v at the porch light. But a dimmer/regulator is a good idea.
 
BrandO said:
Thats good information. I guess I assumed that I would have 12v at the porch light. But a dimmer/regulator is a good idea.

The lights I bought on Amazon came with a 12 volt regulator that you can splice into any 12 volt wire on your coach. I erred on the the side of caution and also added an inline 5 amp fuse.
 
When drilling the hole to run the wires through, how do you know where to drill? With my luck, I would drill into wiring in my RV.
 
Steve,

I remember having the same concern. I knew where I wanted to come through the wall, which was an area behind some overhead cabinets, so I picked a spot that didn't have any obvious mounting holes for the cabinets, and which was offset from any light fixtures. Then I drilled a shallow hole through the inner wall with a small drill bit. I was very careful to not drill very deep. I used a tiny screwdriver to poke around in the hole and when I was reasonably sure that there were no metal stringers or wiring bundles where I drilled, I used a large drill bit and enlarged the hole. Once again, I did not drill deep. I just wanted to open the hole up enough so that I could see into it with a flashlight. Then I dug around with the screwdriver until I reached the outside wall. That told me there were no obstructions. Then I just drilled through the outer wall. It worked for me.

Kev
 
Here?s an update to our LED light-strip project?

I?ve always thought it would be nice to have the area under the right front slide illuminated, because when the light-strip under our awning is on, the slide blocks a lot of the light, making the area under the slide pretty dark.

I bought a white weatherproof LED light-strip and cut it down to 14 feet. I?ve never trusted the sticky-back tape on those light-strips, so I bought some six foot lengths of shelf-brackets and then riveted them together to make one 14 foot section. These shelf-brackets have a small channel in them that the light-strip fits nicely into. Before attaching the light-strip to the metal channel, I riveted several aluminum brackets to it, so I could screw the final assembly in place (Picture 3).

I attached the light-strip to the recessed channel with its sticky-back tape (Picture 1), and then covered the entire front and back of the light-strip with clear silicon glue (Picture 2). The glue holds the light-strip firmly in place and completely seals it from the elements. When it was dry, I mounted the assembly under the lip of the slide (Picture 3).

As you can see, the light-strip hangs upside down, so it?s very important to use more than just its own sticky-back tape to hold it in place ? trust me, the sticky-back tape alone won?t hold over time.

I tapped into 12 volts at the outside TV entertainment center and installed a two-channel 12 volt dry contact switch to turn the light-strip on and off remotely (Picture 4). I used the second channel to remotely control my porch and entry lights, which are on the same circuit. The switches themselves are completely sealed, they come with two remotes and have great range (I tested it to 100 feet, but it?ll go further).

Picture 5 is a view from under the slide, looking up at the illuminated light-strip. The remaining pictures show the difference in area lighting. It?s pretty nice ? especially being able to control it with a remote.

Kev


Attachments

  • Picture 1.jpg
    Picture 1.jpg
    202.5 KB · Views: 85
  • Picture 2.jpg
    Picture 2.jpg
    195.2 KB · Views: 79
  • Picture 3.jpg
    Picture 3.jpg
    213.9 KB · Views: 123
  • Picture 4.jpg
    Picture 4.jpg
    211.8 KB · Views: 101
  • Picture 5.jpg
    Picture 5.jpg
    171.7 KB · Views: 109
  • Picture 6.jpg
    Picture 6.jpg
    176.7 KB · Views: 87
  • Picture 7.jpg
    Picture 7.jpg
    173.2 KB · Views: 84
  • Picture 8.jpg
    Picture 8.jpg
    210.8 KB · Views: 78
  • Picture 9.jpg
    Picture 9.jpg
    209.6 KB · Views: 97
Nice install, looks great. That channel you used almost looks like a tile edge. I mounted ours on the awning roller which is good for us as it is always out when we are camping. I thought about doing the RGBW but the wiring is a little trickier when mounted as such. For ours I installed a pigtail plug on the porch light so after the awning is out I just plug an extension cable into it and the light strip. For those planning to do this mod keep in mind that RGB lights use a combination of red, green and blue light to make white, and as such makes for a very cool white light. If you want your white light to be warm you need to use RGBW which has RGB chips and warm white chips on the same roll. Lucky for me I own an LED lighting company so I have 100's of rolls on hand to play around with;) Another thing to keep in mind is anything with a remote control will draw a tiny bit of power even when off, with these RGB controllers it is less than a watt.
 
That's why I put it in Marty... just to get you to do yours! ;)

Good point about the power draw Wayne, it isn't much, but those "isn't much's" can add up if you're not careful - something to be aware of if you're boondockers like us. I've got a Trimetric battery monitor and a pretty large house battery-bank (840 AH), but before I install anything, I always check the Trimetric to determine its draw. In this case, both remote switches together draw less than .3 amps per hour.

Speaking of amps, I've noticed that the five meter RGB (multi-color) light-strips draw almost four amps at full brightness, no matter what color is being displayed. The five meter white (only) light-strips only draw about two amps. That's a significant difference if you leave them on all night.

I see what you mean about how the metal channel looks like a tile edge, but they're just those metal shelf brackets that have the notches in them so you can adjust the height of the shelves.

Kev
 
Has anyone sprung for the $150 light strip or most everybody using the ones that are around $20?

http://www.amazon.com/Boogey-Lights-KRV-VS-MC-BK-AWNING-S-Hi-Intensity-Awning/dp/B010RGKSR6/ref=sr_1_1?ie=UTF8&qid=1459176979&sr=8-1&keywords=boogie+lights

The differences seem to be maybe a few more "special effects" and perhaps more importantly a three year warranty.  They seem to claim they are engineered tougher but I'm skeptical.

They claim they are "All Boogey Lights products are designed, assembled and supported in the USA. 3 year warranty." but it also says the product originates in China.
 
I would love to install one of these strips under my awning, but I would like to run the 12v to the strip from the outdoor light which is about middle of the strip, can I solder in the power and ground somewhere mid strip?
 
Hi molsonice02... welcome to the RVForum. Yes, it is possible ro cut away the clear rubbery covering on a light strip to expose the foil material that carries the 12 volts, but you've got to be careful not to cut through it. Soldering small wires to the exposed foil takes a steady hand, a clean low wattage soldering iron with a small tip, and when I did it, I found it helpful to use a magnifying glass. Once the wires are connected, be careful not to pull too hard on them or twist them.

Kev
 

Latest posts

Members online

Forum statistics

Threads
132,009
Posts
1,389,082
Members
137,756
Latest member
anewvisionllc
Back
Top Bottom