rsalhus
Well-known member
- Joined
- Jul 20, 2006
- Posts
- 1,335
I finally got around to replacing the 21 ft A&E 8500 Awning fabric and right-side torsion spring assembly on our 2001 Rexhall Vision motorhome and took some pictures along the way. I already had the awning off of the motorhome (I had to cut the fabric down when we hit some heavy winds coming back from Arizona last March) so I had the roller tube, arms, and rafters down and ready to go. When removing the awning from the motorhome, I had to remove the leftover fabric from the awning rail and from the roller tube. (That was actually the hardest part of the whole operation.)
I ordered a few small parts from Mark's RV for the awning arms and rafters (slider and foot assemblies) which were also damaged some by the wind. The right-side torsion spring assembly, the plastic installation cap, and the awning fabric itself were ordered separately from a dealer on eBay.
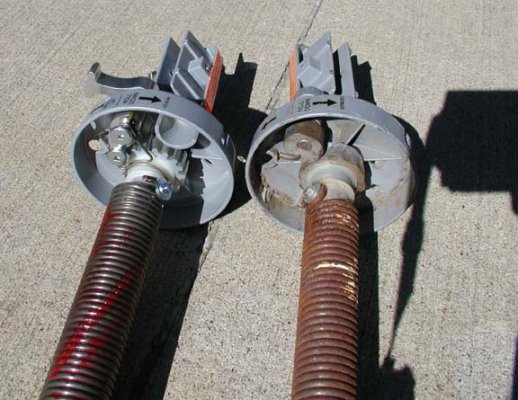
PIC 1 shows the new and old endcaps of the right-side torsion spring assembly (note how worn down the cams are on the old one which caused the roller tube to unwind in the heavy winds). Notice also how they have completely changed the design of the lever lock - the new ones don't have cams and look to be a much stronger design and shouldn't ever wear down like the old ones did.
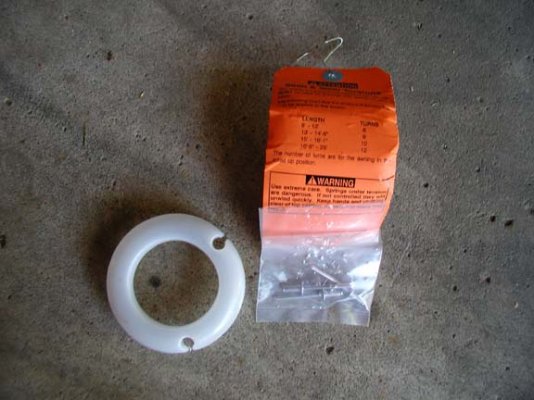
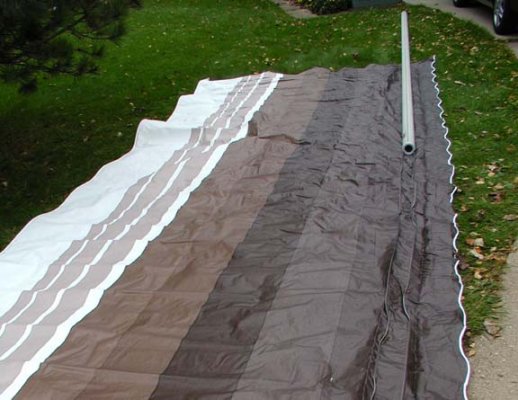
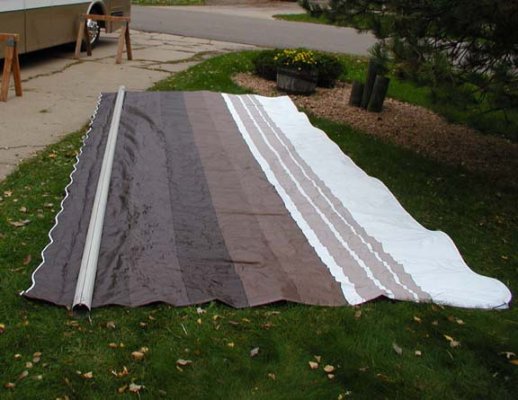
PIC 2 shows the plastic installation cap (on the left) which was placed over the roller tube to allow the fabric and the poly rope to slide into the roller tube grooves more easily without rubbing against the sharp edges of the steel roller tube and cutting the fabric. I strongly recommend using this, it really did its job. I actually managed to install the fabric onto the roller tube by myself. To do this, I laid the fabric on the ground flat with the valance poly rope and the fabric poly rope on top. At first I inserted the poly tapes into their respective grooves and pulled the fabric and valance on to the roller tube by pulling on them. After pulling the fabric a few inches it got harder to do. Then I simply pushed on the roller tube while standing on the fabric. PIC 3 shows the result of this. PIC 4 shows the roller tube from the opposite side with the valance and fabric poly tape completely inside of the grooves of the roller tube.
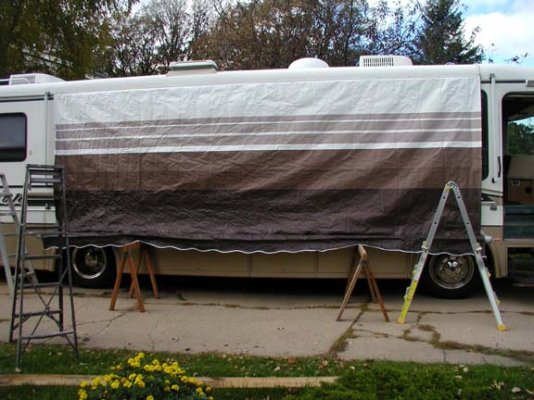
For the rest of the installation, I recruited a neighbor to help me. We riveted the endcaps (which are part of the torsion spring assemblies) onto the roller tube and lifted the roller tube onto the sawhorses which I had placed by the motorhome. Then we slid the other end of the fabric into the awning rail (from front to back) and pulled it across. This went much easier than I thought it would. I set up some scaffolding (two ladders and a long plank) and we marched the roller tube along as we pulled the fabric and poly tape into the awning rail. PIC 5 shows the fabric attached to the awning rail and the roller tube resting on the sawhorses. Note that the awning rafters are attached to the motorhome at the top on each side of the awning.
Next, we attached the awning arms at the bottom (quick connects) and inserted the sliding rafters into the arms (one at a time) so the arms would be ready to attach to the roller tube after winding the torsion springs. Starting with the front torsion spring, we wound the torsion spring the required number of turns (12) and let the lock lever hold the tension. We didn't have to insert a cotter pin to hold the tension but we did anyway in case we accidentally knocked the lock lever while attaching the awning arm to the roller tube. Only one small bolt is used to attach the awning arm to the roller tube on each side. Then we wound the torsion spring on the left-hand side and again held the tension with a cotter pin while we attached the left awning arm to the roller tube.
PIC 6 shows the awning when we were done. The awning strap had to be installed in the spare groove in the roller tube and slid from back to front. We had to take one turn out of the left-hand torsion spring as it was retracting faster than the right side, and I may have to take another turn out of that side later if it keeps doing that. Both torsion springs were wound the same number of turns but I'm thinking that the old torsion spring may have been a heavy-duty one while the new one is just a standard one. That would account for the difference in windings. I don't think they sell heavy-duty ones any longer for my size of awning. (I think that's what the dealer told me.)
Total time to install the new awning? About 3 hours, 2 hours with 2 people and one hour by myself. Is this something that the average do-it-yourselfer can do? Absolutely, but you will need some help. Only two of us did ours, but a third person would make it easier. This was much easier than the Blue Ox baseplate installation I wrote about recently, that's for sure! And don't worry about the danger of the torsion springs. If you work slowly and carefully, you won't have a problem. The cotter pins work great and are easy to insert to hold the tension and a vice grips can be used to do the windings. But then, I should let you know that the same neighbor and I just replaced the torsion springs in my double garage recently, so this might have seemed easier for us than it actually was.
Sorry this is so long, but I'm hoping it might help to encourage another newbie (like me) to attempt a project like this. 8)
I ordered a few small parts from Mark's RV for the awning arms and rafters (slider and foot assemblies) which were also damaged some by the wind. The right-side torsion spring assembly, the plastic installation cap, and the awning fabric itself were ordered separately from a dealer on eBay.
PIC 1 shows the new and old endcaps of the right-side torsion spring assembly (note how worn down the cams are on the old one which caused the roller tube to unwind in the heavy winds). Notice also how they have completely changed the design of the lever lock - the new ones don't have cams and look to be a much stronger design and shouldn't ever wear down like the old ones did.
PIC 2 shows the plastic installation cap (on the left) which was placed over the roller tube to allow the fabric and the poly rope to slide into the roller tube grooves more easily without rubbing against the sharp edges of the steel roller tube and cutting the fabric. I strongly recommend using this, it really did its job. I actually managed to install the fabric onto the roller tube by myself. To do this, I laid the fabric on the ground flat with the valance poly rope and the fabric poly rope on top. At first I inserted the poly tapes into their respective grooves and pulled the fabric and valance on to the roller tube by pulling on them. After pulling the fabric a few inches it got harder to do. Then I simply pushed on the roller tube while standing on the fabric. PIC 3 shows the result of this. PIC 4 shows the roller tube from the opposite side with the valance and fabric poly tape completely inside of the grooves of the roller tube.
For the rest of the installation, I recruited a neighbor to help me. We riveted the endcaps (which are part of the torsion spring assemblies) onto the roller tube and lifted the roller tube onto the sawhorses which I had placed by the motorhome. Then we slid the other end of the fabric into the awning rail (from front to back) and pulled it across. This went much easier than I thought it would. I set up some scaffolding (two ladders and a long plank) and we marched the roller tube along as we pulled the fabric and poly tape into the awning rail. PIC 5 shows the fabric attached to the awning rail and the roller tube resting on the sawhorses. Note that the awning rafters are attached to the motorhome at the top on each side of the awning.
Next, we attached the awning arms at the bottom (quick connects) and inserted the sliding rafters into the arms (one at a time) so the arms would be ready to attach to the roller tube after winding the torsion springs. Starting with the front torsion spring, we wound the torsion spring the required number of turns (12) and let the lock lever hold the tension. We didn't have to insert a cotter pin to hold the tension but we did anyway in case we accidentally knocked the lock lever while attaching the awning arm to the roller tube. Only one small bolt is used to attach the awning arm to the roller tube on each side. Then we wound the torsion spring on the left-hand side and again held the tension with a cotter pin while we attached the left awning arm to the roller tube.
PIC 6 shows the awning when we were done. The awning strap had to be installed in the spare groove in the roller tube and slid from back to front. We had to take one turn out of the left-hand torsion spring as it was retracting faster than the right side, and I may have to take another turn out of that side later if it keeps doing that. Both torsion springs were wound the same number of turns but I'm thinking that the old torsion spring may have been a heavy-duty one while the new one is just a standard one. That would account for the difference in windings. I don't think they sell heavy-duty ones any longer for my size of awning. (I think that's what the dealer told me.)
Total time to install the new awning? About 3 hours, 2 hours with 2 people and one hour by myself. Is this something that the average do-it-yourselfer can do? Absolutely, but you will need some help. Only two of us did ours, but a third person would make it easier. This was much easier than the Blue Ox baseplate installation I wrote about recently, that's for sure! And don't worry about the danger of the torsion springs. If you work slowly and carefully, you won't have a problem. The cotter pins work great and are easy to insert to hold the tension and a vice grips can be used to do the windings. But then, I should let you know that the same neighbor and I just replaced the torsion springs in my double garage recently, so this might have seemed easier for us than it actually was.
Sorry this is so long, but I'm hoping it might help to encourage another newbie (like me) to attempt a project like this. 8)