Ceiling repair-

The friendliest place on the web for anyone with an RV or an interest in RVing!
If you have answers, please help by responding to the unanswered posts.

detectivedrew

Well-known member
Joined
Apr 13, 2012
Posts
160
Location
Lancaster, PA
Hello all,

I think I got myself in over my head and need a life jacket. 

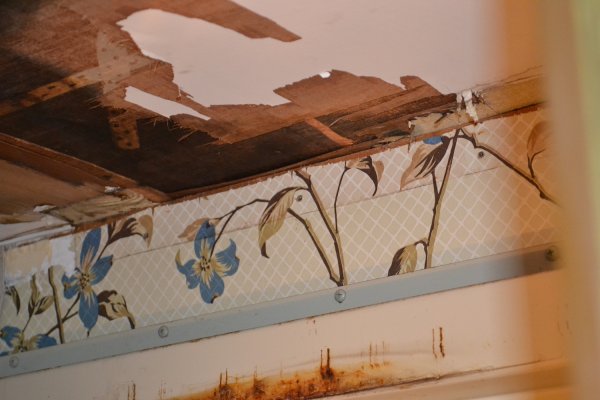
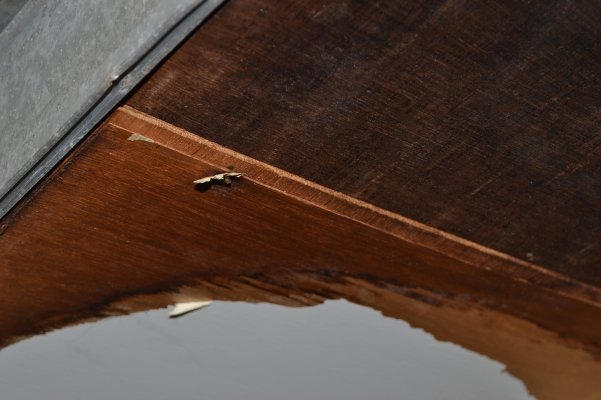
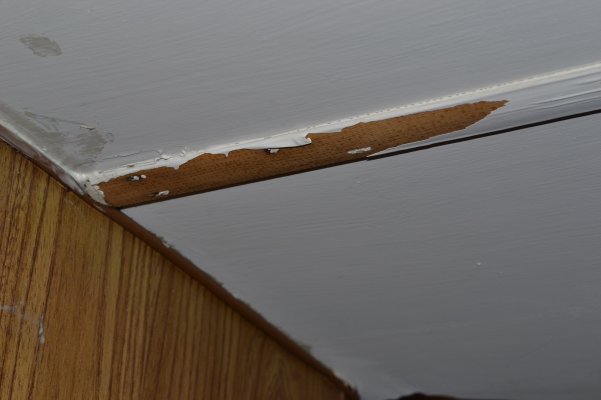
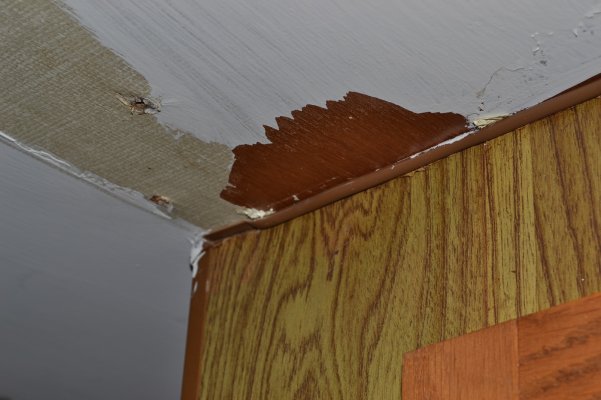
There is some prior leakage (since I have had the rig, the roof has been sealed properly) around the bathroom vent. I began to remove part of the wood that is rotted and found rotted wood throughout the bathroom and rear bedroom.  First question: The wood seems to be placed in layers. Not sure if this is Winnebago specific; that is why I posted in this forum.  There are about two to three layers of what appears to be 1/16" plywood. My measurement is a guess but it is thin enough and rotted enough to break and pull away with one hand. What is the thickness and specific name of this wood? .....which leads me to my next question. If you can imagine, some areas were stained others not. Now the ceiling is uneven- Some areas need to be filled to level out with other areas.  Do I spackle these areas or replace those areas with the same type of wood Winnebago uses? I have read other ideas like placing vinyl flooring on the ceiling, fiberglass etc... What will be the easiest, cleanest and most aesthetically pleasing way to redo the bathroom and bedroom? A prior owner used an oil based paint over the ceiling cover (quick cover job prior to selling?) and the ceiling cover is beginning to crack throughout the RV. Looks like I will need to re "kilz," the rig.

Thanks for any assistance.
 
Drew - that is probably 1/8" Luan plywood.  As far as the best way to repair your ceiling, I haven't a clue.  That would be something that I would have to look at and ponder for a few days.
 
What about just putting up new Luan plywood in the whole affected area? Cut it to size, cut out for vents and lights, then glue and screw as necessary.

I know that when I had a really ugly ceiling in a stick house, I would simply put up a new 1/4" drywall lid, tape and paint and it's brand new.

You could paint or glue a material covering over it. IMHO spakle and paint is going to look pretty rough. By removing the vents and lights and cutting the Luan to fit, the vents and lights would help in securing the new wood.
 
Hi Sarge,

That is what I was thinking. Here is the mess.....Should I glue the luan or nail it?
 

Attachments

  • 005.JPG
    005.JPG
    418.1 KB · Views: 89
Got it now, I did not notice the more attachments box.
 

Attachments

  • 010.JPG
    010.JPG
    360.2 KB · Views: 37
  • 014.JPG
    014.JPG
    381.5 KB · Views: 47
  • 017.JPG
    017.JPG
    284.9 KB · Views: 36
  • 018.JPG
    018.JPG
    390.3 KB · Views: 43
I would do both. Glue the heck out of it, and screw as well. You could even add a strip of moulding across the center, stained or painted to match the decor, then screw through it and i to the roof.

Thats what Winne does in the new rigs to cover seams in the roof panels.
 
I am pretty handy but this is first for me. Few questions...

1) What type of nail for the luan?
2) Best type of glue for the ceiling?
3) This luan does not cut cleanly; what kind of saw and blade should I use for a clean cut?

Thanks!
 
No nails, screws. Coarse thread, about 3/4 inch long. I would use something like Liquid Nails, designed for paneling. And for a saw blade, use a fine tooth blade on a circular saw or table saw. And cut on the back side of the board so the front side will get the smoothest cut.
 
Just did the "cab" section ceiling this month. Used white FRP with liquid nails but it didn't hold as expected. Second try I used plastic push-pins and everything seems to hold well on first trip. Corner molding helps secure the edges.

 
catblaster said:
Just did the "cab" section ceiling this month. Used white FRP with liquid nails but it didn't hold as expected. Second try I used plastic push-pins and everything seems to hold well on first trip. Corner molding helps secure the edges.

Hi Will,

I saw FRP at Lowes and it is thick and unsightly. I may not have been shown the right product. I am thinking FRP in the bathroom area (cut to fit) and luan in the bedroom area. What type and size of corner molding did you use and do you think I can use molding with the luan?

What is the thickness of the FRP. Can I get it smooth not textured? What did you use to cut it, a utility knife? Sounds easier than the luan plywood process I am getting into over the bed-

drew
 
detectivedrew said:
1) What type of nail for the luan?

Like Marty says, screws and not nails.  Of course the trick is how do you hide the screw heads.  If you go the screw route, use stainless

2) Best type of glue for the ceiling?

No glue, WEST System epoxy

3) This luan does not cut cleanly; what kind of saw and blade should I use for a clean cut?

It will cut very cleanly with a very high tooth count carbide blade

If you have a marine upholstery shop anywhere close, talk to them about your possibilities - yours is a very common situation on older boats
 
The FRP you saw at Lowes is probably the same thing, about 3/32 thick and it cuts with razor knife or sheet metal snips. I have see it plain but it's been several years since and I haven't really looked for it, the dimpled surface seems to mix well the the ceiling "carpet".

The molding was what came with the winnebago, maple corner bead. Pulled the molding off and reused it.
 
I now believe the prior owner did a quick paint job on the ceiling and to the novice buyer (like myself at the time) it looked nice.  The ceiling cover (it looks like wallpaper) is cracking all over. Will the covering come off with a heat gun? It looks as if it is pasted to the Luan.  I may go ahead and hire some help. I picked at most of the entire ceiling and the rig went from looking half way decent to horrible. I am stressed at the situation and mad at myself for picking-

Any assistance would be great.
 
I don't think you need to be that careful.  I would just hit it with a putty knife to scrape off the loose stuff, then apply the new layer as we earlier discussed.  If it looks bad all over, just replace the whole cover with a new one.  It will be much easier in the long run. 
 
Back
Top Bottom