Drilling into walls......

The friendliest place on the web for anyone with an RV or an interest in RVing!
If you have answers, please help by responding to the unanswered posts.

Juliemom28

New member
Joined
Jan 11, 2020
Posts
4
Hello!  We are getting ready to renovate our 2008 Tiffin Allegro motorhome.  I have been scouring renovated RV? s for weeks now, pulling together ideas.  We?ve had our RV for 5 years now.  We are taking a month long trip out west with our kids in June and I?m super excited to get the RV into ?shape.?  Some of the renovations we are making are custom captain?s chair covers, new furniture, new flooring, new paint/hardware, etc.  I have seen very little about how to screw into walls/flooring. I know just enough to be scared. We aren?t making major reno?s like custom furniture or anything, so I?m mainly concerned with bolting our new couch down and putting quarter round trim around the new flooring. I would like to hang a few shelves on the walls also, but I?m not sure that?s possible. Any advice??  Thanks!
 
RV walls are too thin to use bolts or screws so I use Velcro. I buy large rolls of the 2 inch black and use it to attach all kinds of things to walls and desks in my RV.
 
What Seilerbird says, at least for walls and ceilings.  If you need to use screws and can't find one of the almost random studs, use screw (drywall) anchors in the thin material.  Floor have a thicker substrate and you can screw or staple without fear.

There is typically very little wiring or plumbing hidden inside walls or ceiling. To simplify production, RV manufacturers mostly use a pre-made wiring harness for  and it gets run in a channel, often behind cabinets or along heating ducts.  Obviously wiring and plumbing has to come up here and there to reach switches or faucets, but that's the exception. If there isn't a wall switch or outlet near the drill point, chances of hitting anything are slim.
 
Gary RV_Wizard said:
What Seilerbird says, at least for walls and ceilings.  If you need to use screws and can't find one of the almost random studs, use screw (drywall) anchors in the thin material.  Floor have a thicker substrate and you can screw or staple without fear.

There is typically very little wiring or plumbing hidden inside walls or ceiling. To simplify production, RV manufacturers mostly use a pre-made wiring harness for  and it gets run in a channel, often behind cabinets or along heating ducts.  Obviously wiring and plumbing has to come up here and there to reach switches or faucets, but that's the exception. If there isn't a wall switch or outlet near the drill point, chances of hitting anything are slim.

Mine has some 12v wiring through the walls and ceiling from factory. If you are worried about it, use a cable tracer and use a drill stop to prevent going in too far.
 
The heavy duty 3M double-sided tape works quite well for hanging things on the walls as long as they?re not too heavy, and it also comes off without damage
 
Dvan said:
The heavy duty 3M double-sided tape works quite well for hanging things on the walls as long as they?re not too heavy, and it also comes off without damage


I use the 3M command strips a lot, however I got a lesson in just how fragile RV walls can be - I hung an electronic picture frame using two of the largest command strips, rated if I recall at over 30 pounds each - the frame weighs perhaps 3 pounds. Anytime I moved I removed the frame itself leaving just the bracket. After about 3 months, one evening the frame fell off the wall. Turns out the weight had very slowly delaminated the "wallpaper" from the wallboard creating a large bubble and causing the command strips to lose their adhesion. I was able to conclusively locate two studs fortuitously located left and right of the frame, attach a board spanning the studs, then attach the frame to the board.

Short of through bolting, I would be very hesitant to attach a shelf that would carry any weight whatsoever
 
Oldgator73 said:
I used rivets to hang shelves in mine. Worked well. The shelves are still on the walls.

Something like this

https://www.amazon.com/Tri-Fold-Exploding-Aluminum-Shaveable-0-050-0-500/dp/B07K18GZJF?th=1

 
Conesus1 said:
Something like this

https://www.amazon.com/Tri-Fold-Exploding-Aluminum-Shaveable-0-050-0-500/dp/B07K18GZJF?th=1
You can also use the bolt type so they are removeable.
https://www.homedepot.com/p/5-Pieces-6-32-x-1-in-Zinc-Plated-Hollow-Wall-Anchor-with-Truss-Head-Combo-Drive-Screw-803782/204273421

Keep in mind that these will only hold as much as the wall panel can handle, which isn't much. Wall panels are only 1/8" thick and are typically only held on with brad nails or staples. If you can grasp behind it, you can rip off a panel by hand without tools. That's exactly how I tore mine off when I was remodeling.
 
Screwing into a floor is usually not too difficult---most of those floor panels are pretty thick, pretty good quality plywood.  I suggest you use a threaded fastener with a grip length only long enough to go through the floor material itself, or in other words, I would not put a 3 inch screw through a 3/4 inch thick floor and leave 2+ inches sticking out the bottom. You could do a LOT of damage to wire bundles, plumbing, tanks, etc that are installed under the floor.

If you want to put up some new cabinets, maybe you can attach them on the sides to some existing cabinets? Check to see if those existing cabinet walls are made from solid plywood or are built up on wimpy frames (like most walls are made).

And I agree that it is dangerous to attach weight to existing walls. Those inner wall skins should be considered cosmetic, not structural. If you need to position your new cabinets on the middle of a wall, maybe you can run some 2x2 strips from floor to ceiling on the cabinet sides to support the added weight? (I know that could look ugly, but hey, if you have to have these new cabinets, that might be a way to add them safely.)
 
dufferDave said:
If you need to position your new cabinets on the middle of a wall, maybe you can run some 2x2 strips from floor to ceiling on the cabinet sides to support the added weight? (I know that could look ugly, but hey, if you have to have these new cabinets, that might be a way to add them safely.)
Residential cabinets can be pretty heavy. If possible, get a quote to have some made using lighter materials. The only thing that you don't want to skimp on is the panel in the back that holds it together and against the wall.

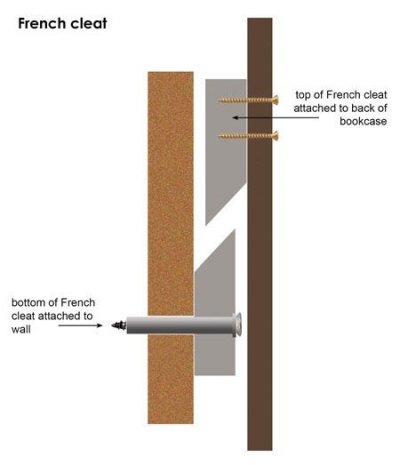
If you need additional support for the weight between studs, you can consider a french cleat. This will disperse the weight, provide a solid mating surface, and also give you a hanger so you don't have to sit there and hold it while you fasten it. You can make one with a piece of 1x3 cut in half the long way with a 45 degree cut. One side goes the wall with the point facing outward and on top. The other will have the point away from the cabinet and facing down. You will want to countersink the screw heads so they don't interfere.

See the image attached for reference.
 

Attachments

  • 8a241de9aae05a232772f7351caae43b.jpg
    8a241de9aae05a232772f7351caae43b.jpg
    16.9 KB · Views: 28
Back
Top Bottom