Professor David
Well-known member
I had a good paint day today. Finishing up the body work on the new to me motorhome I purchased 6 months ago. Just need to polish the clear coat and button up things.


Thanks! Not a professional but have restored about 10 or more cars. I'm getting better at this work after many years of trials and many errors. Always willing to help a friend or even a new friend.Nice. Are you a professional auto painter? I know someone who would appreciate your expertise very much.
Come to think of it I have a few spots with peeling clear coat. I was quoted $2300 to take care of them.
There are a library of YT videos on touching up clear coat. I'd messed up some on the hood of my Outback, the tutorials on YT walked me right through the process using rattle can clear coat.I have two small areas on my 89 Mustang that I tried to touch up.
They were caused while being hauled on the lift in my Stacker trailer by a chains that hung from the ceiling and rubbed away the paint on two circles about the size of a silver dollar down to the bare metal.
I bought a custom matched gallon of metallic blue paint and did a god job of laying down the color coat.
I then sprayed it with clear coat and messed it up with to heavy spray.
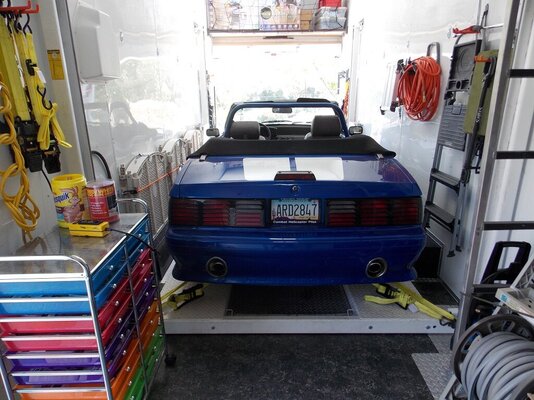
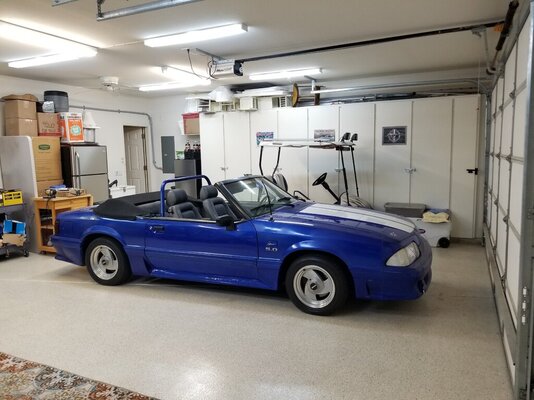
It is two relatively small areas. One is above the 5.0 logo and the other is above and slightly behind the rear wheel on the passenger side as seen in the second picture.
I went to a paint shop and was under the impression that they would have to strip the whole area and was quoted several thousand dollars.
I would really like to know what the exact procedure to use to remove the clear coat without damaging the color coat.
The best thing about a high quality clear coat is if the clear coat was properly mixed it doesn't matter if it was sprayed too thick. Cheap quality clear coats or if not mixed right may stay soft forever and have to be removed. Rattle can clear coats are ok if they are 2k like Eastwood. Otherwise rattle can jobs don't last.I have two small areas on my 89 Mustang that I tried to touch up.
They were caused while being hauled on the lift in my Stacker trailer by a chains that hung from the ceiling and rubbed away the paint on two circles about the size of a silver dollar down to the bare metal.
I bought a custom matched gallon of metallic blue paint and did a god job of laying down the color coat.
I then sprayed it with clear coat and messed it up with to heavy spray.
It is two relatively small areas. One is above the 5.0 logo and the other is above and slightly behind the rear wheel on the passenger side as seen in the second picture.
I went to a paint shop and was under the impression that they would have to strip the whole area and was quoted several thousand dollars.
I would really like to know what the exact procedure to use to remove the clear coat without damaging the color coat.
that should be fairly straight forward.I'll see if I can find the pictures. My damage is pretty typical. Front cap ove the windshield, rear cap near the roof, and the rear bumper.
Lot's of spot on replies about how to do this above. As stated, check out Youtube. Watch several videos. It does take some skill and practice to wet sand just enough to take down the clear and not go into the color layers. In my post above, I put down about 7 to 8 coats of color and 3 coats of clear. Not sure what your situation is with the mustang (nice car BTW)...that is...how many coats? Sometimes I practice on something before working on the actual project. Let me know how it goes!I would really like to know what the exact procedure to use to remove the clear coat without damaging the color coat.
Great point!! It pays off big time to use the best materials you can find. They will cost more upfront but totally mandatory.
 That's a good enough recommendation for me.
More coats gives you a 3D effect like looking in a deep pool of water. Some show jobs exceed $10K in materials alone. That's beyond my financial and patience limits.In my post above, I put down about 7 to 8 coats of color and 3 coats of clear.

Painting is very fastidious and tedious work. It can be very frustrating at times.I just read your reply and it was like in a foreign language. I have been handling our son’s affairs with the VA and Social Security for several years now, compiling records and correspondence and insuring everyone involved has what they ask for. I seem to be very good at minutiae.
A friend asked me to join a disabled veterans fly fishing club. I enjoy fishing but fly fishing is too fussy for me so I dropped out of the club.Painting is very fastidious and tedious work
Are you doing any other fishing?A friend asked me to join a disabled veterans fly fishing club. I enjoy fishing but fly fishing is too fussy for me so I dropped out of the club.
Not really. We live close to the shore and there’s a lake about 5 minutes from our house. Delaware is not a pretty place. I used to fish in Alaska; salmon and lake trout and in Oregon for lake trout. I grew up in Florida so fished a lot as growing up.Are you doing any other fishing?