Hybrid traditional boat build.

The friendliest place on the web for anyone with an RV or an interest in RVing!
If you have answers, please help by responding to the unanswered posts.
I fish a 19 foot modified vee shallow water lapstrake hull. I love it. The ride is a lot more fun than most any glass boat. I will try to downsize a shot of it and probably post in it the next couple of days.  All my photos are too big for the format on the forum.
 
When on the water or at the ramp with my skiff people ask what kind of skiff is that. I tell them its my 19.95 skiff.  :)) My clamming and fishing skiff sees a lot of duty with clam rakes and shoved up on sand bars. Yes its  a wash and wear boat. We have a removable dodger for winter time use. The dodger has easily removable bows and we add on a bimini top for the summer time.
 

Attachments

  • skiff on sandbar.JPG
    skiff on sandbar.JPG
    113.8 KB · Views: 39
Thanks, The hull side lap planks are Meranti marine plywood. The laps are glued with thickened epoxy resin. In the olden days it was fairly common to rivet the laps or clinch nail them.  This is when you drive a long copper nail for instance into the lap and then bend over the extra on the inside. Rarely was any type of bedding used. Of course you would almost always get some water in the seams. But it was nothing to be alarmed about. The standard practice for what we use now, a modern day bilge pump was a wooden bailer. Most of these were made from oak or even white cedar. They looked like big ice scoops, except the scoop end was flat with square corners.
 
I built a stitch-and-glue canoe about 15 years ago and I now live in Arizona, but the sight of someone's boat in progress makes me think about building another. Keep posting the pictures!
 
There are a lot of steps that goes into these builds. So its  a slow progress. The bottom is really an important part that needs to be right or fair as we call it, which is not always showy. In many of the big boat of days gone by they would always loft the boats in full size so that all the parts were true. This was done from a table of offsets from designers. I loft my boats in full size, built for a certain need and from the seat of my pants and on a strongback as you see this framing, either upside down for the smaller ones or right side up for the bigger ones.   


But after we get out of the bottom then the fun begins. Then the funner parts ;) is the glits and gingerbread, or window dressing. This is about a six months build at my pace. Of course if things open up across the country and things are somewhat in tack, I will take a break and go land cruising.  But I will add as I make progress.
 
Yup, that's old style indeed, lofting, ye gads, back when men were men. Keep the photos coming.
 
So lets put some curves to this girl.  I got some wood glued up to the frames. The two chine logs are in place, but will get shaped with the deadrise on the edge grain.  Yes, slow as watching grass growing, but springtime is helping the "grass grow" quicker now..  8)
 

Attachments

  • DSC00194.JPG
    DSC00194.JPG
    191.3 KB · Views: 28
  • DSC00196.JPG
    DSC00196.JPG
    168.7 KB · Views: 27
Keep the photos coming, looks like it's coming right along. What are your fasteners for planking to frames ?
 
magothy1 said:
Keep the photos coming, looks like it's coming right along. What are your fasteners for planking to frames ?
Of course in the older days and when we built using solid wood on frame we used slotted head silicon bronze fasteners. In any traditional builds I still can order these in from a couple of outlets and always counterbore tapered  pilot holes before running them in.  A point of note we also use paraffin wax on the tips of the screws too, which works really well with the hardwoods like the mahogany. Matter of fact I still have about 300 bd ft of the old stuff that was left over from an older build that's hanging out waiting for the call of duty. Need a cool varnished hull? ;)


But I digress , the silicon bronze  have all but gone by the wayside when talking about being available in any form at most of the purveyors of marine parts . But also with the advent of epoxy we are not really too concerned with the type of fasteners past using them to hold components in place until the glue dries. On tape and glue or stitch and glue no fasteners are required.  And the common theme about stainless steel is that you cannot bury them in wood because this causes crevice corrosion. On trailable boats this has proven out not to be an issue.

So in this build I am using trim head # 7 stainless steel square heads.  The torque heads are better for driving in by mechanical means. But with the softwood, white cedar I don't really have to worry about stripping heads. And these are readily available within a mile from the shed and priced better than the 316 torque heads. That's the new fasteners now for all outside decks with the new treatments in supposed pressure treated, if anyone is considering one.
 
X-Roughneck said:
I second the motion.
Hey working for free does slow things up more than usual. But of course you can speed things up if you wish$ LOL
 
The trim head screws are smaller heads than the usual flat head ? I've not worked with them. Do you need a countersink type bit or does a tapered bit give enough opening to flush sink them ?
 
Sorry, dead old brain forgot the next question - what's your epoxy choice ?  I've used a fair bit of WEST a while back, built a kit boat from Pygmy Kayak in Port Townsend, Wa. It was the stitch method, I think it's called, using wires to pull the planks together. Boatbuilding is what you're doing. Mine was paint by numbers style.
 
magothy1 said:
The trim head screws are smaller heads than the usual flat head ? I've not worked with them. Do you need a countersink type bit or does a tapered bit give enough opening to flush sink them ?
Yes the heads are just a tad bit bigger than the thread, similar to a head on a finished nail on those types. They pull in pretty good though with the smaller head from most fasteners, especially in soft lumber such as the cedars. But being small in diameter, they will wring off if you attempt to back them out  when they counter sunk into the surface of the wood naturally and thru thickened epoxy glued parts when let sit in for several days.  The thickened epoxy will grab on the thread when cured completely.  I don't use any countersink bits unless its in hardwood.

Because of the small nature in the diameter of the screw  and using power tools like  a driver drill the screws will get warm and sheer off if you just start them in thicker hardwood without predrilling. I also use fine thread sheetrock screws to just hold plywood parts, which is thinner than the framing parts until the glue dries. Sometimes if you leave them in too long, its a safe habit to use a soldering gun on the heads before backing them out, if they appear to be stuck . This softens the epoxy a bit thru the shank of the fasteners.

Those heads are larger and you do not want to leave them in and attempt to paint or glass over them at all. They rust worse than most of the stain-less steel. Yep that's what we call them these days. If you go with any stainless steel fasteners, at the very least use only 304 or 316. Most of the hardware stuff in stainless is 18-8 and must be countersunk and buried if you plan on leaving them in place.
 
magothy1 said:
Sorry, dead old brain forgot the next question - what's your epoxy choice ?  I've used a fair bit of WEST a while back, built a kit boat from Pygmy Kayak in Port Townsend, Wa. It was the stitch method, I think it's called, using wires to pull the planks together. Boatbuilding is what you're doing. Mine was paint by numbers style.
For sure West and System Three is the go to for most folks. But I have been using E Bond Epoxy for years. Its a third of the price, the epoxy is basically the same for glue up and glassing  with the hardeners a bit different. Its used by small boat builders and kit builders too,  repackaged and sold in conjuction with the kits. .  But they do not do retail outlets. They service a lot of industrial businesses But their service is second to none. They sell 3 gallon kits and ship UPS. They ship 5 gallon kits to commercial addresses.

They do not sell the pump kits, but you can buy the large ketchup bottles and pumps to use. I use 2 to 1 mixture.  I also measure mine using a stir stick measured with lines in recycled kitchen cans.  But you can use almost any plastic containers with the measuring marks on them.
 
Boat Addict said:
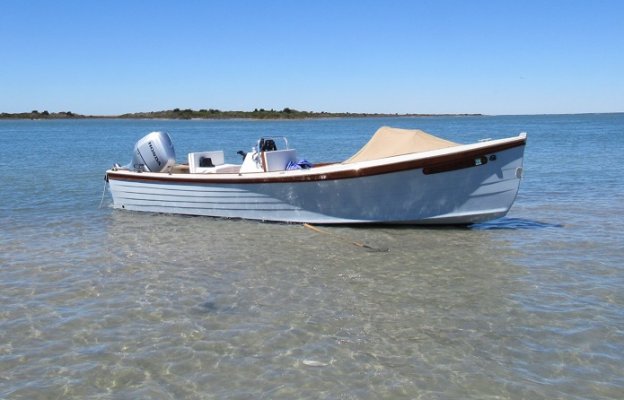
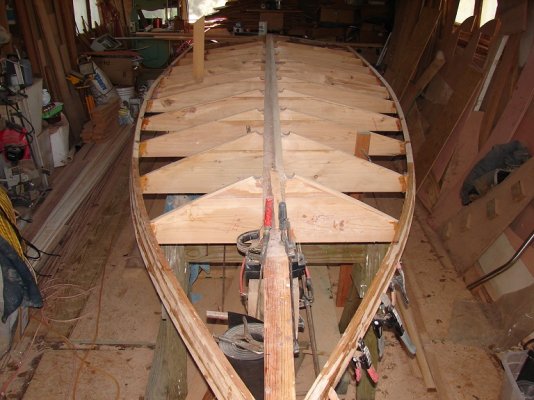
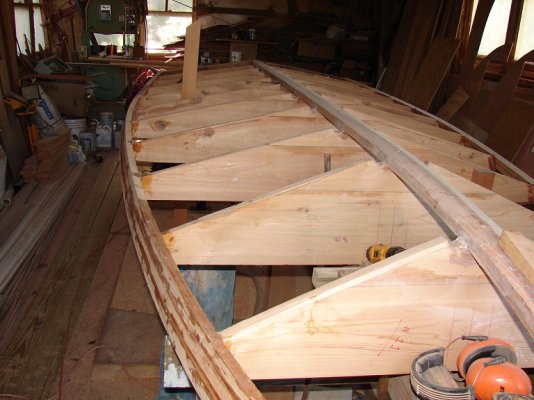
I don't know if this is allowed or if there is any interest here. But while we are homebound and restricted from traveling across the country with everything being closed, I am starting a 21 foot skiff in my boat shed. Its will be a framed hull with plywood hull material.  If this is something that's not allowed, please delete it.

BA,

Here you go.

Dang, It just hit me.  I know you are having major issues with the MFG of your particular RV flavor you paid alot of hard earned $$$ on. 

In case it doesn't work out, why don't you convert this "Boat" build now to a RV-Build instead?

It is apparent you have some mad DIY Skill Sets, plural for sure.

EXpert Craftsman comes immediately to my mind. 

It is apparent that this is not your first Boat Building Rodeo.

Follow my train of thought below..

Get some tips here for the suspension, Solar.... Build that RV like I can tell this boat is going to look.  :))

If they Don't Honor their Warranty to Joe Q,.. I got friends in Low Places, Garth Brooks, then...

(Shoot... if a Warranty does not cover front door separation that creates water to pour inside, really? << Thought / drift for a second)

Possible Course of Action:

Drive it up and park it next to their HQ, with a Loud Speaker saying I paid XXXX dollars to this company and their POS they sold me fell apart under warranty so I decided to build one myself!,

Have that PA set to Volume #10 Wide Open, No Muffler, In Their Face, Right off the Turbo, BLASTING LOUD! 

Send them a Pics sample of your other previously built "Master Crafted Boats"  with a cover sheet Stating that this was your former hobby, Let them know you picked up the Itch to Master Craft a RV out of necessity.

Let then know you preparing for some Long Term Camping Out in Front of their HQ in the near future.

JD
 
 
Better yet.

Take the Boat and Tent Camp at their HQ. 

Your Loud Speaker #10 Volume Rant.....you took up boat building out of necessity because you spent all you available money on a Defective RV from that MFG.  Let them know how Much You want to Be in the Woods, not the open water! 

Bring the Boat.  That is your "A Game" for sure!

Don't forget the tent and the Loudspeaker.

Option B...Drive around in the HQ Home town with the Loud Speaker blaring from your vehicle that is towing the boat?

JD
 

Latest posts

Forum statistics

Threads
131,990
Posts
1,388,716
Members
137,736
Latest member
Savysoaker
Back
Top Bottom