Interior Water Damage - In Over Our heads?

The friendliest place on the web for anyone with an RV or an interest in RVing!
If you have answers, please help by responding to the unanswered posts.

SharpestJim

Member
Joined
Feb 24, 2014
Posts
16
My wife and I purchased a 2008 Puma 20QB trailer about two years ago. We were (still are) newbies, but the trailer seemed to be in excellent condition and we did not have anyone perform an inspection on it. It sat in our driveway for nearly a year before we ventured out with it. We?ve been on four adventures with it since last spring. While we were getting ready for a Thanksgiving trip, my wife noticed a squishy spot in the floor on her side of the bed below the window. We went away again for a few days before Christmas. With the trailer back in the driveway and me on vacation, I figured that it would be a good time to figure out what we?re dealing with.

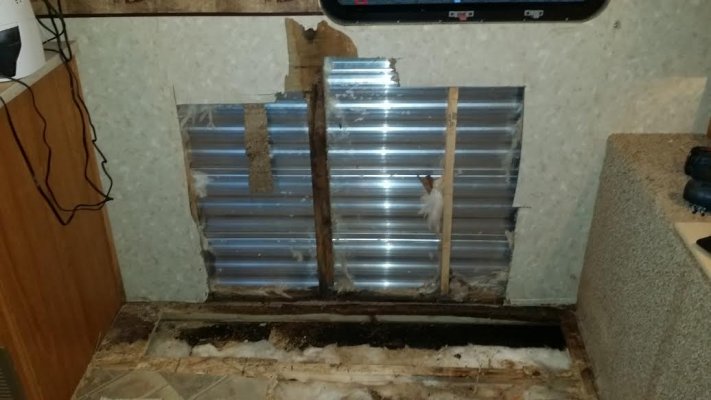
This morning, I yanked out the sleeper sofa and hauled it to the dump. We weren?t using the sofa anyway and I figured that I would construct a new frame/platform for our memory foam mattress. After the sofa came out, I went to work tearing out carpet, linoleum, and paneling. The damage is much worse than I had anticipated. I?m reasonably handy when it comes to minor home repairs and improvement. But I fear that I may be in over my head on this.

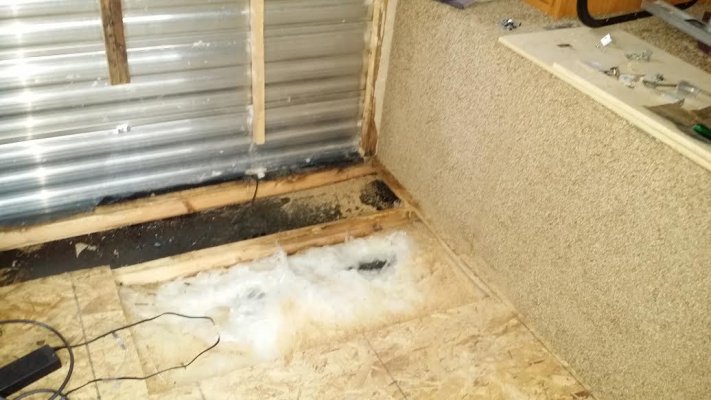
I?ve attached a photo which shows the paneling and subflooring which I?ve gotten out. But the damage extends fore and aft much farther than I had expected. It looks like it may extend under/behind the kitchen cabinets. At least one stud and the sill board (is that what it is called?) is also going to need replacing. I own a decent quality Bosch circular saw and a saber saw both of which I?ve used this far. Getting the stud and the sill board out scares me. I, obviously, want/need to be very careful that I do not damage the back side of the outer shell.

We have a gentleman who has done service work for us in the past. He is very good but we?re trying to keep the cost down. Then again, I don?t want to throw good money after bad. If this is as bad as I think it is, I?d just as soon suck it up and pay someone who knows what they?re doing. Furthermore, I'd like to have an expert evaluate things. I want to make sure that I fix the water intrusion issue before I go to the time and expense of repairing all the damage. Apparently, the water has come in from around the window. But I can't see exactly where it came from.

Any advice would be greatly appreciated. Thanks in advance & Happy New Year!
 

Attachments

  • Trailer-1215.jpg
    Trailer-1215.jpg
    49.7 KB · Views: 239
RV construction is pretty simple, but it's a pain to work because the sidewalls and cabinetry are built on top of the finished floor. Still pretty simple stuff, though. so be prepared to remove those cabinets and what not to get at the rest of the damage.

And now you know why it is crucial to keep an eye out for signs of water intrusion and fix the leak promptly. Letting it sit and rot for a year or two causes major damage.
 
Gary RV Roamer said:
RV construction is pretty simple, but it's a pain to work because the sidewalls and cabinetry are built on top of the finished floor. Still pretty simple stuff, though. so be prepared to remove those cabinets and what not to get at the rest of the damage.

And now you know why it is crucial to keep an eye out for signs of water intrusion and fix the leak promptly. Letting it sit and rot for a year or two causes major damage.

Thanks a lot, Gary. I suspect that the previous owner knew about the problem when he sold the trailer. But that's water under the bridge, no pun intended. It looks like the water got in through the lower left corner of the window since there does not appear to be any damage up top. But I can't see exactly where or how it got in. But i definitely want to make sure that I nip that it the bud so I don't end up having to do it again.

We're in Alachua County. I may be giving you a call.

Thanks again for the advice!
 
Looks good what you have done so far. The damage from what I can see does not look to extensive. If you continue with the work you might want to invest in a multitool. Harbor Freight or Home depot. The cutting blade moves back and forth very fast. They will cut metal also so nails and staples can be cut so rotted pieces can be removed and new pieces put back easily. They are easy to control and great for tight spots.  I have used a wood to metal mastic on the out side face of the new studs to secure the aluminum siding.

Food for thought, hope this helps, Tom
 
Water is an interesting phenomenon.  It comes in through a loosely caulked spot and then proceeds to find an exit point.  Don't guess that it came in near the window.  You need to verify where it entered.  It may have rained and come in through a loose bit of caulking on the roof, then started seeking lower spots which means it could go down the wall toward the area near the window.  We live in the desert and seldom see rainstorms but a couple of years ago we were in the northeast with hard rains.  One night we started having water drip down off one of the air conditioning vents on the inside of the roof.  The leak turned out to be a tiny piece of loose caulking where the crank-up TV antenna goes through the roof.  Luckily we were in the motorhome when it started and as soon as the rain stopped Jerry went on the roof to check caulking, found the leak and repaired it quickly.  We left the inside air conditioning cover off to give it chance to dry out well and no damage was done.  You really need to find the source of the leak, fix it, and let everything dry well before making repairs.  I might add that it's a good idea to check all roof openings and all windows to see if there are any other caulking issues.  You have a nine-year-old RV and you don't know it the caulking has ever been checked so it should be a high priority to prevent further water damage.

ArdraF
 
Thanks to all for the advice. You bet, ArdraF. I've determined that the water came in from around the window. I noticed that the caulking on the outside is of two different shades. This further leads me to believe that the previous owner knew of the problem. Could be why he was selling the trailer. Live and learn. Now I know some things to look for if I ever purchase another second-hand trailer (not likely). At any rate, I?ve picked up a couple of tubes of Geocel ProFlex and I don?t do too badly with a caulking gun.

The good news is that the damage was not as extensive as I had originally thought. There was a good bit of wood that had gotten wet but not all that much that was still wet and/or rotted. I had to cut out parts of two studs, about three feet of "sill" (or whatever you call the bottom of the wall frame that sits atop the flooring, and the flooring in that area. I cut out a little more flooring width than I really needed to. But I can just take that back to the next joist. With the bad wood cut out, I plan to hit the remaining wood with bleach to get rid of the mold. I?ve got a dehumidifier running inside and thought that I would wait a couple of weeks before I start rebuilding stuff.

I plan to use pressure treated lumber when I go to rebuild. I?m going to use ?real? 3/4" plywood to replace the subfloor that I had to take out. I read or saw something online (might have been YouTube) about coating all of the frame members with an epoxy type paint. Is this necessary? I don?t mind going to the trouble if I can realize some sort of benefit from it.

I had to take out quite a bit of insulation which had gotten wet. Do I need to use any particular kind of insulation? Or can I just pick something up at the home improvement store? Just something that?s not too thick, I assume, would work.

Then I guess it?s just a matter of installing new paneling and linoleum and figuring out how to best transition from the new to the existing. But we?ll cross that bridge when we get to it.

Again, thanks to all who took the time to reply. You've gotta love the internet!

Happy New Year, everyone!
 
Any insulation that fits is fine. In all likelihood, the original wasn't all that great to begin with.

No, you don't need to epoxy paint anything, but a coat of primer/sealer or plain old paint or shellac wouldn't hurt if water ever gets in again. Anything that seals the wood would be of benefit if the problem ever happens again. But if you have used PT wood, the sealer doesn't gain you much, if anything.
 
Thanks again for the advice, Gary!

I thought that I would check in with an update in the hope that others can benefit from my "experience":

All-in-all, it could have been worse; much worse. I've attached a photo that shows the extent of the rebuild. The fact that the use of non-standard dimension wood is a real pain in the ***. The floor joists are 2.5" x 1.5" and the wall studs are 1.5" x 1". So I am going to be doing a lot of ripping. There is one spot at the lower left corner of the "box" (which supports the head of the bed) that still has some squishy wood. But it doesn't support any weight to speak of as it is only between the outer joist and first inbound one. I have elected to leave it be since I do not want to tear apart the entire front of the trailer. I plan to construct a "box" frame to fit between the two joists and screw into place. My thinking is that this will provide added rigidity to the damaged subfloor.

Another thing that left me shaking my head is the fact that the wall structures are built on TOP of the flooring. The bed area was carpeted so there was linoleum AND carpet underneath the wall "sill". I guess that that's just the way these things are built but what a pain.

As I get wood ripped and screwed into position prior to installing new 3/4" pressure treated plywood for my subfloor and new paneling, I'll take more photos.

It's not, by any stretch, a "professional" job. But I expect it to be "good enough" and stronger than the original construction.

I have not recaulked the window - yet. I'm hoping for drier weather next weekend so I'm saving that part of the project until then. We had rain much of the day yesterday (not heavy) with no signs of new water intrusion.

I've got two studs that had to be partially removed in addition to a three foot section of the sill. Fortunately, the ledger was not damaged.


Attachments

  • Trailer4-0116.jpg
    Trailer4-0116.jpg
    67.4 KB · Views: 123
Thanks for the feedback. Repair looks about like I would have done, so [obviously] good work!

RV factories optimize the build process, not future maintenance. Laying flooring in a small area around cabinets and such is extremely time consuming labor, so they just cover the entire floor first and then add stuff on top. Having done a couple RV floors, as well as various small rooms (e.g. a bath) in a stick house, I am sympathetic to their view!

RV construction is all about simple and fast. Long lasting and future needs are far-second considerations!
 
You're doing fine.  You'll get it fixed and enjoy your trailer again...and get to know it better in the process. 
 
It's been a while since I've checked in (too busy working on repairs). I thought that I would post a photo to show our progress thus far. I think that we're doing pretty well. I've got a coat of drywall mud on the seams between the new wall paneling and old. I'm going to try to blend this is. I may end up doing some kind of texture to try to minimize the differences between the two surfaces.

The wife found a Stainmaster vinyl tile at Lowe's that she likes. So I think that we're going to go this route to replace the vinyl that we took out. I used a section of "real" 3/4" plywood to replace the damaged subfloor. There are some slight imperfections between the old and the new subfloor, also. I'm thinking that I should put down a layer of floor leveling compound before putting the new vinyl down. I've never done any kind of flooring before - in a trailer or otherwise. Does this sound like a prudent thing to do? Any problems using leveling cement in a trailer? I would guess that the 3/4" subfloor should have no problem.
 

Attachments

  • Trailer-011716.jpg
    Trailer-011716.jpg
    17.2 KB · Views: 78
Because an RV vibrates and twists so much, I would suggest a flexible floor patch rather than the cement-based type.  I've used both in my home (we've had a lot of floor problems) and I like the cement type the best, but the flex stuff is good too and it does flex (as the name implied).

http://www.lowes.com/pd_132891-68-59184_0__?productId=3011841
 
Thanks a lot, Gary. I will definitely give that a go.

And thanks, also, kdbgoat. I had not thought about that. I worked in the paint industry many years ago and have used drywall mud since dinosaurs roamed the Earth to perform large-area wall repairs. What do they make for walls that is more flexible? I guess I could try some sort of elastomeric patch such as those used for stucco. But the problem with something that flexible is that it is not going to be sandable.

I may end up having to use wallpaper to cover up the repaired area.
 
We're coming down the home stretch - finally!

Here's a shot from Saturday not long after I started putting down the new flooring. We went with Allure from Home Depot. This is the "floating" kind of vinyl. It's really great stuff. Looks like a million bucks and Mama is happy (happy wife - happy life). We took out a nasty sofa which flipped down into a bed. But the memory foam mattress that we bought made the sofa unusable anyway - so out it went. I constructed a frame out of 2x4's to support the lower 2/3 of the mattress. When I'm done with it, it will provide tons of storage space underneath.

About all that's left now is some trim and painting.

FWIW: The Dap Flexible Floor Patch/Leveler, in addition to being ungodly expensive ($7 a quart) is a royal PIA to work with. Almost impossible to trowel and not really sandable either. So I ended up buying a conventional cement type leveler to put over top of it. Fortunately, much of the patched/leveled area is beneath the aforementioned bed frame. So who cares?

Again, I can't thank you forum folks enough for your encouragement and advice!
 

Attachments

  • Trailer-New Int-020616.jpg
    Trailer-New Int-020616.jpg
    14 KB · Views: 49
Back
Top Bottom