Believe me we all understand the allure of having that kind of power available for that price but the advice you have received here is right on, you will not be able to use it as you want around other RVers. The extra cost of a quiet RV type generator will pay you dividends.
You are using an out of date browser. It may not display this or other websites correctly.
You should upgrade or use an alternative browser.
You should upgrade or use an alternative browser.
This generator??
- Thread starter Zach
- Start date
The friendliest place on the web for anyone with an RV or an interest in RVing!
If you have answers, please help by responding to the unanswered posts.
If you have answers, please help by responding to the unanswered posts.
kbfeip
Well-known member
I hear you...even over all the loud noise! ;D
Just to close the loop, I received a response from Champion as follows:
Kurt,
Our C46540 model is better suited for camping. It tested at 68 decibels at 7 meters (standard distance for portable generator sound measurement). The C46540 is equipped with a TT30 receptacle which is compatible with most trailers and provides the entire output of the generator at 120 V through one connection.
Thank you for considering Champion Power Equipment products.
-Guy Buker
Ron
Moderator Emeritus
kbfeip said:Our C46540 model is better suited for camping. It tested at 68 decibels at 7 meters (standard distance for portable generator sound measurement). The C46540 is equipped with a TT30 receptacle which is compatible with most trailers and provides the entire output of the generator at 120 V through one connection.
68 decibels at 7 meters is going to be noisey. Looks to me like they used meters instead of feet since the low number of 7 meters might be more appealing than 68 decibels at 23 Feet (ok 22.967 ft.) Whether they use meters or feet it is the same NOISE.
kbfeip
Well-known member
Champion Generator:
Interesting post found on RV.net @ http://www.rv.net/forum/index.cfm/fuseaction/thread/tid/15825963/page/1.cfm
Interesting post found on RV.net @ http://www.rv.net/forum/index.cfm/fuseaction/thread/tid/15825963/page/1.cfm
Lowell said:I noticed that the sound rating is at full load on some generators. Are the generators much quieter when running at lower loads? How often do they run at full load typically?
Lowell:
The difference in levels from light to heavy loads depends on the design of the generator. A 4 cycle gen set running at A constant 3400 RPMs is noisy all the time. The quieter units are designed (and geared) to run at lower noise levels and the lowest noise levels are produced by gen sets that generate DC current, use an inverter to convert to 110v 60cycle power and use RPM to control output. These units idle at 1000-1300 RPMs so they are very quiet when under light loads so the manufacturer would naturally rather show noise levels at those loads.
Gary RV_Wizard
Site Team
Only the inverter models have significantly different sound levels depending on load, because the engine and generator speed varies with the load. Constant speed gensets run at the rated RPMs all the time, loaded or not. Noise levels increase only slightly when full load is applied and the engine buckles down to hard work. That's because the primary source of noise is vibration from the constantly spinning crankshaft and alternator and not engine exhaust, so load makes little difference.
kbfeip
Well-known member
I picked up my Champion # C46540 just this morning. I'll fire it up later this afternoon and report on just how loud it its.
Not to worry, I have a running list of folks within this thread that I must distance myself from while boondocking.")
Signed....
...the frugal one...
Not to worry, I have a running list of folks within this thread that I must distance myself from while boondocking.
Signed....
...the frugal one...
kbfeip
Well-known member
Okay folks....the verdict is in.
I un-boxed my new Champion generator this afternoon for it's initial run in. My first impressions were good, noting the quality that Champion provides in packaging, accessories and instructions. I filled the unit with gas and oil as per the clear and succinct instructions, actuated the choke mechanism, and pulled the starter rope. My first pull was very light in an attempt to pump oil through the engine before actually firing the unit for the first time. To my surprise, the unit actually started on me with almost no effort, on the first pull. I had dawned ear plugs, as my ears are very sensitive to noise, and I always wear plugs when operating my lawn mower, power washer, or power saws.
The unit ran very smooth, with no vibration, so I decided to take out my ear plugs to see just how loud this little machine was gonna be. Not bad. Not bad at all! In fact, this machine is significantly quieter than the 7kw Kohler unit installed in my 1988 Pace Arrow, quieter than my lawn mower, and much quieter than my power washer.
I loaded it up with three vacuum cleaners, (one portable shop vac, one 10 gal. shop vac rated at 1 1/21 HP & 10 amps, and one Kirby vac) plus a four ft. shop light, and a trouble light at 60W. The noise level did not change significantly whether being run loaded or unloaded.
I ran the unit for about 40 minutes, including about 4 minutes of run down time unloaded. I hit the off switch, and the unit shut down with no sputtering or dieseling.
Now there may be many out there who will disagree, but for my $299.00 outlay I feel I've received an incredible value in the Champion generator. I would not hesitate at all to run the unit at Dillon's Beach, where we dry camp.
The best news is that the manager at Kragen's Auto said that I had 60 days to bring the unit back for a full refund if I wasn't satisfied. Seemed like a no risk proposition to me.
Satisfied, I am....
Gary RV_Wizard
Site Team
Well, just about anything new should be quieter than that old Kohler you had. Modern gensets are indeed much improved over vintage models. And as you say, it's hard to argue with $299 price tag. Hope it continues to do well for you. And your neighbors.
hoochonwheels
Member
- Joined
- Jan 3, 2007
- Posts
- 23
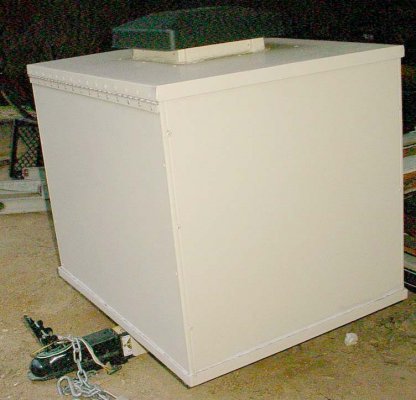
Can we post photos here or just links? I am a newbie and have dealt with the generator/expense question. I built a soundproof box for my 6.5 HP Honda 4000. I will post photos if anyone is interested.
I rigged it for the trailer hitch since we only need it when going to primitive sites. Why carry the extra weight when you are not going to use it? At least that was my thought on the matter.
When running the AC, microwave and refrigerator all you feel is a slight hum if standing on the floor and no audible noise. I think the whole box including vent fan and welding was less than 125.00.
If interested in seeing my SNAFU post on the thread I started "1991 Toyota Itasca Spirit Thread" I will post photos tomorrow.
kbfeip
Well-known member
Please post the photo's here!
I'd love to see the work you did, and understand how you handled the exhaust and intake issue.
After your post, if you click on "Additional Options" below left of the text box, it is pretty self explanatory.
I'd love to see the work you did, and understand how you handled the exhaust and intake issue.
After your post, if you click on "Additional Options" below left of the text box, it is pretty self explanatory.
hoochonwheels
Member
- Joined
- Jan 3, 2007
- Posts
- 23
Sure will. Pretty simple design and actually runs 9 degrees cooler in the box than sitting open in the sun. Exhaust was handled with flexible stainless corrugated hose/flexpipe. I also made it where it would ride the tongue of the trailer if we were pulling the bikes.
I'll write up a simple how-to tonight and get the photos ready for tomorrow.
I'll write up a simple how-to tonight and get the photos ready for tomorrow.
Tom
Administrator
- Joined
- Jan 13, 2005
- Posts
- 52,000
Here's the procedure for posting photos.
My Class C Damon Escaper has a generator storage area at the very back on the drivers side. It's metal inside with a heavy frame for the genny to sit on. The door is vented at the top....is it okay to run the generator in there with just that ventilation? I'd prefer to not have to lug the thing in and out when I use it especially for a quick overnight boondock situation, but I also don't want to die from the fumes. Thoughts?
thanks,
Zach
thanks,
Zach
hoochonwheels
Member
- Joined
- Jan 3, 2007
- Posts
- 23
A promise made is a debt unpaid.........
First decide the size of the box you will need. Allow room inside to work and offer air circulation. I had my box built at the local heating and air shop ($35.00). He used a heavy gauge metal, the same used for furnace duct work. The lid is overlapping and made of the same thickness.
A stainless piano hinge ($8.00) was purchased at the local Tractor Supply. I also picked up an 1/8" thick X 36" X 1" aluminum flat ($6.00) so I could space the hinge to allow contact free opening and closing of the lid. While at the welding shop getting the angle iron frame that supports the box, I had them to bend (brake) 15' of light weight aluminum from their scrap pile. This isn't much more than aluminum siding. I had them to shear and brake it into 3/4" X 3/4" angle.
Attachments

kbfeip
Well-known member
Very nice work!
So there is enough gap to allow air intake, and the exhaust is ducted to the outside of the box?
Is there any additional sound insulation material other than the metal enclosure?
I'd like to have that baby sitting in the back of my truck bed!
So there is enough gap to allow air intake, and the exhaust is ducted to the outside of the box?
Is there any additional sound insulation material other than the metal enclosure?
I'd like to have that baby sitting in the back of my truck bed!
hoochonwheels
Member
- Joined
- Jan 3, 2007
- Posts
- 23
AW, heck! I'll post the URLs and you can take a look.
http://i23.photobucket.com/albums/b364/BBLoA/MVC-001F.jpg
http://i23.photobucket.com/albums/b364/BBLoA/MVC-002F.jpg
http://i23.photobucket.com/albums/b364/BBLoA/MVC-004F.jpg
http://i23.photobucket.com/albums/b364/BBLoA/MVC-005F.jpg
http://i23.photobucket.com/albums/b364/BBLoA/MVC-003F.jpg
http://i23.photobucket.com/albums/b364/BBLoA/MVC-006F.jpg
http://i23.photobucket.com/albums/b364/BBLoA/MVC-007F.jpg
http://i23.photobucket.com/albums/b364/BBLoA/MVC-008F.jpg
http://i23.photobucket.com/albums/b364/BBLoA/MVC-010F.jpg
http://i23.photobucket.com/albums/b364/BBLoA/box1.jpg
http://i23.photobucket.com/albums/b364/BBLoA/box2.jpg
http://i23.photobucket.com/albums/b364/BBLoA/box4.jpg
http://i23.photobucket.com/albums/b364/BBLoA/box5.jpg
The lightweight aluminum angle ($10.00) will be placed inside the box and secured with RTV silicone ($8.00) and pop rivets($6.00). The steel 3/4" X 3/4" angle (10.00) will be welded into a rectangle that allows your furnace duct work metal box to sit in with a fairly snug fit. While at the welding shop you will need to have two pieces of angle steel made that will be the saddle for your box ($ Cost will vary mine was around $8.00). They will be attached across the bottom of the steel angle iron frame built for your box. My trailer drawbar (tongue) is the same with as the receiver on my Reese Hitch which made it very simple for me. I wouldn't have to use a spacer for my saddle to fit either the trailer or a 2" X 2" X 36" X 3/16" square tube steel. **Don't scrimp here this drawbar takes a lot of stress holding a 75-100 lbs. generator.** The two pieces of angle that form the saddle will vary depending on your trailer drawbar and the weight of the generator. Also if you want to carry only the generator you may have to add some spacers (washers) would work great if trailer drawbar and Reese Hitch bar insert is different.
You will see from the photos how I installed the lightweight angle as corner support and sealer. Use plenty of RTV silicone and after pop riveting these braces in place the excess can be removed rather easily after it cures. Also use the RTV sealant generously in the angle iron frame to prevent water from being trapped between the frame support and the box.
""Notice** Pay attention to your oil dipstick, on/off/choke control and spark plug location. With proper planning you will be able to access these componets without having to lift the generator from the box.
The lid with the overlapping lip can be sealed using foam insulation tape around the inside that meets up with the top edge of the box. In the center of the lid you will be cutting a hole to acommodate a house roof vent. I used a PVC type roof vent that allows a large volume of air to flow freely. You will see once again where the lightweight aluminum angle was used to reinforce this area and allow the mounting of the fan.
The fan is a low profile automotive radiator fan that will be powered by the 12 volt charge circuit on the generator A pin switch can be used to control the on/off of the fan if you don't want to start your generator with even a very slight load on this circuit.
In the bottom of your box you will need a fuel resistant mat. I elected to use a mat from Tractor Supply that is made for horses to stand on while in transport. It is reticulated and allows air to pass through and also absorbs even more vibration from the generator. Cut mat to fit. In the bottom of the metal box you will be cutting vent (intake holes) I used soffet vents like used in the eves of some houses most of these are louvered with a screen on the backside to prevent wasp and other pest to pass through.. You need to be generous with these vents because even though the mat is a lace work it will restrict some aiflow. You want the fan to be free and not pulling any negative pressure inside the box when running. This can be checked by raising the lid with fan off and fan on. You should feel no increase in the force needed to raise the lid. This means you have maximum airflow. The placement of the bottom vents should be placed according to the design of the generator. You want plenty of air flowing across the engine as well as the head unit (armature) generator.
The puchase of a dogbone adapter for electrical supply can be installed if desired or a simple notch in the top edge of the box for your RV supply cord/cable can be plugged into the generator.
Now for the fun part......
The muffler will have to be outside the box. After trial and error I achieved an 8 degree cooler running temp for the generator in the box than the generator sitting out in the open. This was a temp reading on the cylinder head. The radiator fan and placement of the bottom intake vents circulates the air in specific/critical areas. I ordered a Honda replacement (a new take off from a go cart builder) muffler off Ebay to have the extra manifold and mating flange I cut the muffler away leaving only the flange and stub of tube to attach the stainless steel flex pipe. Then mounting the muffler to the bottom of the box with extra flex tube to move or redirect the muffler noise if need be.
Inside the little Itasca the generator can not be heard however if you stand on the floor you can feel only a slight vibration in your feet. If hauling the box on your trailer? Simply disconnect the trailer from the hitch ball and this vibration is gone. If using the drawbar only you could set the box on the ground but I never felt the need to do so.
Once you have figured the space inside the box needed to access the routine matainance and keep in mind center of balance you are ready to mount the generator in the box. Center of balance is important and don't forget the ventilation holes in the bottom. Here is what the bottom of the box will look like and can be used to figure your center of balance.
______I_I_______ (Inverted diagram) the two verticals are the mounting legs of your saddle. They will straddle your trailer or the drawbar. I used grade #8, 3/8' shank bolts but with careful matching you could use some type of tractor pins for even quicker change over.
By placing the box on a flat hard surface and placing the rubber mat inside and sitting the generator in the box you want it to balance on the two legs created by the saddle. When the box will sit steady on these legs mark and drill though the generator frame and through the top legs of the saddle you made with the angle. My saddle pieces were 6" X 8" which gave me a spread of 16" plus the 2 inch space for the drawbar saddle for a total of 18". I used two high grade #8 bolts and washers which passed through the generator frame, rubber mat, bottom of the ductwork metal box and the upper legs of the saddle. Tighten only to secure do not compress the rubber mat or you will split it and loose the vibration insulation. I used 1/4" shank bolts with self locking nuts and flat washers ($5.00)
This box can be used for extra storage if you want to remove the generator, in my Minnie Winnie this can be a great blessing. For those of you that have the Reese Hitch luggage racks you may want to design your generator cover around the already made luggage rack. Very easy if a little planning is used.
I painted my box to match the color of my MH, I still need to put the Teal and blue stripes on the box but cold weather has set in and this spring I will finish the cosmetics. I preped the box by lightly sanding the galvanized metal and cleaned with muric acid (brick acid)
vinegar or most any mild acid solution would work. I used plenty of high grade primer especially on the joints and seams. I then used an epoxy appliance paint for the color several coats.
I plan on making a couple of additions to the box this spring. Two retractable handles to make lifting more easy. They will also be made to act as supports on the outer edge of the bottom so when the box is sitting on the ground the center saddle will support the weight and the handles will prevent the box leaning to one side or the other. I will make them, when not in use they can be pushed back under the box out of sight and no shin bone busters.
Tom
Administrator
- Joined
- Jan 13, 2005
- Posts
- 52,000
If you use the Insert hyperlink tool (farthest left icon immediately above the smileys), you can make your links "live", so they'll open when folks click on them.
hoochonwheels
Member
- Joined
- Jan 3, 2007
- Posts
- 23
I have some of the foil covered subwall type insulating panels. I may have had to use them with a Briggs and Stratton or Tecumseh engine. With the Honda there was no need. Yes I directed the exhaust out through the bottom. I can hang (attach) the muffler on the trailer, box or on a stake thereby directing the noise away from my neighbors.
I intend to add a thermostat cutoff in case the fan were to quit in the middle of the night. Other than that I am completely confident. I used my wife's laser thermometer she uses in her jewelry casting to measure the temps. The engine head is 8 degrees cooler in the box than sitting in the sun running with same load on it.
I intend to add a thermostat cutoff in case the fan were to quit in the middle of the night. Other than that I am completely confident. I used my wife's laser thermometer she uses in her jewelry casting to measure the temps. The engine head is 8 degrees cooler in the box than sitting in the sun running with same load on it.