What to do with leftover LED strip lights (this is not a question ;-) )

The friendliest place on the web for anyone with an RV or an interest in RVing!
If you have answers, please help by responding to the unanswered posts.
Jim, if you don't have one, I do have the solder pen etc.  We can mess with it up here or over a couple nights on the rerun trip.  I was recently looking at these for our display in the foyer at the VC, and Jolene wants some lighting under cabinets, found many places in all sorts of configurations.
 
Bill,

Thanks, but I do have a soldering iron and solder. Might be a little large but it is a small one. I'm going to check the vendors at QZ sometime this week.
 
Greetings from the warm skies of Quartzsite :)

John: I asked this in the other LED strip thread, but this one seems to be the active one..  What are you doing about voltage regulation on the strips? They won't tolerate bulk charges for very long..

On my radio bay, its running off the same switching regulator as LEDZILLA. But these need something or they will start burning out in time. Since the bays are all run by one stitch, you can locate something in the switch box by the door rather than buying a case full o' regulators.
 
SCVJeff said:
What are you doing about voltage regulation on the strips? They won't tolerate bulk charges for very long....

Jeff - I guess I'll find out if they will tolerate a Vin delta  :p.  No worries, if they burn out, then I'll look for a regulated version, at this point, they are simple to replace. 
 
John,
I looked at the plug together version of the strips. Most appeared not to be water proof and I thing that system is pricey. Think I'll stick with the epoxy covered strips I bought. I too have and am damn good with a soldering pencil.
 
Nice install, John. Did you also do the filter install yourself? That looks like another great project, but what supports all that weight? Don't they and the metal pipes attach to plastic fittings several inches inboard?
 
SVTotem said:
Nice install, John. Did you also do the filter install yourself? That looks like another great project, but what supports all that weight? Don't they and the metal pipes attach to plastic fittings several inches inboard?

Bill - yes, I permanently installed a two stage (sediment and charcoal) water filter to replace the portable unit I built about four or five years ago - I got tired of deploying the portable filters and then draining them when breaking camp.  The water filters are GE and they come with an aluminum bracket that attaches to the in and out piping, so they are being supported by the bracket (each bracket has two screws.)

The actual plumbing hookup was fairly simple, there are some access points where there are standard 1/2" pipe thread fittings available to tap into, I think I broke into the output of the hose reel.
 
John Canfield said:
Jeff - I guess I'll find out if they will tolerate a Vin delta  :p.  No worries, if they burn out, then I'll look for a regulated version, at this point, they are simple to replace.
You'll have to roll your own, but no big deal. Keep this one bookmarked incase you do. Only one needed..
 
Good write up John, and I appreciate it.  ;D

This is what I am going to use, which is similar as yours, only from Ebay, much less expensive, waterproof, and ships direct from China.  You can cut the length you need and one roll might be enough to install in all compartments.  I intend on installing a strip in each basement storage area, and will include pics when finished.

http://www.ebay.com/itm/White-Waterproof-5050-300LED-5M-60LED-M-Light-Strip-12V-/110716967714?pt=US_Car_Lighting&hash=item19c73edb22

Also, seeing other posts on RV.net, I am thinking about installing some colored LED lights either under my rolled up awning, or on the extended awning roller itself. (not sure yet).  It includes the wireless 44 button remote so you can change colors, have it rotate into new colors, dim, etc.  Notice it also uses the 5050 LED bulbs which are a larger LED bulb than the 3828 size.  I am looking in to some Ebay ones too that are similar to these.

http://www.amazon.com/gp/product/B0054U46Y2/ref=oh_details_o03_s00_i00

 
SCVJeff said:
You'll have to roll your own, but no big deal. Keep this one bookmarked incase you do. Only one needed..
Sorry, I forgot to add the link:
http://www.dimensionengineering.com/products/de-swadj3
There is zero radiated noise out of this, so it won't bother the TV or radio. I intend to use only one and place it behind the side door panel and run it in series with the switch and run all the switched bays.
 
I am assuming you cut the strip with a pair of scissors to the length you want.
 
This isn't exactly a "Winnebago Specific Issue" but it follows a discussion that was started by John Canfield about a year ago. I found this topic when I was researching how to improve the illumination in my basement compartments, so I thought I'd continue the thought process here.

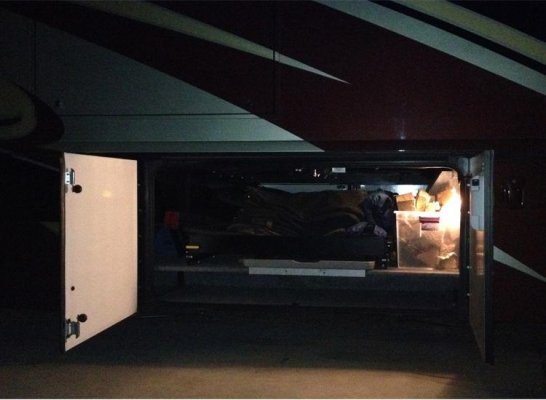
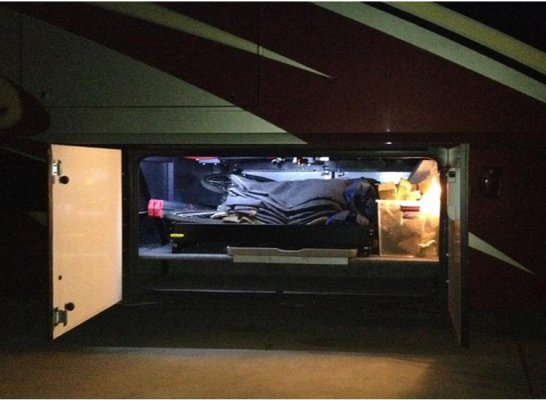
Our MH basement compartments are pretty poorly lit, so I looked at how John used an LED light strip to improve the lighting in his wet-bay and I thought that should work for my basement compartments too. Picture 1 is how my dual-door basement compartment, with the slide-out tray, looked when illuminated by the single factory light - an incandescent bulb. Picture 2 shows how it looks now - illuminated by the factory light and by about a three-foot section of an LED light strip that's glued along the top of the compartment door frame. What an improvement! The pictures don't do it justice. The shadows and dark areas that were present with the factory light are almost non-existent.

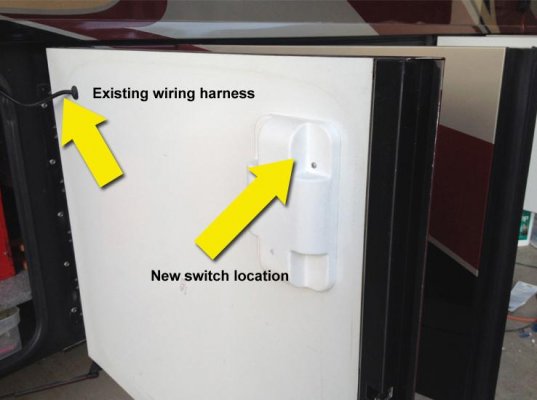
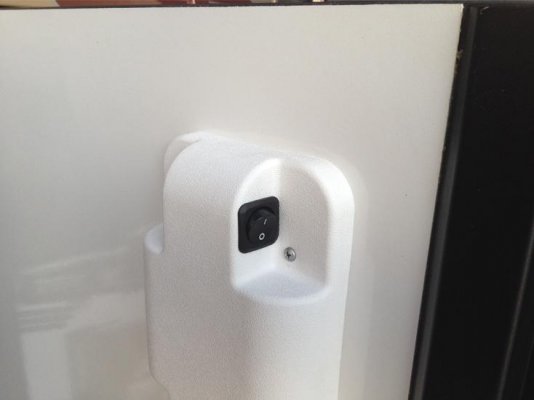
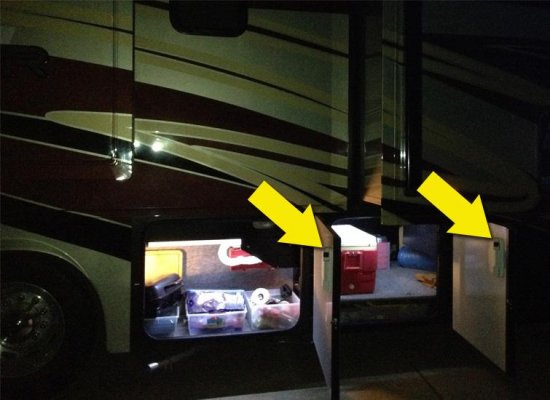
I also wanted to make it easier to turn the basement lights on and off, because when the slides are extended, you have to crawl under them and search in the dark compartments for the light switches (They're on the light fixtures). Picture 3 is one of my compartment doors - one arrow points to an existing wiring harness for the compartment-door-locks, and the other arrow points to a plastic housing that covers the door-lock-solenoids and door-handle-mechanisms. All of my compartment doors have these housings. Picture 4 shows a switch that I installed in each of these housings. The switches are wired in parallel to the factory light-fixture-switches. Using a coat hanger, it was easy to snake the wiring for each switch through an existing channel in each door.

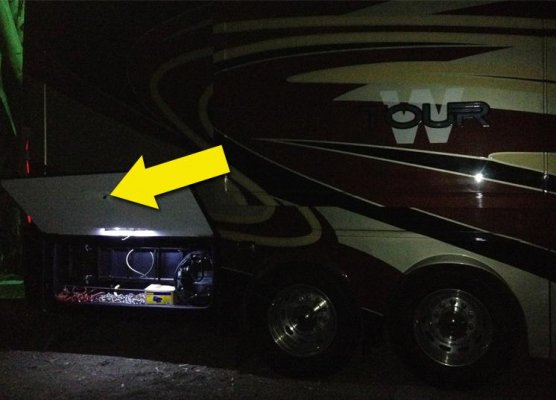
Picture 5 shows the location of the switches in two compartment doors, and how well the compartments are illuminated now. For some reason, Winnie chose not to install light fixtures in the rear compartments (??) so I ran 12 volts to those compartments and illuminated them with the light strips. The arrow in Picture 6 shows the compartment-illumination and the location of the switch. Yes, you still have to bend down to open the doors, but every little bit helps. :) None of this was hard to do, just somewhat time consuming. The total cost for all the switches, light strips, wire, solder etc. was about $75.00. As soon as they arrive in the mail, I'll be replacing the factory incandescent bulbs in the basement fixtures with LEDs.

Kev
 

Attachments

  • 1. Factory lighting only1.jpg
    1. Factory lighting only1.jpg
    43 KB · Views: 80
  • 2. Factory & LED lighting.jpg
    2. Factory & LED lighting.jpg
    53.8 KB · Views: 76
  • 3. Switch Location 1.jpg
    3. Switch Location 1.jpg
    33.7 KB · Views: 80
  • 4. Modified door.jpg
    4. Modified door.jpg
    22.8 KB · Views: 72
  • 5. Other compartments.jpg
    5. Other compartments.jpg
    49.7 KB · Views: 78
  • 6. Rear compartment.jpg
    6. Rear compartment.jpg
    45.8 KB · Views: 72
I like the idea of the switch on the door. Did you consider a microswitch to automatically turn the lights on when the door is open?
 
John, you would think that Winnie would have put them in (I did) but they didn't :eek:  Michael, I think such switches would work every bit as well as the switches I used but I just chose to go this route. Boy, I sure like these LED light strips!
 
Wow, what a cool mod Kev! The little toggle switches are cool. And what an improvement in the light in the bay. But shoot, now you have gotten me more work to do on the rig!  The $75 spent illuminated how many of the bays?
 
Back
Top Bottom