How to change slide topper fabric nested inside main awning?

The friendliest place on the web for anyone with an RV or an interest in RVing!
If you have answers, please help by responding to the unanswered posts.

jnwhite

Member
Joined
Aug 25, 2015
Posts
20
Location
Eastern WV
Hi All,

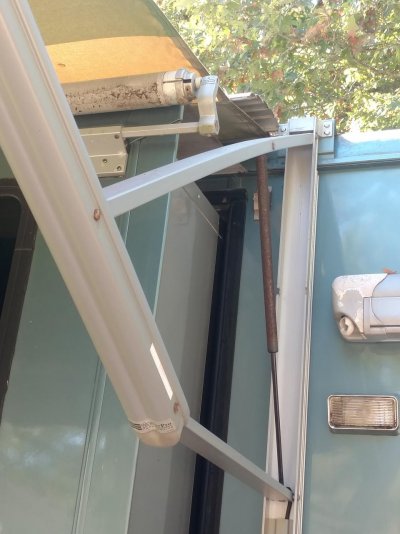
On to doing the slide topper replacement for the third slide.  The one on the front passenger side of the Journey 39K.

The slide is under the main awning.  So there is a plot complication sliding the topper fabric off and on as the awning arms are in the way.  See attached picture.  I see only two possibilities:

1 - Unbolt the front awning arm and support it somehow.  This seems like it could get me in big trouble.  Not sure how all that works.

2 - There is plenty of track toward the rear before the rear awning arm.  Maybe I could spread the track somehow and slide it out there.  I tried some gentle prying with a screwdriver.  It didn't seem to want to spread.

Anyone have any experience doing this?  What did you do?

Thanks!
Jay


Attachments

  • toppernested.jpg
    toppernested.jpg
    120.2 KB · Views: 30
I had all 3 of my slideout covers replaced back in June  at Stone Vos in Florida. My passenger side slideout and awning are like yours. They had me run the awning part way out. Unfortunately,  I didn't watch the installation so I can't tell you how they did it. But I know for certain they didn't do anything with the awning frame. They are really nice folks and I think they would tell you how to do it.  (352) 942-0224
 
Looks pretty simple to me.  Close the main awning.  Open the slide room completely.  Using a 16d nail lock both ends of the spring bar.  Retract the room about half way.  Make a note of where the topper is. Using a razor knife cut the old fabric off and remove.  There is usually a small screw in one or possibly both ends of the house end.  Pull everything out.  Using a screw deiver open the "C" channel a bit.  Get a can of silicone spray.  Liberally lube the channel and the cord ends.  Using a buddy start sliding the new fabric in the channels making sure your overlapped the roller tube the same as the old one.  Open the slide room, take the nails out.  Retract and check your work.  Shift the fwbric left right as needed to get it to roll correctly.  Put the little lock screws back in.  Done.
 
Hi Donn.  Doing the slide topper is easy.  I did the other two slide toppers on the drivers side already.  The problem is the Main Awning arms go OVER the track where the fabric must slide.  So if you try to slide the fabric out or in, it will hit the awning arms.  That is the issue, not installing the topper.

ChasA.  Thanks for the contact and tip.

Jay
 
jnwhite said:
Hi Donn.  Doing the slide topper is easy.  I did the other two slide toppers on the drivers side already.  The problem is the Main Awning arms go OVER the track where the fabric must slide.  So if you try to slide the fabric out or in, it will hit the awning arms.  That is the issue, not installing the topper.

ChasA.  Thanks for the contact and tip.

Jay

OK, if thats the issue, roll the main awning out ans lock the springs in place.  Usually the same 16d nail trick.  Drop the arm. How much space between the awning arm and the end of the toppers c channel?  6 inches or more, I would just work it in carefully between the two.
 

Latest posts

Forum statistics

Threads
132,175
Posts
1,391,474
Members
137,886
Latest member
Bob007
Back
Top Bottom