Sportsmobile Penthouse Raised Roof

The friendliest place on the web for anyone with an RV or an interest in RVing!
If you have answers, please help by responding to the unanswered posts.
Dave,

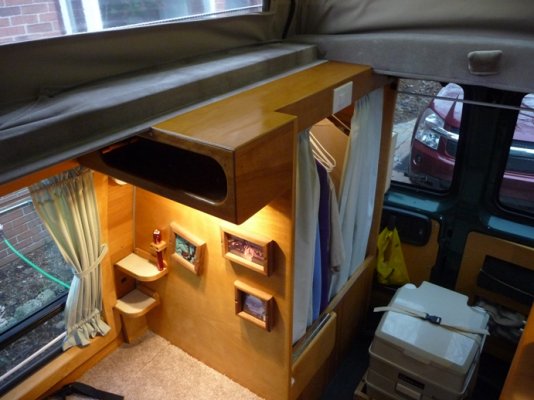
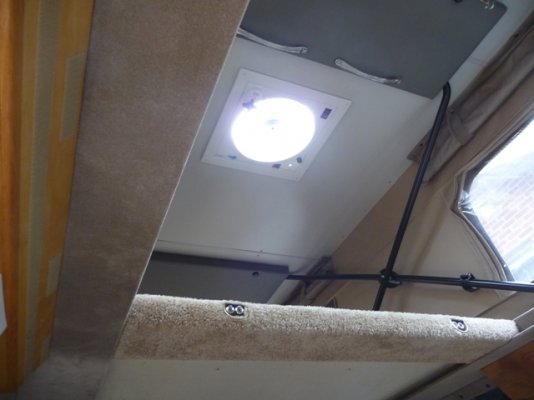
If you go to: http://www.sportsmobile.com/1_rb-50.html you will find their photo's of the optional penthouse bed.  You will see that the bed when down is supported by the two side rails of the penthouse assembly.  If you look close you will note the two cleats (two more at other end of bed) that they use to attach bed to ceiling for out of the way storage.  They have stainless steel 1/8" cable loops attached to ceiling that when you push the end of the bed up to the ceiling that you rap around the cleats.

Jack,

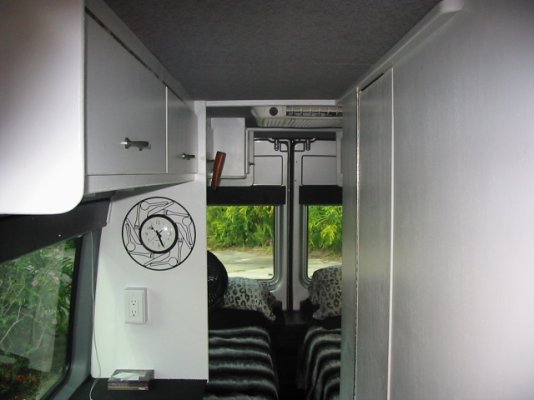
Photo 4 shows both of my drills setting on the drivers side bench.  The small dark one is a 9.6 volt Black and Decker and the yellow one is one of my two Ryobi 18 volt drills (one a drill and one with hammer drill option).  The Black and Decker (very old model) is my favorite: light weight (good for overhead use), good torque, reasonable battery charge life, and batteries last for years before needing replacing.  Ryobi: has more torque (of course w 18v), battery charger charges battery reasonably fast, BUT the batteries DO NOT last for years like the B&D $$$.

I took my pet ("old reliable" B&D 9.6v w two batteries and charger) to Mirebalais Haiti with me but recharging took 24 hours with the cities 96 volt line voltage.  I got a fell days work out of the drill drilling cinder block walls for wall anchors.  Second battery did not die until end of work day.  Put one battery on charger in hotel room and at 1 am got up (5 hr charge time) and switched to second batter on the charger (another 5 hours of charge time) only to discover that neither battery had a charge when I got to work that morning.  Had to leave one battery on charger for 24 hours to get it charged.  We had a 18 volt DeWalt and it would recharge in a reasonable time with that sub-standard voltage (but only had one battery for it).
 
I see I reported having a GFI tripping problem on March 31st.  Well today April 4th, and working on it every day, I FINALLY have the problem fixed.  I have been humbled.  Everything I thought it was, it was not.  After spending 3 days not getting anywhere I decided to start where the power comes into the van and replace wiring.  Clean up some past sins.  Turns out the problem was not close to were I was working.  Lot of wiring cleaned up. 

Sportsmobile used an air chisel to remove the roof.  Lots of vibration.  Found an outlet box where the ground wires had vibrated loss or off.  Anyway cleaning up some wiring and re-attaching those wires fixed the problem.

Now I can start going forward again.  :) :)
 
Well the rear of the van is now complete.  I did salvage some of the overhead storage cabinets and installed small sections of them at the top of the rear compartment wall.  Good place to mount lighting on.  I also installed lighting (2 10w 12v fixtures) in the hanging closet.  Note the white light switch mounted above the closet.

Next task is to figure out how to mount an awning on the side of the van.  My old roof rack mounting method has been eliminated by the Sportsmobile penthouse roof.  My thoughts are to add a roof ladder to the rear passenger side of the van (just forward of rr bumper) and some sort of attachment above the passenger front door.  That would give me two locations to mount an awning.  Need to find away to make the awning weather tight where it meets the van.  The awnings trailers, motor homes, etc. are tight against the RV so that you don't get wet when you first step out under the awning on a rainy day.
 

Attachments

  • s29m Rear 1.JPG
    s29m Rear 1.JPG
    189.6 KB · Views: 170
  • s29m Rear 2.JPG
    s29m Rear 2.JPG
    185.4 KB · Views: 167
  • s29m Rear 3.JPG
    s29m Rear 3.JPG
    197.3 KB · Views: 166
Thanks Gary,

It will be different.  Still can't get used to the new roof.  I get in the van and walk around like a very old man.  Then I remember I can stand up.  Then I forget almost as soon as I remember.  It will take awhile to undue 8 years of hard knock (literally) training. ;D ;D
 
Most impressive.  Looks like great workmanship from where I sit.  Clever space utilization, too.
 
Len and Jo said:
Well the rear of the van is now complete.  I did salvage some of the overhead storage cabinets and installed small sections of them at the top of the rear compartment wall.  Good place to mount lighting on.  I also installed lighting (2 10w 12v fixtures) in the hanging closet.  Note the white light switch mounted above the closet.
Next task is to figure out how to mount an awning on the side of the van.  My old roof rack mounting method has been eliminated by the Sportsmobile penthouse roof.  My thoughts are to add a roof ladder to the rear passenger side of the van (just forward of rr bumper) and some sort of attachment above the passenger front door.  That would give me two locations to mount an awning.  Need to find away to make the awning weather tight where it meets the van.  The awnings trailers, motor homes, etc. are tight against the RV so that you don't get wet when you first step out under the awning on a rainy day.

Looks wonderful Len!...I like it!...

BTW, is that white 'Dercora' switch approved for 12 volt application?
 
Yes, I approved it. ;D

It would be interesting to hear some other comments though.  I figure they can handle 10 amps A/c or so, so a couple of amps ( my case 20watts at 12 volts...about 1.8 amps DC) DC should not hurt.

 
Len,

You're OK with the switch.  The problem with AC or large amperage switches in low voltage applications is usually there is not enough current, say a few ma, and the contacts build a film and insulate from the low voltage so they no longer work.  With over 1 A you are fine, 1 ma, no.
 
I used to use toggle switches once and awhile....seems to me (my memory  ::) ) is that they came with different current ratings.  One for 120/240 volts AC and a different rating for low voltage DC.  Does my memory serve me correctly??  :p
 
Since I'm the only class B owner on the RV forum  ::) ::) I will continue this epistle.

I have now installed my awning and Fantastic Vent on the Sportsmobile penthouse top. 

I have been on a Sportsmobile forum but evidentially none of its members have done what I wanted to do.  They are mainly into trick suspensions and off road driving.

Sportsmobile installed awnings are attached to the drip rail and then some screws into the van side sheet metal.  The awning brackets must raise the awning up so that it clears the side doors when deployed.  The sheet metal tends to develop cracks at the screw attachments from this cantilevered awning load over time.  I finally decided to attach my awning to the SMB penthouse top.  I used every other hole in my new white awning rail and backed up the #6 machine screws with fender washers and acorn nuts.  See attached photos of awning installed and deployed.

We set the awning up and then raise the penthouse roof.  To take the awning down we must lower the roof first.


Oh yes,  I found a roof raising assist method!  The penthouse roof is spring loaded.  You have to push up from a crotched position to start raising it.  (When it is down it wants to stay down and when it is up it wants to stay up).  After it is about 1/3 of the way up and you have to hold onto the it as the spring load now wants to pop it up and hold it up.  Trying to push up while bent over is not a trivial task.  So, instead of opening doors to let air in as you raise the top.....close the camper up tight....run the van engine and turn the van blower to outside air and put it on HIGH.  Now with the van internal positive pressure the penthouse roof goes up real easy!!

Sportsmobile does not recommend installing a fan in the roof.  Oh well.  The main roof structure is five strips of fore aft running plywood encased in the fiberglass roof material.  The outboard strips are probably 3/4 inch plywood and the inboard three strips are 1/2 inch plywood ( see photo below of center section). 

I mounted my year and half old Fantastic Vent 6600 over the foot of the bed.  As far from our heads as possible and still fit in the roof.  The 12 volt electrical wiring between the two penthouse ceiling lights goes right through this area.  Easy place to get power for the fan after I cut them making the fan mounting hole.


Oh yes,  even if you mark all the 12 volt wiring clearly as to what is positive and what is negative you will blow the fuse on the Fantastic Vent if you connect them backwards.  Just can't get good help these days ;D ;D ;D
 

Attachments

  • 30a Awning Installed Frt.JPG
    30a Awning Installed Frt.JPG
    232.9 KB · Views: 97
  • 30b Awning Installed Rr.JPG
    30b Awning Installed Rr.JPG
    196.9 KB · Views: 91
  • 30c Awning Raised.JPG
    30c Awning Raised.JPG
    151 KB · Views: 102
  • 31a Fan Hole.JPG
    31a Fan Hole.JPG
    195.1 KB · Views: 94
  • 31b Fan Ext w Sealer.JPG
    31b Fan Ext w Sealer.JPG
    174 KB · Views: 90
  • 31c Fan Interior Looking Aft.JPG
    31c Fan Interior Looking Aft.JPG
    119.2 KB · Views: 94
  • 31d fan Interior Looking From Side Door.JPG
    31d fan Interior Looking From Side Door.JPG
    124.6 KB · Views: 87
I do OK, but my "progress rate" per "hour worked" ratio is fairly low.  Even if you paid me 50 cents an hour you probably couldn't afford me.  ;D ::) :p :-\
 
Very nice job! I 've got to say you are a brave man cutting a hole in that new roof . It took me 2 years to get the nerve up to do any mods to my TT. looks great! Have you been camping in the new set up yet? Keep us posted. Thanks for the update.
 
Back
Top Bottom