Tail light installation

The friendliest place on the web for anyone with an RV or an interest in RVing!
If you have answers, please help by responding to the unanswered posts.

Doc Roads

Well-known member
Joined
Jun 7, 2017
Posts
175
Location
Southern Arizona
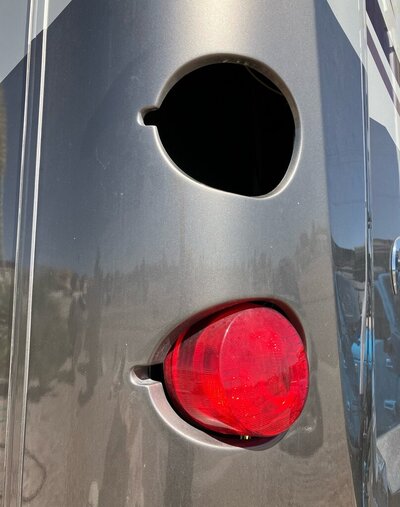
An overly enthusiastic wash rack attendant pushed too hard on my tail light. Apparently, they are glued in place and if you push too hard, you push in the light. Now I will have to glue it back in place. Conceptually, it seems straight forward but probably is not.
First, what glue do I need to buy? Second, surface prep may be tricky because it’s glued to the exterior fiberglass. Any tips on getting the old glue out and new glue in place? (and be confident it will stay)
I’m pretty sure I can do this but … It never hurts ask the forum.
 
Winnebago uses two part adhesives where metal parts need to be bonded to fiberglass (front/rear cap) and they do use double side adhesive tape for minor applications (trim, etc.)
 
Anything attached to my front and rear cap use something like JB Weld. I had one hinge for my hood come loose, not on the hood side, but on the front cap side. I used JB Weld to reattach it. When I was looking around down there I noticed that the headlight mounts are the same way. Haven't verified but pretty sure the taillights are the same.
 
Yes, John, it’s a metal bracket mounted light glued to the fiberglass end cap. As you can see from the photo, it’s glued right onto fiberglass outer body. (right beside the notch) The old glue is very hard and I’m concerned about removing the old glue without damaging the fiberglass. Yikes!
It sounds like you are describing a two part epoxy glue (mix and use immediately) … is a particular brand named used by Winn? JB Weld has a pretty good reputation. (Thx Bobtop46) Any tips on removing the glue? Heat? 😬 I’m thinking I’m going to have to carefully chip it away.
My idea … Once the area is prepped, I’m thinking I can use a suction cup to hold the light, quickly apply the epoxy, place the bracket in proper spot and hold til stable … simple right? 😵‍💫
Any tips or ideas welcome 🤗
 

Attachments

  • IMG_7678.jpeg
    IMG_7678.jpeg
    124.9 KB · Views: 24
On my View motor home, I had a lot of steel brackets that were separating from the adhesive/glue/whatever. Rather than re glue them, especially on the lower panels and doors, I drilled holes and used screws and nuts on the back to hold the parts together. Part shown is the LH aft access door that is the shore cord compartment. The curved plastic door has metal brackets on the back. Every one of the corners on these lower panels were coming loose. When you are an aircraft mechanic working for a big company, you have all sorts of resources. Aluminum countersunk washer with rounded surface and titanium screws.

Charles
 

Attachments

  • Image049.jpg
    Image049.jpg
    162 KB · Views: 8
Yes, John, it’s a metal bracket mounted light glued to the fiberglass end cap. As you can see from the photo, it’s glued right onto fiberglass outer body. (right beside the notch) The old glue is very hard and I’m concerned about removing the old glue without damaging the fiberglass. Yikes!
It sounds like you are describing a two part epoxy glue (mix and use immediately) … is a particular brand named used by Winn? JB Weld has a pretty good reputation. (Thx Bobtop46) Any tips on removing the glue? Heat? 😬 I’m thinking I’m going to have to carefully chip it away.
My idea … Once the area is prepped, I’m thinking I can use a suction cup to hold the light, quickly apply the epoxy, place the bracket in proper spot and hold til stable … simple right? 😵‍💫
Any tips or ideas welcome 🤗
When I reattached the rear engine access panel (the 'trunk' or 'hood') metal part to the cap I did not attempt to remove the old adhesive. It acts as a locator to reattach the metal bracket. Rough up the bonding area on both parts with 40 or 80 grit abrasive whatever.

Get creative about how to keep the metal part in firm contact with the cap - bungee cords, blue tape, duct tape, etc.

JB Weld has a pretty good reputation but if you want a thorough evaluation of two part adhesives, watch the particular episode of the YouTube channel "Project Farm." A word of warning about Project Farm - lots of first time viewers will binge watch his tool, oil, lawn equipment, etc evaluations. His videos are all about 15-20 minutes long and he purchases everything he reviews so he's not beholding to any manufacturer. Every Sunday about 11 AM CDT he releases a new video.
 
John … I will have to get creative … with the light and bracket in its correct position, there is no access behind the light … I’m considering removing the lens of the light below it and seeing if I can reach the light above (see pic) … 🤞 
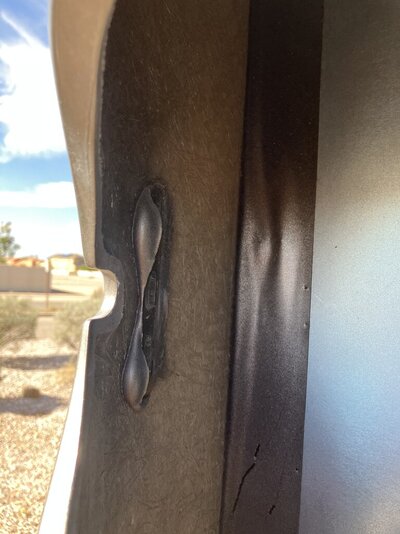
… I appreciate the comment about leaving the old glue in place. It is formed fitted to the bracket on both sides and can serve as a jig for the bracket. I’m holding off on applying any glue in this triple digit heat in AZ. A little more time to ponder the problem.
 

Attachments

  • IMG_7680.jpeg
    IMG_7680.jpeg
    132.8 KB · Views: 7
Wish you were close to me - this looks like a real challenge. We had way, way more triple digit temps here than I remember in 15 years but we finally have sneaked into autumn. Yup, wait until it cools down.

I found the two part adhesive that Winnebago uses (or used several years ago, they probably moved on to something else by now). The brand name is ITW Plexus MA330, Methacrylate Adhesive . "A structural adhesive suitable for bonding plastics, composites, metals and dissimilar substrates."

Winnebago part number: 112901-02-000. Link to it on Amazon. It's expensive!
 
Okay … it’s done! I posted some pics to help you understand what I did. First, I looked for the right type of glue. I settled on a two part, two tube epoxy which worked well. I used a twin tube plunger epoxy made by Gorilla Glue. It claims to have 3K lb. hold. It worked! Second, I prepped the surfaces by getting all dust and loose old glue off. Not really much to do, but real important for the surface to surface adhesion. I did not remove the old adhesive. I used the old adhesive as a jig to place the bracket properly. Third, I removed the tail light directly below the repair site. It gave more options to hold and position the bracket. Fourth, I practiced all the motions and movements to properly place the bracket without the epoxy. I probably practiced too many times. You have 5 minutes before this stuff sets so you get only one good shot at it. Fifth, I made a binder to hold the bracket in place while the glue cured. Sixth, it was show time! I pushed out the glue, mixed, applied it to the bracket and old glue and put the bracket in place. I timed myself and I was under a minute to glue and place. I held it in place for just over 5 minutes then set up the binder and let cure 24 hours. It’s actually more solid and stable than the original lights. I reattached the wires and reinstalled the lights. BTW, I labeled everything to ensure I could reassemble it. Done ✅ IMG_7759.jpegIMG_7776.jpegIMG_7775.jpegIMG_7757.jpeg
 
Thanks for the name of the epoxy … I will post an update (post-mortem) on this little project … thanks to all!
The adhesive I have found to be excellent has been 3M 5200 marine grade. The drying time was longer then the advertised 24 hours (3 days in my case). It's been several years and no problems to date. Again as John has said it's expensive, but if it works, it's worth it.
 
3M 5200 sealant is the gold standard for marine applications and anything else that needs tenacious adhesive properties and is 100% waterproof. I always had a tube of it in ship's stores. The only negative is that it's not UV stable so its primary use is for bedding parts. 3M 4200 is UV stable but I don't think it has the adhesive properties of 5200.
 

Latest posts

Forum statistics

Threads
131,989
Posts
1,388,713
Members
137,736
Latest member
Savysoaker
Back
Top Bottom