Building a new System

The friendliest place on the web for anyone with an RV or an interest in RVing!
If you have answers, please help by responding to the unanswered posts.
My understanding is, yes. Amps times volts gives you the power rating.


However, there are a lot of complications converting a trailer to 24V. Fridge, furnace, etc will still require 12V.
 
Kathy & Bill said:
A little curious  ::)  if one has a 24 volt system with.. lets say a 300 AH battery bank, is that kind of like having a 600 AH battery bank on a 12 volt system?

Yes, exactly.  Watt's law is volts * amps = watts.  (600 x 12 = 7200 watts just as 300 x 24 = 7200 watts)

Many of the items on my coach 24VDC (water pump, lights, inverter, etc..). However; some are simply available only in 12VDC (hose reels, ceiling fan, dump valve, some lights, etc.) so a 24VDC to 12VDC step-down converter is required.  Of course, there is an electrical 'cost' involved every time you 'convert' electrical power so it's always best to keep that to a minimum.

The amount of power you plan to draw from your battery bank - assuming lead-acid (of some sort) - has a lot to do with the 'better' battery bank voltage decision (C rate).  If you have lithium, this is much less of a problem.  The next most important factor, IMO, is the solar charge controller. All of the name brand MPPT controllers output their rated amperage at whatever the battery bank voltage is (within reason).  Thus; a 40 amp charge controller will output a maximum of 40 amps into a 12V battery bank - OR - the same controller will output 40 amps into a 24V battery bank.  That is DOUBLE the capacity for free!! :)    (remember Watt's law)

The big downside to converting an existing rig is that you already have a whole bunch of 12VDC components that are probably working just fine. Replacing them with their 24VDC counterpart is probably an expense that will gain you very little. :-(
 
solarman said:
I would suggest you not buy batteries first until you have at least performed a power budget and have a better idea of what you actually need.  I witness this "cart before the horse" engineering all the time, even by those qualified to know better..

ok, professional rant over.. LOL... seriously though, it would be better for you to have a good estimate of your actual needs rather
than just buying four of this or that..  I know it may seem to be an overkill to have a good estimate first, but it will pay off in the long run having a system better matched to your needs. ( and potentially a more economical solution )

I have a post here that explains solar and battery capacities..
http://www.rvforum.net/SMF_forum/index.php/topic,113514.0.html

also one thing you should be aware of with lithium is the limited temperature range.. if you intend to camp
in colder,freezing or sub zero weather then they are not a good choice unless you can install them inside the RV.
I have done this with mine for such a reason.

as for separate vs combo units.. it's down to reliability, cost and personal preference.

combo units take up less space generally and may include an automatic transfer switch too..
best of all worlds.. however, if you have not sized it correctly, then upgrading is more expensive vs individual units
as you have to replace everything in one go.. if space is not an issue then separate units will give you more flexability
in the event of failure.

Good info but with regards to lithium batteries and freezing temperatures might discourage some and should not.  We have the Battle Born batteries and because of available and realistic real estate in our rig, we have them in the battery box.  I lined the battery box with reflectix and I placed a worklight with a 60 watt bulb inside to warm the box if necessary.  We have camped as low as mid twenties and have not had to turn the light on as the ambient temp in the battery box never dropped below 42 degrees.  Understand a couple things, first with regards to temperature, the batteries measure temp at their core so it is going to take a sustained very cold weather to reach that point.  Second point is these batteries have internal BMS which will shut down any charging if the temps drop below 32 degrees to protect the batteries.  So until the temperature rises above 32 degrees the batteries will not receive a charge, but they will not be harmed.

Also it was said in this thread that these batteries can be discharged down to 20%, actually it is 10% but many use a 20% number for a margin of safety.  So if in practice one reaches the 10% mark, no harm is done, but for sure you better get to charging fast, because if they get down to zero, your expensive investment will be toast.

We have 3-100ah Battle Born batteries for a year now as full timers and they have performed brilliantly, highly recommend them.  We have never dropped below 55% capacity and that was only once, so we right now have plenty of capacity and comforting to know we had plenty more capacity. 

As for battery monitors, the Tri Metric has been around a long time and does the job well, it is among the best and yet typically is less expensive among the top brands.  I prefer the Tri Metric over the Victron because the Victron seems to rely too much operationally on a laptop or smartphone to effectively program, trouble shoot etc. As we prefer to boondock, I do not want to have to rely on needing a laptop or smartphone off grid, keep it simpe in other words.  Also the Victron is more expensive than the Tri Metric and I see no real benefit to the added cost.

 
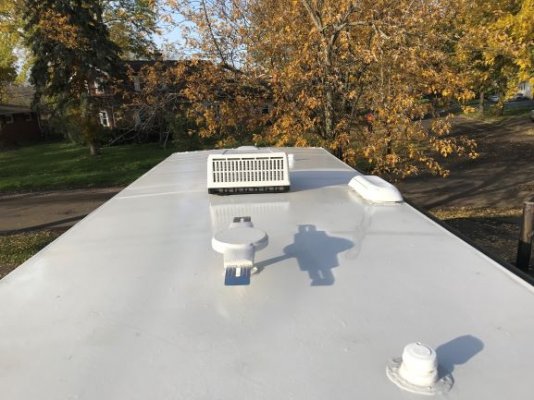
Attached is a pic of my roof from the rear looking forward.  I took this on November 4th at 9:00 in the morning, sun being low and bad shade angle.  I'm thinking I can get five of the bigger, higher voltage residential panels up here.  Two up front either side of the bedroom vent, one cross-ways in front of the AC unit and two either side of the TV antenna.  Keeping them wired in parallel to minimize the lose when shaded.  Is there a rule of thumb as to how far back from the front edge of the roof a panel should be with regards to the wind generated while traveling?

With the mild winter here in Western NY, and the camper in storage, it is killing me not being able to measure things, see where I can run wires and just planning overall.  Since I can't do any hands on with the camper I've been doing the next best thing... reading and reading and reading this forum and other articles.  What a wealth of information that is on here!!

The DW has a couple trips planned and reserved already, the first one the beginning of May.  My plan is to get two 100ah LiPo Battle Born batteries and a battery monitor installed before that first trip so we can get a handle on our usage.  Then I will be able to more accurately know what our needs will be.

Again I can't thank everyone enough for their replies and expertise.


Attachments

  • Apex roof small.jpg
    Apex roof small.jpg
    54.7 KB · Views: 26
Re: Building a new System

? Reply #1 on: October 28, 2018, 02:07:21 AM ?


Quote


Good luck on your project - it sounds like fun!

Both the Tri-Metric and Victron do about the same things, Victron has an edge in that it can communicate via Bluetooth to your Smartphone, tablet or computer and has an app that makes it easier to see and manipulate the data compared to staring at that limited display on the unit.

The Victron at ~ $206 includes a shunt and cable. Not sure what those are $ wise. Maybe $45.
Pat
 
solarman said:
I would strongly advise against a 3000 W unit, at 12 Volts you are getting into very high currents and very heavy cabling.

this highlights one of the biggest problems with low voltage systems, cabling and contact resistance have a big effect.

secondly, a 3000 W inverter has a high standby current, some as high as 30 to 40 Watts in idle mode.

thirdly, at full power and with 90% efficiency, you will need to supply ( 3000 * 1.1 ) / 12 = 277 Amps.  even using cable to 90 degree spec you will need better than 4/0
cables, also most DIY do not have the tools or experience to terminate cable lugs, you will need to have cables made by a marine or golf shop..
don't under estimate this, I have seen melted battery posts, lugs and cable from improper design..

additionally, at 90% efficiency, the inverter will need to dissipate close to 300 watts of heat, it should be in a ventilated area.

I suggest you scale it down to at most 2000 W, less idle draw and easier on cabling.

good units to consider are:

Victron Multiplus
Xantrex freedom XC2000
Samlex EVO-2212

these have 30 to 40 A transfer relays and good efficiency.
personally I would not consider the aims units, the quality is low compared to the others.

I agree with this, staying away from a 3000 watt inverter, unless of course your energy needs require a larger inverter.  I have seen where too many folks go with a 3k inverter because they "might need the extra power" and in reality only need 1500-2000 watts.  It is doable of course but a significant drain on their battery banks.

We full time and prefer to boondock a lot, we have gotten along quite well on a 2000 watt Samlex inverter which I can recommend.  Magnum also makes excellent inverters.  As to your question on inverter/chargers, it seems if you go 3000 watt most of them have both, while many 2000  watt come as inverter only.  A couple advantages to an inverter/charger configuration is you may have the ability and should locate it near the batteries which will be more efficient for charging and they often have a higher amperage output which should yield a faster charge time.  Also, if you choose to install one and keep but shut off the converter in your rig you would have a back-up.  Good luck with your new rig and planned projects.
 
Kathy & Bill said:
Attached is a pic of my roof from the rear looking forward.  I took this on November 4th at 9:00 in the morning, sun being low and bad shade angle.  I'm thinking I can get five of the bigger, higher voltage residential panels up here.  Two up front either side of the bedroom vent, one cross-ways in front of the AC unit and two either side of the TV antenna.  Keeping them wired in parallel to minimize the lose when shaded.  Is there a rule of thumb as to how far back from the front edge of the roof a panel should be with regards to the wind generated while traveling?......................
I would keep them back 2-3 inches from the edge if you can, but not so much for wind.  More if you get really close to a tree branch or something.  Be sure to fasten the panels down securely.  This is what I use to anchor my panels:  https://www.zoro.com/red-head-anchor-kit-phillips-1-14-in-pk25-ezp25/i/G4306723/  I bought them at a big box hdwr store.  My Winnebago has a 1/8" or thinner luan panel with a thin coating of fiberglass cloth and resin.  In addition to the screws I put Dicor self leveling between the foot of the panel support and the roof.  40,000 miles including some rough dirt and gravel roads as well as a trip to Alaska and the panels didn't loosen at all.  I just pulled them off a few weeks ago to move them to our new-to-us RV.

I somewhat tilt my panels so the water doesn't pool on the panels.  Pooling water also collects dirt.  Also raising the panels allows for air circulation underneath helping to keep the panels a little cooler.  Heat reduces the output.  My panels are 66" x 52" and are tilted about 1.5" along the 66" edge. 

When you install your panels try to leave a walkway of about 15-18" so you can get up and clean the panels.  Dirty panels really reduces the output.

I would also raise your panels maybe 5-7 inches to reduce the shading from the TV antenna and A/C in early morning and late afternoon.  As long as you install a battery monitor you will notice a few amps being generated as soon as it is bright daylight. 5 or 10AH in the morning and evening goes a long way. Every little bit helps.
 
Frank B said:
The ones made from the 5 in ingots are closer to 32 " wide, which worked very well on our 30 foot travel trailer.


Frank... could I get a little info on your panels?  Manufacturer, Wattage, Where you purchased them and shipping cost?

I live in the burbs of Buffalo.  Tesla has a new plant in S. Buffalo that is making panels, I think Panasonic panels.  Thought I might see if they sell factory direct there and eliminate the shipping cost.
 
Kathy & Bill said:

Frank... could I get a little info on your panels?  Manufacturer, Wattage, Where you purchased them and shipping cost?

I live in the burbs of Buffalo.  Tesla has a new plant in S. Buffalo that is making panels, I think Panasonic panels.  Thought I might see if they sell factory direct there and eliminate the shipping cost.


http://www.rvforum.net/SMF_forum/index.php/topic,106669.0.html

16 messages down.  These are Mexican made panels that may escape the Chinese tariffs.

You can also try Rebecca Sanchez at Solarflexion in California. 951.691.7621. An honorable lady who knows her product well.

If you do have to ship, get them to deliver to the warehouse in your city, and then go pick them up yourself. Freight companies charge stupid money for the last mile delivery.


I purchased an inverter and it was delivered today.  I went with the Xantrex Freedom XC 2000.  It's a nice compact unit and fairly light weight.  This should meet our needs nicely and I can mount it in the forward storage compartment.  This will keep it close to the Batteries under the bed enabling a very short cable run.

The plan is to acquire the Pieces Parts in the next couple of months.  Then when the Camper comes out of storage I can get to work installing everything.  I'm going to start with the Victron 712 Battery monitor, two Battle Born batteries, the inverter and a hard wired surge protector.  I can't wait to get started on the project.

 
Kathy & Bill said:
Attached is a pic of my roof from the rear looking forward.  I took this on November 4th at 9:00 in the morning, sun being low and bad shade angle.  I'm thinking I can get five of the bigger, higher voltage residential panels up here. 

Bill , that's a lot of nice open space. 5 larger  panels is going to give you a sizable system. Frank may need a do over. I'm thinking 4 larger panels.
Please let us know if you elevate the panels near the antenna and what hardware you use.
Pat
 
AStravelers said:
I somewhat tilt my panels so the water doesn't pool on the panels.  Pooling water also collects dirt.  Also raising the panels allows for air circulation underneath helping to keep the panels a little cooler.  Heat reduces the output.  My panels are 66" x 52" and are tilted about 1.5" along the 66" edge. 


I would also raise your panels maybe 5-7 inches to reduce the shading from the TV antenna and A/C in early morning and late afternoon.  As long as you install a battery monitor you will notice a few amps being generated as soon as it is bright daylight. 5 or 10AH in the morning and evening goes a long way. Every little bit helps.
I like the tilting and elevating idea.  What kind of hardware did you use to raise the panels? 
Thanks,
Pat
 
While I agree heartily that mounting the panels high enough to allow air flow is very positive, there is a trade-off on everything.


On solar farms, the panels are mounted on racks that are several feet above the ground. On a typical roof top installation on a house, the panels are mounted only a few inches off the roof. What is optimal? I really have no idea.


My panels are mounted about an inch above the roof. For me that was sufficient to run the conduit under the panels. Also, because most trailers these days have curved roofs, a certain amount of angle will be generated with just the curvature of the roof. That assumes, of course, that you mount panels in a longitudinal strip from front to back on a trailer. If you mount them across the trailer horizontally, then you lose any angle. I find that with the longitudinal installation on my trailer, just the angle of the roof is sufficient to keep the water from pooling.


As to the hardware used to do the mounting, that is pretty much variable. Most often, there are so-called 'z' brackets that are used for this. One side of the 'z' bolts to the bottom of panel, and the other side is attached to the roof with screws. If a panel has to be removed, you have to unscrew the wood screws from the roof, as often removing the machine screw attachment between the bracket and the panel is next to Impossible.  I tried to avoid this problem using L-shaped brackets that I pop riveted to the sides of the panels. If one of my panels has to be removed, I just drill out the rivets. The L brackets remain attached to the roof, reducing (in theory anyway) any chance of producing a leak.
 
Blues Driver said:
I like the tilting and elevating idea.  What kind of hardware did you use to raise the panels? 
Thanks,
Pat
I purchased aluminum 1 1/4" angle bar and aluminum 2" flat bar 1/8" thick along with #10 stainless steel screws, flat washers, lock washers and nuts.  I cut the pieces to size bolted everything together.  For the lower end of the panels I didn't use the flat bar.  I made a "Z" bracket by bolting one angle bar to the solar panel, bolting the other angle bar to the first to make the "Z" and then screwed the lower part to the roof.  For the higher end bracket I used the 2" flat bar as a spacer between the two angle bars.  If I was to raise the panels up to 6-10 inches I would use 1/4" flat bar for the spacer instead of the 1/8" I used.  I probably would use 2 pieces of the 1/4" flat bar for spacers as well as 2" angle bars 1/8" thick.

To attach the Z brackets to the roof I used E-Z anchors https://www.homedepot.com/p/E-Z-Ancor-Stud-Solver-7-x-1-1-4-in-Phillips-Zinc-Plated-Flat-Head-Drywall-Anchors-50-Pack-25316/100391938.  I drilled a 5/16" hole (which is the diameter of the center of the anchor) in the roof, put a little Dicor in the hole, and screwed the anchor into the roof.  When I actually put the solar panels on the roof, I covered the anchors with self leveling Dicor, placed the panels with Z brackets onto the anchors and used the screws that came with the anchors to screw into the anchors.  Topped off the screws and Z bracket with more Dicor to seal everything up.

My MH is a Winnebago which comes with a fiberglass roof which is glued to solid white Styrofoam.  This makes a very sturdy roof.  While the fiberglass is very thin, just one sheet of fiberglass on 3/32" a luan sheet.  While this doesn't sound very strong, the luan glued to the Styrofoam makes it pretty strong. 

These solar panels went 45,000 miles on my former MH including an Alaska trip for 4 months with about 600-700 miles of gravel and potholes.  Lots of bouncing and wind from all directions in the 4 years.  I have now moved these panels to our new-to-us MH.

What I really love about Dicor is it never hardens.  Stay flexible.  To remove the panels just take the screws out, use a thick bladed putty knife and push it under the Z bracket and pry it off the roof.  Paint thinner is then used to remove the Dicor left on the roof and Z brackets.  To fill in the holes in my old RV, I used Bondo, which is used to patch holes in auto/truck bodies.

NOTE:  Don't use paint thinner on rubber roofs.  This is just another reason I don't like rubber roofs. 
 
AStravelers said:
I purchased aluminum 1 1/4" angle bar and aluminum 2" flat bar 1/8" thick along with #10 stainless steel screws, flat washers, lock washers and nuts. 

Where did you bu;y the aluminum bar?
Thanks , Pat
 
Frank B said:
If you have one in your area, these folks are very helpful:

https://www.metalsupermarkets.com/
Thanks for the link.  Looks like a great link to a place to buy most any size metal you could want.  Should be much better selection than the big box stores.
 
Back
Top Bottom