You are using an out of date browser. It may not display this or other websites correctly.
You should upgrade or use an alternative browser.
You should upgrade or use an alternative browser.
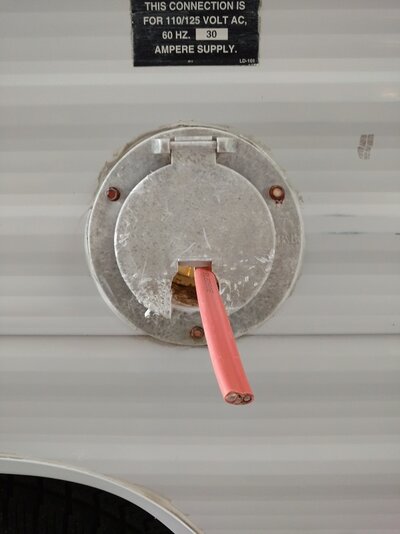
Damaged shore power cord. Replace original pull out or install plug type
- Thread starter R.J.
- Start date
The friendliest place on the web for anyone with an RV or an interest in RVing!
If you have answers, please help by responding to the unanswered posts.
If you have answers, please help by responding to the unanswered posts.
Rene T
Site Team
Is it just the outer jacket or did they get into the wiring? If the wiring is damaged, I would replace it as an assembly that way the plug will be molded right on the wiring.
If it’s just the outer jacket, wrap some electrical tape around it and just inspect the tape every time when you pull it out.
If it’s just the outer jacket, wrap some electrical tape around it and just inspect the tape every time when you pull it out.
Jeff in Ferndale Wa
Well-known member
If it were me, I would just tape it up. I don't like the male plug set up. I liked the pull it out type I had on my last trailer. The plug type, I have to find a place to store the cord when traveling and there is always a concern in the back of mind that the cord could be easily stolen. It hasn't happened yet, but it could.
1stimerver
Well-known member
We have a pull out type cord.. We permanently mounted our EMS inside the cord storage area. It seems to save time during hookups as opposed to having a loose cord, that you have to fish out of storage and plug in at both the post and the RV.. Same for getting ready to leave the site.
Since our cord is stowed below the Fridge, I installed a hinged door to access the cord storage area from inside the RV and found I could use some of it to store a small tool box as well.
Safe travels and all the best....
Since our cord is stowed below the Fridge, I installed a hinged door to access the cord storage area from inside the RV and found I could use some of it to store a small tool box as well.
Safe travels and all the best....
boatbuilder
Well-known member
If you buy the cable separately and put your own plug on it you can get a much more flexible cable than a premade one. When I had my TT the previous owner had replaced the cable with a marine cable and was much easier to handle. Still had to push it in and pull it out but the extra flexibility made it a lot easier.
John From Detroit
Well-known member
I would ask where on the cable the rodent dined.. If it's near the part that remains inside the RV I'd cut the cord and install a Marico plug and outlet (Outlet goes on the part that goes to the park. Plug has exposed contacts so it's on the RV) Though you usually see the plug mounted on the RV they make them with housings just like the outlet has for "Extension cords"
IF it's in the middle of the run and you can find marine grade heat shrink tubing big enough (A challenge) I'd go that route.
IF it's in the middle of the run and you can find marine grade heat shrink tubing big enough (A challenge) I'd go that route.
stevem
Well-known member
we have had both pullout and plugin type cords. our present trailer has a plug in cord with a male twist lock on the trailer side, it also has a locking ring.
after 5 years, i prefer the detachable cord over the push in. when travelling everyday the cord and water hose both get thrown the back of the truck just before leaving and are the first to come out when setting up. so storage is a nonissue
the space where a pushin cord would go(under a dinette seat) is a great storage spot. both of our dinette seats have huge drawers on heavyduty slides
CharlesinGA
Well-known member
My 2008 Bigfoot trailer had a plastic inside compartment with the generator outlet in it, and that is where the hardwired shore cord was stored. Darn near impossible to get the cord stored in there, let along plug into the genny outlet. I removed the compartment and outside door and used a 1/8 thick aluminum plate and put a hole in it and a Marinco power inlet fitting, connected to an automatic transfer switch. I eventually took my old cord and put a female 30 amp TT end on it and made it into an extension cord. I had bought a new 36 ft premade cord with and angled turnlock on the trailer end.
Previously I had converted my 2008 Thor to a power inlet setup to eliminate the "mouse hole".
I had a hardwired shore cord on my motor home, but it had a good sized compartment to store the cord in, not a mouse hole or small access door.
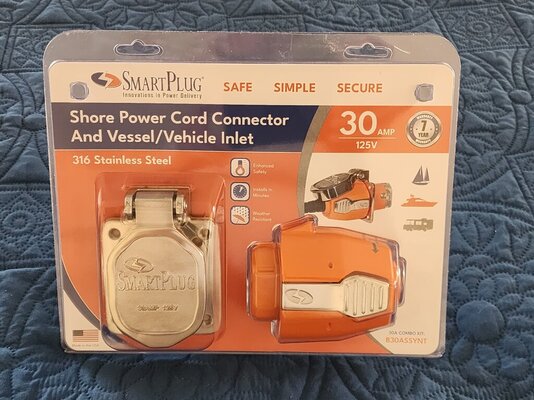
If you are interested in spending the money, the Smart Plug power inlet system could be installed.
Charles
Previously I had converted my 2008 Thor to a power inlet setup to eliminate the "mouse hole".
I had a hardwired shore cord on my motor home, but it had a good sized compartment to store the cord in, not a mouse hole or small access door.
If you are interested in spending the money, the Smart Plug power inlet system could be installed.
Charles
Attachments
-
 Power Cord inlet outside view.jpg73 KB · Views: 3
 -
 Power Inlet Transfer Switch installation.jpg868.4 KB · Views: 3
 -
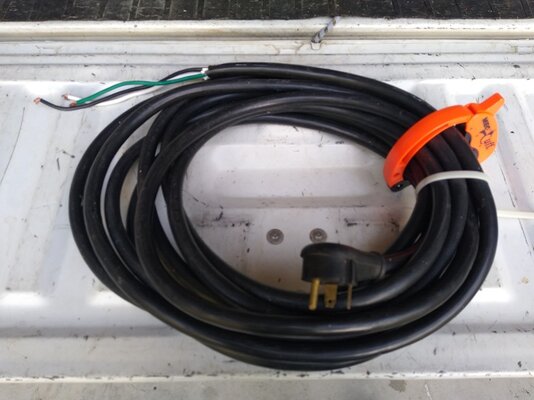 Shore Cord Extension 1 original cord as removed from the trailer.jpg274.2 KB · Views: 3
 -
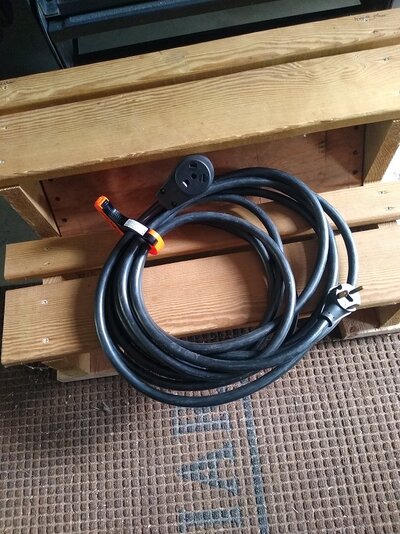 Shore Cord Extension 9 completed cord ready to use.jpg389.6 KB · Views: 4
 -
 Original mouse hole in Thor.jpg773.8 KB · Views: 4
 -
 mouse hole removed and power inlet installed.jpg796.2 KB · Views: 4
Lou Schneider
Site Team
- Joined
- Mar 14, 2005
- Posts
- 13,325
I'd use something like Rescue Tape, a silicon based tape that fuses to itself and makes a permanent repair without leaving a sticky residue.
I picked up a new Marinco RV Park Model cord kit off eBay and replaced the hard wired cord end with a twist-lock plug made for the Marinco 30 amp twist lock outlet. It's a nice, secure, waterproof connection. Since we rarely plug the camper into shore power, it just made more sense to do it that way. I was swapping the electric and water fill anyway (the water fill was directly above the electric cord and I thought that was dangerous). Now the power cord is stored behind the seat in the truck.
meierjn
Well-known member
I'd use something like Rescue Tape, a silicon based tape that fuses to itself and makes a permanent repair without leaving a sticky residue.
Some of that stuff would be good to have around homme and in the trailer!
HueyPilotVN
Well-known member
Funny timing.
Of course I need a new project.
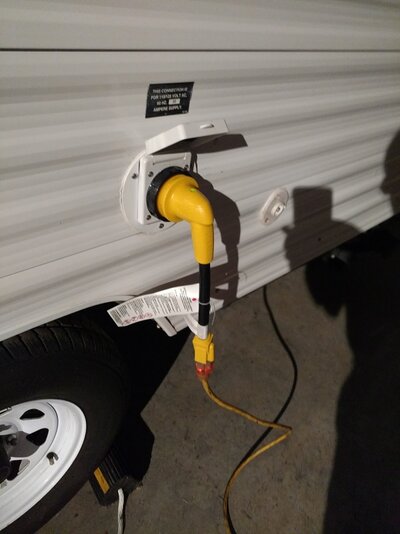
The week before this post I ordered the external attachment kit for my power cord.
I have to pull out my permanently attached cord all the way out and then fish it thru the bottom round access hole to use it. When it is cold the cord is hard to handle.
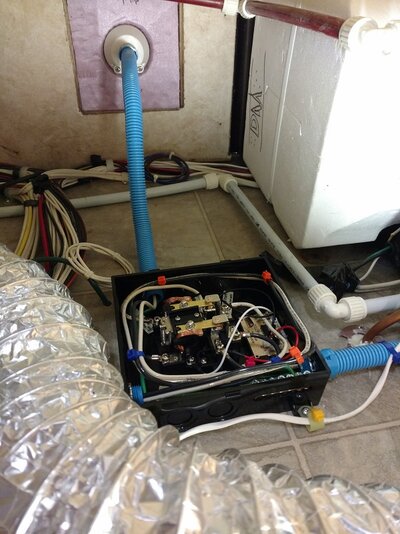
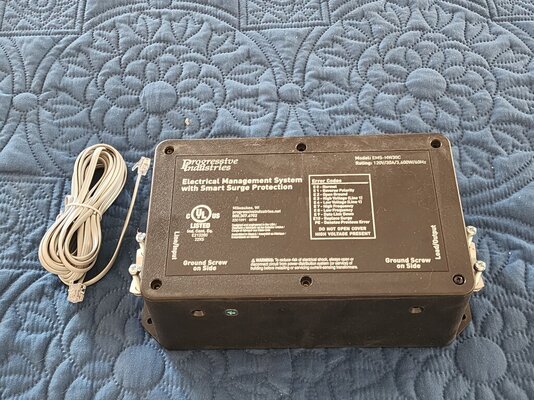
I also ordered a Progressive 30 amp EMS to insert between the end of the cord that goes to the load and the external plug.
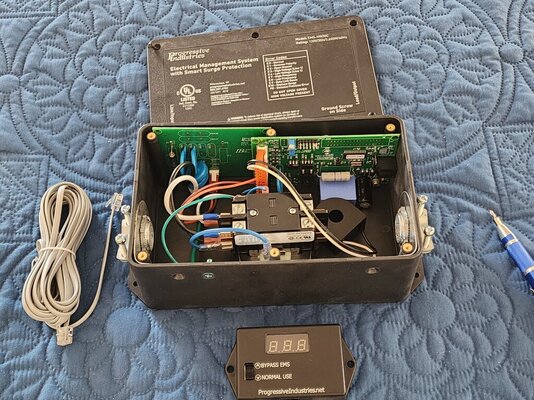
The install is simple, three wires in and three wires out inserted inline on the power cord.
The EMS has two different models. One has the display on the box and the other is remote.
I chose the remote because the box is going in the compartment where the cord was stored.
I am mounting the remote display above the outside plug but covered by a weatherproof cover.
I wanted to be able to see the voltage, amps, and error codes right away after plugging in the power.
I will do a write up after I install it on a hopefully cool morning.
Of course I need a new project.
The week before this post I ordered the external attachment kit for my power cord.
I have to pull out my permanently attached cord all the way out and then fish it thru the bottom round access hole to use it. When it is cold the cord is hard to handle.
I also ordered a Progressive 30 amp EMS to insert between the end of the cord that goes to the load and the external plug.
The install is simple, three wires in and three wires out inserted inline on the power cord.
The EMS has two different models. One has the display on the box and the other is remote.
I chose the remote because the box is going in the compartment where the cord was stored.
I am mounting the remote display above the outside plug but covered by a weatherproof cover.
I wanted to be able to see the voltage, amps, and error codes right away after plugging in the power.
I will do a write up after I install it on a hopefully cool morning.
Attachments
Last edited:
meierjn
Well-known member
Funny timing.
Of course I need a new project.
The week before this post I ordered the external attachment kit for my power cord.
I have to pull out my permanently attached cord all the way out and then fish it thru the bottom round access hole to use it. When it is cold the cord is hard to handle.
I also ordered a Progressive 30 amp EMS to insert between the end of the cord that goes to the load and the external plug.
The install is simple, three wires in and three wires out inserted inline on the power cord.
The EMS has two different models. One has the display on the box and the other is remote.
I chose the remote because the box is going in the compartment where the cord was stored.
I am mounting the remote display above the outside plug but covered by a weatherproof cover.
I wanted to be able to see the voltage, amps, and error codes right away after plugging in the power.
I will do a write up after I install it on a hopefully cool morning.
If you can, share a pic of the remote display please.
Ignore that! I see it in the third pic.
CharlesinGA
Well-known member
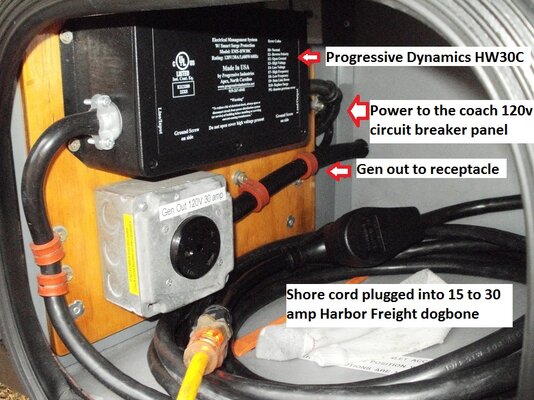
For connecting the HW-30 to the auto xfer switch, to the panel, and from outside to the HW-30.... I prefer blue smurf conduit and THHN wires as it's easier to work with than ROMEX.
See my post #9 above for pics of the smurf conduit and THHN wiring. THHN in 10 gauge is stranded but not the fine stranded like the wire in rubber cords, its a much coarser stranding works well in the electric connections of xfer switches and the HW-30.
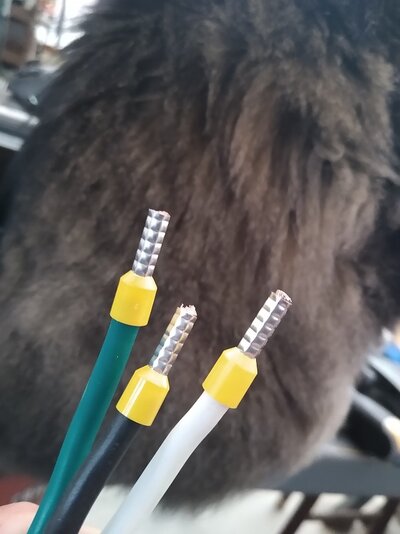
I sometimes add ferrules to the ends depending on the type of connection it is in. I have become a huge fan of ferrules on stranded wires.
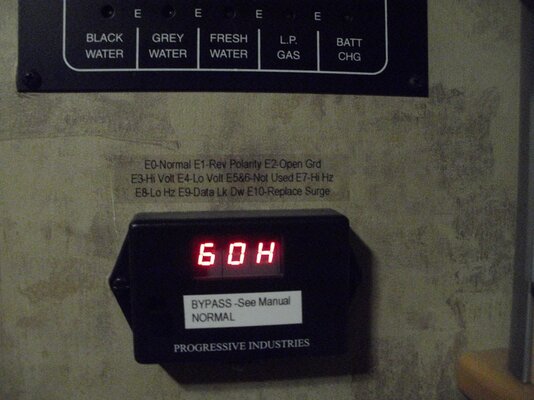
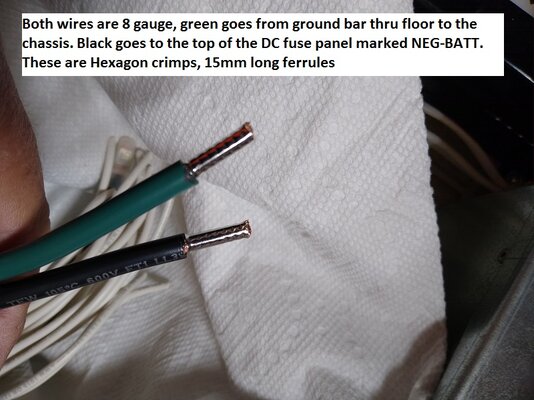
As far as the remote indicator for the HW-30 goes, I put the one in my motor home, inside where I could monitor it. I would hook up and trust the box to do what it is supposed to do, and while inside I could monitor amp draw of various appliances, and of course, voltage, or if on the generator, the Hz. A shore cord connected directly to the HW30 really does need ferrules as the wire stranding is super fine. I did not know about ferrules at the time I installed it, but I wished I had known. (motor home is sold, went to Las Vegas). Last two pics are examples of 10 gauge and 8 gauge wires with ferrules installed
Charles
See my post #9 above for pics of the smurf conduit and THHN wiring. THHN in 10 gauge is stranded but not the fine stranded like the wire in rubber cords, its a much coarser stranding works well in the electric connections of xfer switches and the HW-30.
I sometimes add ferrules to the ends depending on the type of connection it is in. I have become a huge fan of ferrules on stranded wires.
As far as the remote indicator for the HW-30 goes, I put the one in my motor home, inside where I could monitor it. I would hook up and trust the box to do what it is supposed to do, and while inside I could monitor amp draw of various appliances, and of course, voltage, or if on the generator, the Hz. A shore cord connected directly to the HW30 really does need ferrules as the wire stranding is super fine. I did not know about ferrules at the time I installed it, but I wished I had known. (motor home is sold, went to Las Vegas). Last two pics are examples of 10 gauge and 8 gauge wires with ferrules installed
Charles
Attachments
Last edited: