New project - installing a Garnet SeeLevel tank monitor

The friendliest place on the web for anyone with an RV or an interest in RVing!
If you have answers, please help by responding to the unanswered posts.
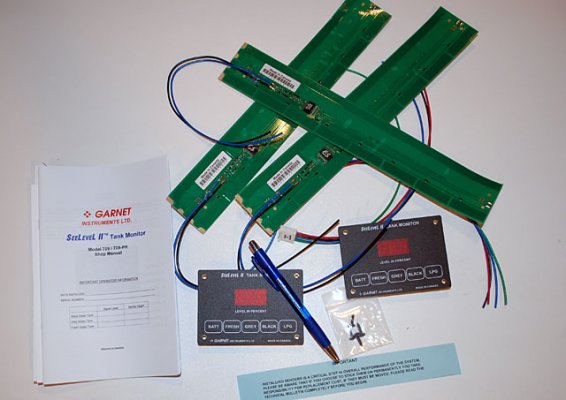
Wow - the parts are here!  The SeeLevel was drop shipped from Granbury, TX and that is probably a UPS one-day delivery area from us.  Never got a notice from RV Upgrades about anything - I was surprised.

I took a look at where 12.5" would be in relation to a full FW tank (12" strip 1/2" from the bottom), and I will be not measuring about 2.5" of tank wall.  The geek in me says that is completely unacceptable  ::), but $85 bucks for another strip to catch 2.5" of tank - not sure about that.

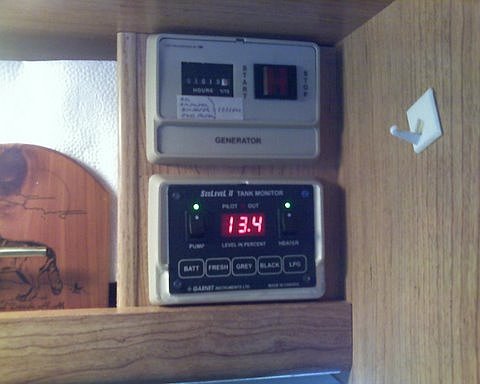
The major issue for me I think is when filling the tank - I could not depend on the gauge to tell me when I have crammed every last drop of water in the tank.  Now, I open the basement door when we get close to full and watch the water level in the tank for the last bit.

All of the major Rubicon upgrades are now complete (here's the build thread on Rubicon Owner's Forum for those of you interested), so I can get hoppin' on this project.
 

Attachments

  • TheParts.jpg
    TheParts.jpg
    62.1 KB · Views: 50
John, I like having the fresh sensor a little down from the top. I can sit inside having a cold one and watching the tube, and when the display says 100%, I still have time to stroll around to the fill port and watch the last few gallons go in.  ;D
 
Hi John, I see you are getting ready tackle this issue as well.

Because of the tank height,  I installed the Seelevel Model 712-TT. It can measure up to 17" in height on a single strip and has better accuracy (2% increments). I was out of town for a while and I just started reading your post today . Sorry I didn't check in sooner to sound in as to how I resolved the FW tank height issue.

I used the temperature sensor that comes with the 712 system to monitor the water bay temperatures for days that we encounter frost. 
 
John tell your wife to look the other way while you order the extra sensor.

This is one project that I will be doing sometime late summer or early fall.  Have got to get my washer done first. All this info is great.
 
Tourmaster said:
John tell your wife to look the other way while you order the extra sensor.

Problem solved thanks to Sarge!  :D :D

Made a bezel for the outside display from 1/8" birch plywood and painted it with clear epoxy - that will make it impervious to water damage.  Current plan for the inside display is to remove the existing monitor push buttons, and use a Dremel tool to make a cut out right over top of the old monitor.  I made a paper template of the new display and I'll see how well that will work when I overlay it.
 
Sounds like you are off and running. Will be anxious to see the photos.

My initial research tells me that I will have to consider the 7094P or 7094PH since I have 2 grey tanks (Grey & Galley). Unfortunately neither one of these has provisions for the LP.
 
Tourmaster said:
My initial research tells me that I will have to consider the 7094P or 7094PH since I have 2 grey tanks (Grey & Galley). ...

As long as the sensor only uses two wires.  Some models use six  :eek:.
~~~~~~~~~~~~~~~~~~~~~~~~~~~~~~~~~~~~~~~~~~

It was a good day - the plumbing bay is all complete and I removed the old monitor circuit board from the OnePlace and cut out a rectangle for the new panel.  It will work okay to install the new monitor panel over the old one - I'll put up some pictures of that part of the job a little later.

To do:

- Spray flat black paint and cover up the old lettering/graphics where I removed the old monitor circuit board assembly
- Install a new LED for solar charge indicator (it was part of the old monitor circuit board)
- Install FW tank sensor strips (waiting on strip #2 from Sarge)
- Celebrate when the job is complete  ;)

For the plumbing bay monitor and sensor strip install, first task was to identify wires - we need +12V, ground, and pick one existing sensor wire to send the sensor signal to the OnePlace tank monitor area.

There are two plugs on the back of the plumbing bay monitor circuit board, a six pin plug and a two (or was it three?) pin plug.  The small plug is connected to the rocker switch that turns on the monitor panel.

The six pin plug wiring on the monitor circuit board:

-White - ground
-Red - fresh water tank sender
-Black - black tank sender
-Gray - gray tank sender
-No connection
-Black - +12V

The new outside display will need +12V, ground, and one of the three tank sender wires (red, black, or gray) to send the new sensor strip signal to the new inside display.  The attached picture should help clarify a bit.
 

Attachments

  • WiringOutsideTest.jpg
    WiringOutsideTest.jpg
    55 KB · Views: 64
  • WiringOutsideGround.jpg
    WiringOutsideGround.jpg
    38.4 KB · Views: 52
  • WiringOutsideSender.jpg
    WiringOutsideSender.jpg
    63.9 KB · Views: 49
  • WiringOutsideSender12Volts.jpg
    WiringOutsideSender12Volts.jpg
    76.6 KB · Views: 47
  • SenderStripInstall.jpg
    SenderStripInstall.jpg
    53 KB · Views: 57
  • OutsideBezel.jpg
    OutsideBezel.jpg
    49.4 KB · Views: 58
  • BezelTemplate.jpg
    BezelTemplate.jpg
    50.8 KB · Views: 55
  • PlumbingBayDone.jpg
    PlumbingBayDone.jpg
    46.6 KB · Views: 64
Question...could the sensors be installed on an angle?  If the tank is 12" high (I'm just throwing out numbers) could a sensor 18" long be installed on a 45 degree angle and still read? This is similar to an incline manometer. Would this give "fuzzy" readings?
 
Will - don't think so.  The sensor strip is measuring capacitance - with water near the strip, the capacitance will change and they have probably designed it for the change to happen at a right angle to the strip, but that's my guess.  Give them a call and run that by them; in my two phone calls to Garnet, whoever answers the phone has the answers - you don't have to wait on a tech to pick up or call you back.  So far I'm very impressed with the system and getting fast answers on the phone.
 
Yep, I believe John is right. A sender on an angle would get conflicting info and probably would not read. The instructions say to mount the sender plumb with the tank.
 
Got the inside part of the job completed this afternoon.  The electrical connections are very similar to the outside monitor.

The ten pin plug on the OnePlace monitor board to the SeeLevel plug wiring harness:

Old monitor board plug.............SeeLevel wiring
Black ---- (+12V)----------------> Red
White-----(ground)--------------> Black
White/Green (LP tank)----------> Green
Red----------(tank sensors)-----> Blue

It was necessary to bridge together the two sender wires at the fresh water tank because I cut out the diodes at that plug - more on this when I make a post about the fresh water tank sensor strip install.

The plan of removing the old monitor board and push buttons worked out quite well.  Only one tiny issue - there is what seems to be a rudimentary solar panel charge current limiter built-in to the tank monitor board (it also has the solar panel charge LED).  I seriously doubt if a current limiter is necessary for such a small panel (10 watts), but I'm going to reverse engineer their circuit and see what's going on.

I'm toying with the idea of buying a small solar panel charge controller and wiring it in and then upgrading to a 50 watt panel.  We'll see how that flies with the family CFO  :eek:.

At this point, all that is left is to install the fresh water tank sensor strips - I'm saving the best for last  :p
 

Attachments

  • SolarPanelInOut.jpg
    SolarPanelInOut.jpg
    46.5 KB · Views: 55
  • AluminumCoverPlate.jpg
    AluminumCoverPlate.jpg
    49.3 KB · Views: 53
  • SprayPaint.jpg
    SprayPaint.jpg
    63.3 KB · Views: 59
  • MonitorInsideRearComplete.jpg
    MonitorInsideRearComplete.jpg
    65.6 KB · Views: 50
  • MonitorInsideFrontComplete.jpg
    MonitorInsideFrontComplete.jpg
    63.7 KB · Views: 57

Latest posts

Forum statistics

Threads
131,998
Posts
1,388,840
Members
137,743
Latest member
Stark Fire
Back
Top Bottom