New project - installing a Garnet SeeLevel tank monitor

The friendliest place on the web for anyone with an RV or an interest in RVing!
If you have answers, please help by responding to the unanswered posts.
Yeah, or cut and paste for you - you're lucky!

My cheap Chinese 'Dremel' tool literally started flying apart (pieces are exiting the tool vent holes) in the middle of using a cut off wheel to make a panel opening large enough for the new monitor,  I used a jig saw to finish the job.  Bought a real Dremel tool this morning  :D
 
cbeierl said:
This posting over on iRV2 shows how to preserve the solar panel functionality SeeLevel Gauges Using Existing Wiring with Solar Charging LED when removing the rest of the circuit board.

Chris - thanks!!  I'm reasonably certain that little bit of circuitry is superfluous.  It looks like they are using two diodes in series to drop the voltage about 1.2 volts (0.6 volt voltage drop across a silicon diode) and the resistor is a current limiter for the LED.  I'll draw out the circuit tomorrow and look up the specs on the diodes to see exactly what's going on.

A ten watt solar panel is going to put out at the most maybe half an amp in the real world, so that is probably not enough to even mitigate self-discharge of three lead-acid batteries.
 
John Canfield said:
I'm toying with the idea of buying a small solar panel charge controller and wiring it in and then upgrading to a 50 watt panel.  We'll see how that flies with the family CFO  :eek:.

I would like to know how this works out!  I would also like to bump up the solar panel on the roof to put out some meaningful voltage.  But I don't want to spend a bunch of $ to do it......
 
Will do Marty.  That solar panel has a 10 amp circuit breaker (in my model - not sure if that is typical) in the electrical bay, so it could easily handle a 50 watt panel. I think 100 watts would be on the ragged edge of tripping the breaker in full sun (max panel output.)

I drew out the little circuit for the solar in/out on the old monitor board and they have three diodes in series with solar panel in & out.  I'll have to unsolder one of them to see what the device number is and exactly what it does (if it is something other than a silicon diode.)  You always have a diode in series with the solar panel output to prevent the battery from discharging through the panel, but I'm not sure why they have three of them.

Received the sensor strip at noon you sent and tried it out since it looked different than mine, and sure enough it did not work - the leads had what looked like a choke on them and the monitor panel said the FW tank was open.  My strips are 2008 design vintage and yours was 2003 and a different rev level.  Oh well...  Thanks for sending it anyway!!  I went the one strip route.

My plan of temporarily sticking the strip to a flexible board to position it for final placement against the tank worked great.  The foam paint trim roller idea offered up (to press the strip against the side of the tank) also worked great!!

This project is a complete success (and goodbye to the "one-thirds", RIP.)  ;D ;D
 

Attachments

  • FWtankFinished.jpg
    FWtankFinished.jpg
    33.3 KB · Views: 54
  • FWtankStripIdea.jpg
    FWtankStripIdea.jpg
    50.2 KB · Views: 55
  • FWtankAcetone.jpg
    FWtankAcetone.jpg
    29.3 KB · Views: 46
  • FWtankSand.jpg
    FWtankSand.jpg
    32.7 KB · Views: 47
Good work John! Sorry about the sensor not working. Too bad. Hang on to it and maybe you can think of a use for it!  It's a little of a surprise that the systems changed that much that the sensors wouldn't cross.  Oh well, that's progress I guess.  Great job on getting your tank senders on.  Very clever ideas. 

I'm surprised that you can see so much of your tank. mine is completely enclosed in a metal shell with only a small access door to even see the inlet connections.  It was really working in the dark by braille..........
 
cbeierl said:
This posting over on iRV2 shows how to preserve the solar panel functionality SeeLevel Gauges Using Existing Wiring with Solar Charging LED when removing the rest of the circuit board.

That was a great tip - thanks Chris!  I used my Dremel and cut off that part of the circuit board (by the way, the three diodes in series are 1N4001 - a general purpose one amp diode), but I added a remote green LED (red to me signifies a problem  8) ).  That cut part of the circuit board is hot-glued to the back of the panel.  (In thinking about the usefulness of the 10 watt solar panel, I probably should have disconnected it as it is way too small to be useful in any capacity.)

SargeW said:
I would like to know how this works out!  I would also like to bump up the solar panel on the roof to put out some meaningful voltage.  But I don't want to spend a bunch of $ to do it......

Marty - I did a bit of investigating and my conclusion is a 50 or even a 100 watt panel is not going to supply enough current to be very meaningful for our units (as in we have lots of stuff to power.)  50 to 100 watts however would be ideal for battery maintenance in a storage situation if you don't have power available.  Three to five amps for $300-400 is just not worth it for me.

When we're boondocking, I have to run the genny for about four hours a day and we're probably going to burn 1/3 to 1/2 gallon of diesel per hour and at $4 a gallon, that's maybe $6-8 per day of boondocking.  Since we are off the grids so infrequently, the math just doesn't work out.

The usefulness of solar increases dramatically if you can install 400-500 watts worth of panels, now you're into the kilobucks range but that much current will let you be fairly independent energy-wise.  If we spent a lot of time on BLM land I would seriously consider a major solar install, but we don't do that.  DW likes full hookups (and so do I!)

NY_Dutch said:
A super job, John! Maybe a consolidated write-up would be a good candidate for the forum library?

Can do Dutch!  I'll make PDFs of the web pages I put up and ask Tom to stick them in the Library.  It will take a while to get to that - we're running a mile a minute around here with projects.
 
Great info John, thanks for crunching the numbers for me.  I'm with you, we don't boondock enough to justify the cash investment either.  We dry camp off and on in a lot of the national and state parks, but we mix in hook up places in between. 
 
I started out out with 200W (actually 100W, but Santa threw in a 2nd). Now up to 400W and personally this is the minimum I can survive with running a few lights, 2 laptops, DSS, LCD, and going 10-7 @ 1-2AM normally. We've been at the beach for 7 days and only run the genset for long MW bouts. This time of year and being on the water with an almost invisible occlusion I get 20A avg. Move inlane and it will jump up as much as 50%.

John: I'm watching this too(as well as Marty's 411 awhile back)  because I'm tired of boondocking and not having a comfortable handle on tank management.
 
That's what did it for me Jeff. The thought of the DW being in the shower and suddenly running out of fresh water was more excitement than I cared to experience..........
 
Jeff - you have validated my conclusion about solar.

While I've only 'played' with the new SeeLevel, I'm very impressed with its performance so far.  I ran some water from the fresh tank to the gray tank and when the FW tank read 97% full, I could see the water level below the top of the sensor strip by maybe 3/4" or 1".  Added about five minutes running time of shore/tank water to the gray and it read 13%.  The black tank is empty and it reads 0%.

YeeHaw!
 
Hi Ho:  Thanks, John for a well thought out and well documented report.  I always get a lot from your experiences.
I am embarrassed to report that I got a SeeLevel last year and stil haven't got it installed so your timing is good.
Dirk
 
Finally completed the project write-up for our RV pages - here's the link to the first page.  This wound up being eight pages long and took quite a bit more time than I anticipated to complete (I think the write-up took about as long as the SeeLevel install  :eek:
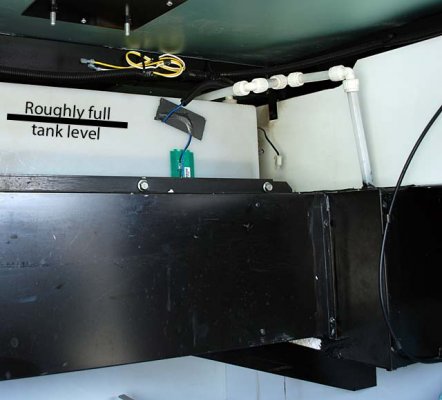
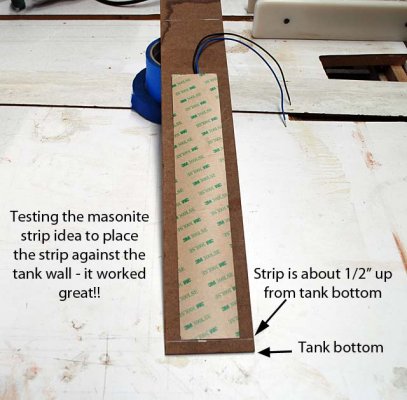
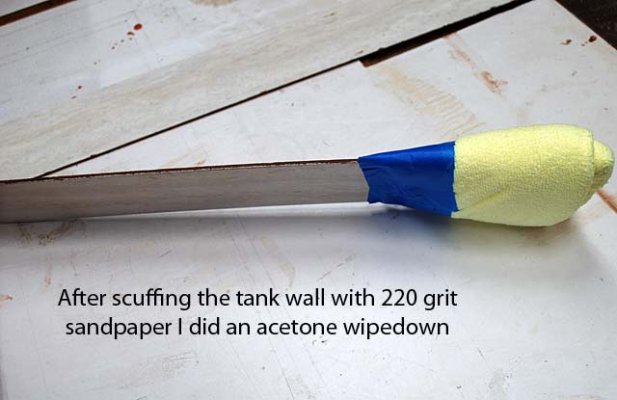
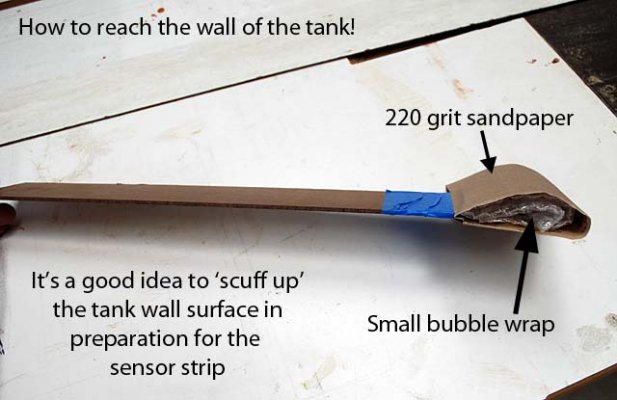
.)  Hopefully the documentation is good enough to where somebody who wouldn't ordinarily tackle a project of this scope would feel comfortable taking it on.

I'm going to export the web pages as PDF files and see how well that will work for the forum library.

Edit:  Creating PDF files of the web pages is not going to work very well for several reasons, sorry  :(
 
John,
I figured I'd go to information central to start with. Can you swap Seelevel sensor strips for the sensors Winnebago installed? In other words  --  a direct swap, leaving everything else alone. My grey tank shows 2/3 and has been that way for a couple months. Knowing it's glued or taped to the tanks side, I used every chemical I could fins to clean the inside of the tank, but that has been a waste of money.
Cheap ideas ?
 
..... but you can likely reuse the wiring and save running a new cable, is that not so John???
 
Good work John. Wish I had this info before paying someone to install the system for me last year.
Two additions for information only.
1. Garnet, as you say, is very helpful and responsive. In talking with them prior to installation they offered matching filler material that you can make bezels and closeouts from. I found this to be very generous and gracious of them. (The same type material can be purchased from local auto stereo shops). It is easy to work with and matches most black panels.
2. I had problems with the location of a reliable 12 VDC for the display. Shop wired up to the water pump switch which, believe it or not, does not always provide 12 VDC where you expect it. If you turn pump off downstairs the 12 VDC "moves" on the switch upstairs. It took several trips to realize what was happening to cause the display to quit. I still wire to the switch since I can't find a hard 12 VDC source in the panel area. So if anyone wires it to this switch and one day it quits, check position of the water pump switch.
The Garnet SeeLevel tank monitor is a tremendous improvement over the older system!
Bob
 
Back
Top Bottom