Removing Washing Machine In Winnie Tour 42QD

The friendliest place on the web for anyone with an RV or an interest in RVing!
If you have answers, please help by responding to the unanswered posts.

Kevin Means

Site Team
Joined
Aug 3, 2010
Posts
5,122
Location
Hereford, Arizona
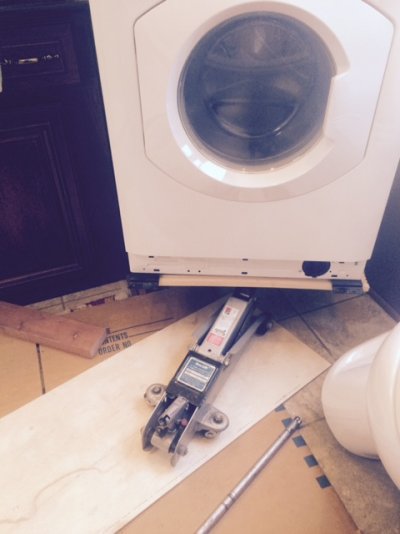
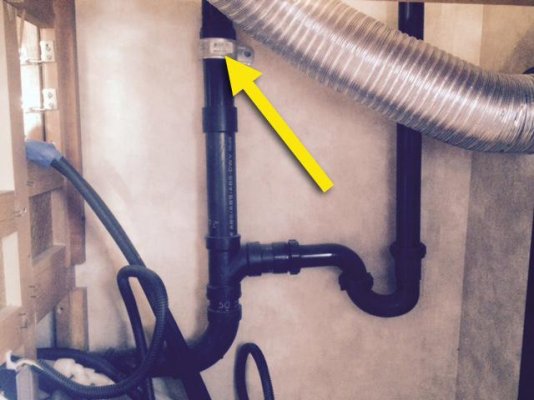
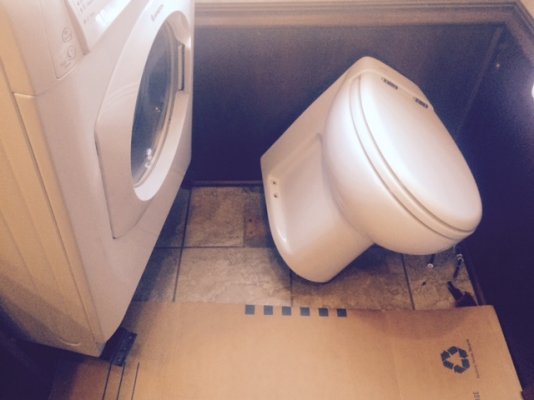
First, this post is primarily going to apply to 42QD owners, because it's more about how to remove the washer than repair it. Our Ariston washing machine stopped working on our vacation two weeks ago, (fault code F-02), and the Ariston tech-rep, essentially, said the unit has to be removed from its cabinet to troubleshoot and repair. Has anyone with a 42QD ever done this? As with many other RV repairs, it seems that very little thought went into removing such a large appliance when the coadh was designed. I've got a lot of things in the rear bathroom disassembled/removed to make room and gain access, but I was wondering if anyone has done this in a 42QD before.

I sent an email off to Winnie tech-support (they've always been very helpful in the past), but I have not heard back from them yet. Was kind of hoping someone here had already fought this battle and knew exactly what to do and what to watch out for.

Kev


Edit by staff - changed message icon to topic solved
 
Hi Kevin,

We don't have the same coach but we recently had to remove our Splendide to do a repair.  Let me just say it ain't easy!  They weigh a ton and are really difficult to wrestle - uhhh maneuver.  Make sure you have something solid that it can sit on once you get it half way out of the cabinet and the weight shifts forward.  As it turned out, we probably could have made the repair by going in through the rear access cupboard.  I will say we certainly learned a lot that day.  Another problem is getting it back into place and level.  We simply couldn't get it as level as we would like so put inflated bicycle tires on each side between the washer and the cabinet walls to prevent vibration.  It works great now but was a huge hassle!  It's a two person job for sure and the stronger they both are, the better!

ArdraF
 
On ours I had to remove the sliding (pocket) doors at the bedroom entrance. The Splendide fit through everywhere else. The sliders were easy enough to remove once I studied them a bit and figured out the rail mechanism.
 
Let me know if you don't hear from Winnie, I'll ask my contact for some help.  I installed my Spendide when the coach was new so I know how to pull it out  :D.  Our main circuit board went out two or three years ago (the board was over $300) got it going and then last summer a sensor went out.  Not pouring any more money into a ten year old unit - this time I'll get an RV shop to install a new replacement.
 
Let me know if you don't hear from Winnie, I'll ask my contact for some help.  I installed my Spendide when the coach was new so I know how to pull it out  :D.  Our main circuit board went out two or three years ago (the board was over $300) got it going and then last summer a sensor went out.  Not pouring any more money into a ten year old unit - this time I'll get an RV shop to install a new replacement unit.
 
An update... We got the washer out, and it's been fixed and reinstalled - boy, was that fun! I was waiting for a response from Winnie to see if I had to remove the dryer first but my email came back as undeliverable (my screw up) so I decided to just yank it anyway. Turns out I didn't need to but it wasn't nearly as difficult (i.e. heavy), as the washer, so it wasn't a big deal. The washer on the other hand...

Of course to get the washer out I had to remove the bathroom window valence, the decorative doors on the front of the washer/dryer, the bathroom door so two of us had room to work, and the rear toilet. It's a macerator toilet so it's got a bunch of connections. We were able to pivot the washer and slide it out with the help of a two-ton hydraulic jack, and then two of us carried it outside to troubleshoot. As it turns out, the only thing wrong with it was a loose electrical connection. I guess I should be happy that it didn't cost anything to repair but I almost wish it had to justify all the effort and smashed fingers we got removing and reinstalling it.

Once the washer and dryer were out, I looked their compartments over and was a bit surprised at what I found. If you look at picture 2 you'll see a pipe bracket that I installed to secure all the pipes to the rear wall. Until now, those pipes have been floating behind the washer and dryer, supported only by the strength of the PVC pipe itself at the bottom radius. Picture 3 shows two aluminum brackets I installed to help support the weight of the dryer, which rides above the washer. Before I installed those brackets, the weight of one side of the dryer was only supported by four small wood screws that were screwed into a 1/2 inch by 1/2 inch piece of pressboard. I'm no engineer, and I admit that I saw no signs of imminent failure, but it sure looked weak to me.

Anyway, it's all back together and working fine. As usual, thanks all for your help.

Kev
 

Attachments

  • 1. Washer On Jack 2.jpg
    1. Washer On Jack 2.jpg
    80.9 KB · Views: 78
  • 2. Pipes Supported EDITED.jpg
    2. Pipes Supported EDITED.jpg
    40.3 KB · Views: 76
  • 3. Aluminum Brackets Added EDITED.jpg
    3. Aluminum Brackets Added EDITED.jpg
    41.2 KB · Views: 76
  • 4. Toilet Removed.jpg
    4. Toilet Removed.jpg
    85.3 KB · Views: 74
  • 5. Washer and Dryer Out.jpg
    5. Washer and Dryer Out.jpg
    78.4 KB · Views: 76
  • 6. Washer Doors Back On EDITED.jpg
    6. Washer Doors Back On EDITED.jpg
    43.3 KB · Views: 73
Good job Kev!  When our Splendide was a year old or so it started working intermittently so we took it to Splendide in Elkhart, IN (we were in the area at the time) and the tech found the main connector on the circuit board wasn't fully seated (there were locking tabs - one wasn't engaged.)  Lots of trouble for us and a waste of the tech's time for a factory screw-up.

You now have improved your rig and know a bit more how it's put together - it's a good thing  :D.

Edit: thanks for putting the pictures up, I wish everybody would in a situation like this
 
Kevin - where was the loose electrical connection located?  Can it be accessed easily?  If ever I have a washer problem, that's the first thing I'll check.

Great documentation job by the way, your effort proves to me that if my washer does need to be yanked, I'll call in the pros.  :)
 
Nice work Kev! Doesn't it feel good when you are just finishing up putting the last few screws back in to finish the job?  And it's even better that your wallet didn't get lighter in the process! 
 
Thanks you guys. Yeah John, I always look here first to see if someone's done whatever it is I'm trying to do. And if they've taken and posted pictures of the process, I consider that paydirt! That's why I take pictures and post them.

You're absolutely right Marty. It really is nice to know that things are put back together a bit stronger than when they were taken apart. Along those lines... I sure saw some improvements that could be made to make it easier to access/remove everthing. Oh well... more RV projects  :D

Tom, the bad connection was in a plug assembly on a wiring harness at the bottom rear of the washer. The harness led to the motor's tachometer, which is why it was indicating Fault Code F-02. The way Winnie's got the washer and dryer wedged into their cabinets, combined with the fact that the washer's access panels are on the top and back of the unit, there's no way to get to anything without removing the washer. I really didn't see a better way to install them though - there's only so much room to work with in an RV. The job involved quite a bit of time (labor) to disassemble and remove everything, but if I ever have to do it again, it'll go much faster. The washer itself was pretty heavy and awkward to work with (top-heavy), because there's a large, spring-mounted stone weight inside the washer, above the drum that dampens vibrations.

By the way Tom, when I showed Cyndi your suggestion on how to fix the washer by shopping for a 2016 model, she told me where I could go to shop for it... and it wasn't to a dealership. ;) Thanks again you guys.

Kev
 
Wow, Kev.  Your's took even more effort to remove than ours!  But we sure felt good when it all got put back together - didn't we?!?!  ;D

ArdraF
 
Kevin..did you clean the filter while you had access to it? I questioned the lack of access to maintain the filter, forest city cut the moulding in front of the washer and added a hinge. Made access to the filter much easier.
 
Yes Ardra, it did feel good (real good!) to have this job done and everything put back together... and working!

DITTO, what filter are you referring to? Before it failed, our washer (and dryer) had only been used once in four years - for one load of laundry - and that was in July of 2014, so I doubt we've got any clogged water filters for the washer anywhere. I'd like to know which filter you're talking about though.

Kev
 
Kevin,
Hope you are still monitoring this topic.
I have a 2011 42QD and need to fix the dryer - bearing noise. 
How the heck did you get the face frame of the cabinet out?  Looks to me that the heater needs to be removed at floor level.
Just getting at the pocket screws of the face frame to disassemble it looks to be near impossible, or did you remove the entire face frame in one piece?
If you removed in one piece, how did you get it clear of the ceiling?
Any advice, even "don't do it", would be helpful.
Barry
 
Hi Barry. Yes, you have to remove the heat exchanger near the floor, but you don't have to disconnect any of its fittings - at least I didn't have to. There was barely enough slack in the hoses to move it out of the way, so I could get the facia board around it.

You also have to remove the window valance to get the facia board out. (Use a flashlight and a long Phillips to get to the screws at the top from underneath) Remove the screws from around the facia board (there's only about a million) then remove the small piece of floor trim under the window. Slide the bottom of the facia board out first. You have to work it past the heat exchanger.

Remove the screws that hold the front feet of the dryer to the wood base (There are four IIRC.) Make sure you unplug the dryer under the sink before sliding it out. I can't remember if I disconnected the dryer vent, or if it came off on its own when I slid the dryer out, but I remember it was kind of a PITA to put it back on when I reinstalled it.

This is definitely a DIY job, but it is a PITA, because there isn't much room to work, and not a lot of clearance between components. Let me know if I can help with anything else.

Kev
 

Latest posts

Members online

Forum statistics

Threads
132,110
Posts
1,390,492
Members
137,830
Latest member
RoadSage
Back
Top Bottom