The life of our lemon...

The friendliest place on the web for anyone with an RV or an interest in RVing!
If you have answers, please help by responding to the unanswered posts.
denmarc said:
Wondering about one thing...
How did hubby get the subfloor under the sole plate of the existing walls? Reason I ask is I might have to do something similar in my TT on a small section next to the super slide?
Otherwise, it looks like you guys are well on your way to enjoying the sweat equity you have been putting into this project.
I'm proud of ya!

Keep us posted.

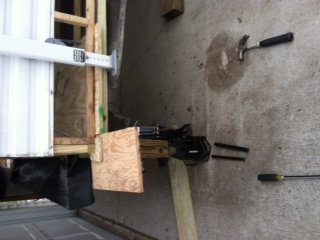
DH used two jacks on each corner when we had the bottom aluminum siding and the back siding wall off. He use the jacks to hold up the back/side wall and then we slid the subfloor between the wall and the bottom support frame. It took some hammering to wedge it in there, but it worked. Once it was between the frame and the wall pieces, he was then able to remove the jacks and finish hammering it into exact place. We did this large back piece installation from the outside. The two pieces inside he had to use some wedges using a huge screwdriver and also a small crow bar on each side to lift just enough to slide the subfloor in between. The interior ones were much easier after we had the main piece toward the back into place. Here's a picture from earlier that kind of shows how he did the back piece from outside. You can see the large piece of subfloor that had been put in between but it's not yet in the exact place. After this picture, he removed the jacks and then hammered the large piece back and inward where it finally needed to be.
Hope this helps!


Attachments

  • IMG_0199.JPG
    IMG_0199.JPG
    42.2 KB · Views: 105
Well, we are still plugging away at this renovation. We have had much progress lately. Replaced some of the insulation on the back wall. Replaced paneling on the back wall and most of the side wall. And FINALLY....
We have almost all of the flooring down! Still have the bathroom to do and also a small area in front of the door and the flooring will be done.
Hopefully, tomorrow we can start installing the cedar on the back wall and the side walls. I am so sore from installing the floors today. My body isn't too happy with me right now. Cutting vinyl flooring with a utility knife is not the easiest task when my arms are so wimpy. And all the hammering against the block. Whew. But, it's almost done and I'm so pleased with the progress that was made. For those who think a renovation is an easy task....it certainly is not. Especially when battling rainy weather days and you have to work outdoors on something. Despite the fact that we got an rv that needed an abundant amount of hard core renovation, we are grateful of how nice it will be when we get it completed. This isn't something I think I would ever do again, certainly not voluntarily. If we were to ever switch to a different rv, we will certainly get a newer one, maybe a year or two old, and hopefully never have to do a renovation of this magnitude again. That's just my two cents on the topic for those who might be curious how I feel this far in to our project.
Alas, here are your updated pictures! Enjoy, friends!
Pic 1 ~ insulation and flooring level goo on
Pic 2 ~ back wall paneling in place, floor goo drying
Pic 3,4&5 ~ Amazing flooring!!
 

Attachments

  • IMG_0231.JPG
    IMG_0231.JPG
    138.1 KB · Views: 97
  • IMG_0232.JPG
    IMG_0232.JPG
    87.2 KB · Views: 93
  • IMG_0233.JPG
    IMG_0233.JPG
    116.3 KB · Views: 100
  • IMG_0234.JPG
    IMG_0234.JPG
    135 KB · Views: 95
  • IMG_0235.JPG
    IMG_0235.JPG
    131.6 KB · Views: 106
Wow. You guys have almost built a new unit. Fantastic job. Won't be long I guess till you can get out there and enjoy the fruits of your labour!!  :D
 
I know this isn't as much fun for me as it is for you but I am enjoying watching your project.  I look forward to reading the explanation of your accomplishments and the photos of the work.  You absolutely have to put a really nice lemon decal on it so people can ask about it and you can tell your story and show them your book of work making lemonade from your lemon.
 
ClickHill said:
I know this isn't as much fun for me as it is for you but I am enjoying watching your project.  I look forward to reading the explanation of your accomplishments and the photos of the work.  You absolutely have to put a really nice lemon decal on it so people can ask about it and you can tell your story and show them your book of work making lemonade from your lemon.

Hello,ClickHill......This is Flex.  I laughed when I read your suggestion about putting a "lemon decal."  I may just do that.  Especially, since there have been moments when we ran into another challenge, only to shake my head and pucker my lips.

Thanks.  Comments like these remind me how much fun we are having....even with the puckers.

Flex
 
DH needed a new wireless mouse for his laptop. I picked one out For him today. I think it's appropriate, all things considered...
 

Attachments

  • IMG_0238.JPG
    IMG_0238.JPG
    148.1 KB · Views: 56
After what we completed today, we couldn't help but stand back and marvel at how pleased we are at the results. It's been a long process and we were excited to get to this point where we can see a cosmetic step. It's nice to see our vision we have had finally starting to coming to life. The cedar we chose to use is incredibly light weight. Very thin. The cedar in the rv smells so incredible each morning when we walk in and start on our daily efforts. And I've been told it is a deterrent for bugs and insects?
Thanks to everyone who continues to follow our project. Here is where we are at right now. We will be grateful when we get to the day where we can post the final project completion. We are getting closer!
 

Attachments

  • IMG_0240.JPG
    IMG_0240.JPG
    122.2 KB · Views: 88
  • IMG_0239.JPG
    IMG_0239.JPG
    127.4 KB · Views: 89
  • IMG_0241.JPG
    IMG_0241.JPG
    127.6 KB · Views: 87
  • IMG_0243.JPG
    IMG_0243.JPG
    122.9 KB · Views: 84
Thanks Cadee! We have had some bumps but overall happy with what we've done.

Jackiemac,  if it would mean going to Scotland we would jump on that opportunity in a second!  ;)
DH would hit every golf course there he could find. We would have to rent a Harley to ride the countryside. But thank you kindly sharing you encouragement. Really enjoying this forum and how helpful most have been.
 
Out standing work so far !, hats off to ya :). no better feeling that when you stand back, and say to yourself, what a wonderful job we/us/I/them did !!!.
 
Love, love, LOVE what you've done with the interior - the floor and walls look fantastic! If there hadn't been any issues to fix, would you have done the floor and walls like that? If not, the lemony lemon-ness was certainly a blessing in disguise...
 
Vanessa,
Thank you! we would not have done any updates right away had we not the surprise of finding water damage and rotten wood. It was an expense we would not have put into the rv, at least not anytime soon. We had planned on taking it camping the week of spring break at the beginning of April. Instead, we spent it starting on the teardown and repairs.

----------------------------

Backsplash went up today! Were able to use scrap pieces for the backsplash and just bought another trim piece to match what we used on the top of the back wall. We do need one more piece for the bottom where the backsplash meets the counter. Too tired tonight to try and squeeze it in this late. It took us all day to measure and cut and attach. Being the frugal people we are, it was satisfying using more of our stuff. DH is such a great handy man and I'm so proud of how good he is at projects. We make a great team! I'm the vision, he is the brains.

Itching to get this thing out camping!! As we get closer the excitement pushes us forward.


Attachments

  • IMG_0246.JPG
    IMG_0246.JPG
    110.9 KB · Views: 92
  • IMG_0248.JPG
    IMG_0248.JPG
    103.2 KB · Views: 81
  • IMG_0249.JPG
    IMG_0249.JPG
    104.8 KB · Views: 75
  • IMG_0250.JPG
    IMG_0250.JPG
    105.3 KB · Views: 87
  • IMG_0251.JPG
    IMG_0251.JPG
    102.9 KB · Views: 92
It fits the rest of the trailer perfectly.  I would have suggested using Smart Tiles, and I would have been wrong, I like your back splash better, Very nice!
 
Looks fantastic! I wonder if doing this has made you even more excited about going out and using it?
 
Back
Top Bottom